840131900 ENv01.qxd 2/22/05 10:40 AM Page 4

How to Assemble and Use

IMPORTANT: Your blender jar and cutting assembly are subject to wear during normal use. Always inspect jar for nicks, chips, or cracks. Always inspect cutting assembly for broken, cracked, or loose blades. If jar or cut- ting assembly is damaged, do not use. Call our toll-free customer service num- ber to obtain replacement parts.

1.Make sure blender is unplugged. Place blender base on clean, dry surface to keep foreign particles from being pulled up into motor during operation.

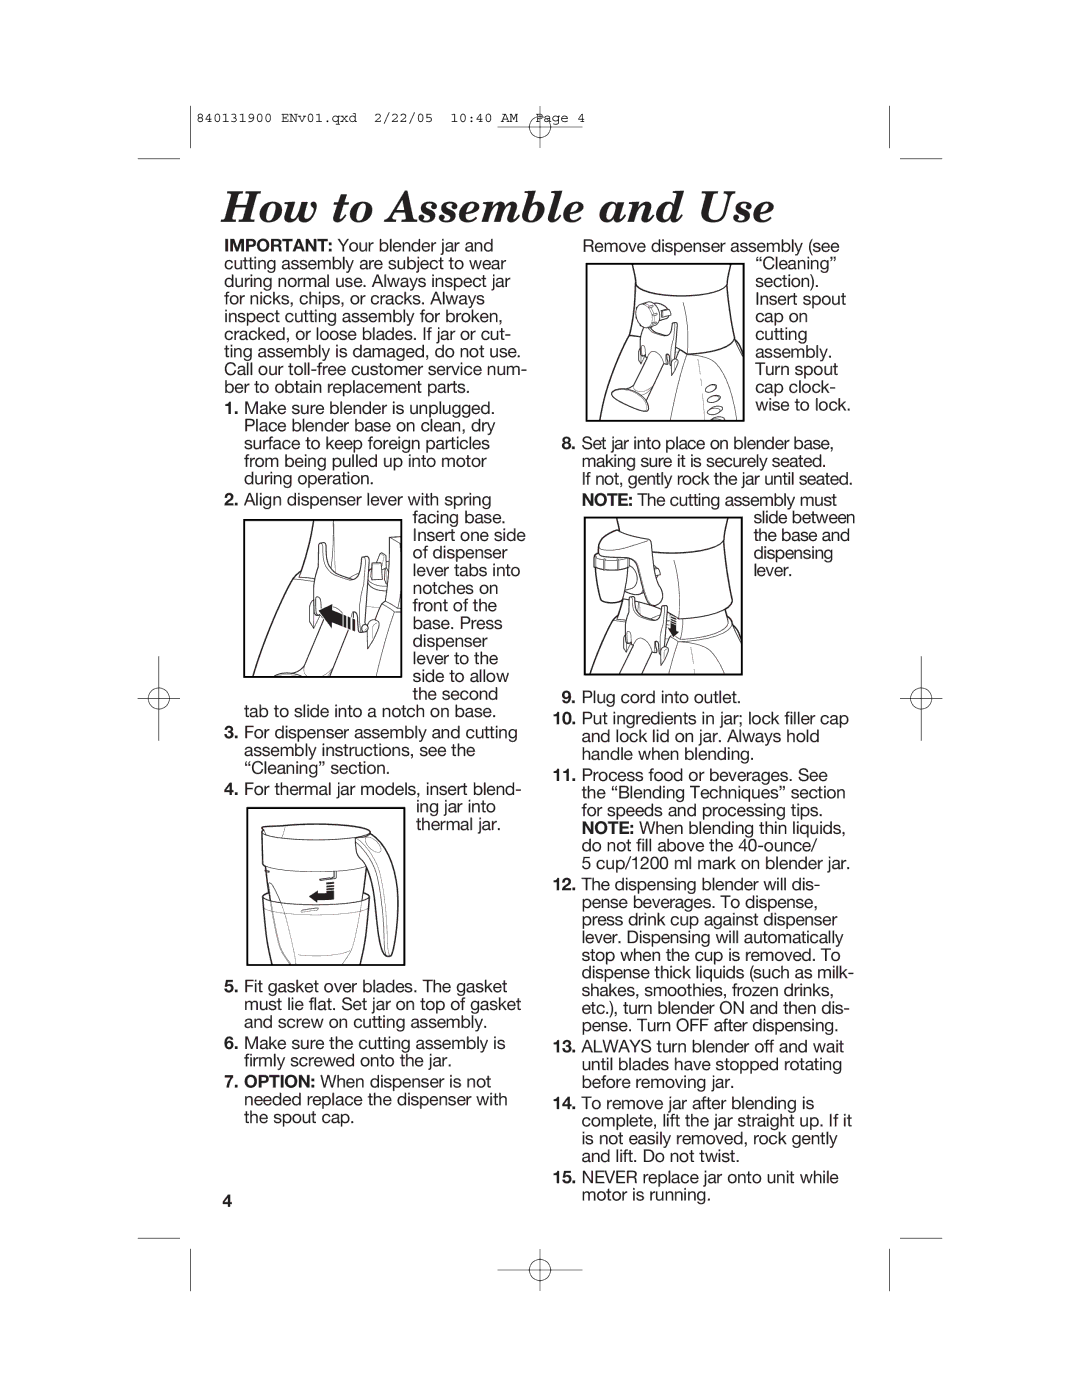
2.Align dispenser lever with spring facing base.

Insert one side of dispenser

lever tabs into

notches on

front of the

base. Press dispenser lever to the

side to allow the second

tab to slide into a notch on base.

3.For dispenser assembly and cutting assembly instructions, see the “Cleaning” section.

4.For thermal jar models, insert blend- ing jar into thermal jar.

5.Fit gasket over blades. The gasket must lie flat. Set jar on top of gasket and screw on cutting assembly.

6.Make sure the cutting assembly is firmly screwed onto the jar.

7.OPTION: When dispenser is not needed replace the dispenser with the spout cap.

4

Remove dispenser assembly (see

“Cleaning”

section).

Insert spout

cap on

cutting

assembly.

Turn spout

cap clock- wise to lock.

8.Set jar into place on blender base, making sure it is securely seated.

If not, gently rock the jar until seated.

NOTE: The cutting assembly must

slide between

the base and

dispensing lever.

9.Plug cord into outlet.

10.Put ingredients in jar; lock filler cap and lock lid on jar. Always hold handle when blending.

11.Process food or beverages. See the “Blending Techniques” section for speeds and processing tips. NOTE: When blending thin liquids, do not fill above the 40-ounce/

5 cup/1200 ml mark on blender jar.

12.The dispensing blender will dis- pense beverages. To dispense, press drink cup against dispenser lever. Dispensing will automatically stop when the cup is removed. To dispense thick liquids (such as milk- shakes, smoothies, frozen drinks, etc.), turn blender ON and then dis- pense. Turn OFF after dispensing.

13.ALWAYS turn blender off and wait until blades have stopped rotating before removing jar.

14.To remove jar after blending is complete, lift the jar straight up. If it is not easily removed, rock gently and lift. Do not twist.

15.NEVER replace jar onto unit while motor is running.

Page 4
Image 4
Hamilton Beach 50754C manual How to Assemble and Use

50754C specifications

The Hamilton Beach 50754C is a versatile and powerful kitchen appliance designed to streamline cooking and baking by providing a myriad of functions in a compact design. This countertop toaster oven is mostly recognized for its efficiency, intuitive controls, and user-friendly features, making it an essential addition to any kitchen.

One of the standout features of the Hamilton Beach 50754C is its spacious interior which can accommodate a variety of food items including a 12-inch pizza, casseroles, or even a small turkey, allowing for cooking flexibility. The toaster oven's adjustable cooking rack has multiple positions, making it adaptable for different types of cooking tasks.

In terms of technology, the Hamilton Beach 50754C is equipped with a precision cooking function that allows for accurate temperature control. This ensures that food is cooked evenly and thoroughly, eliminating guesswork in meal preparation. The toaster oven includes six settings which cater to different cooking needs: bake, broil, toast, bagel, pizza, and rotisserie. These options cater to a wide range of culinary tasks, from toasting bread to roasting meats.

Further enhancing usability, the Hamilton Beach 50754C features easy-to-use manual controls, including a 30-minute timer with an automatic shut-off function. This feature not only helps in preventing overcooking but also assures safety by automatically turning off the oven after the set time is reached.

Cleaning is made easier with the Hamilton Beach 50754C as it comes with a removable crumb tray that catches food particles and debris, preventing them from accumulating in the main cooking area. The exterior is designed for easy wipe-downs, ensuring that the appliance remains tidy and hygienic.

In addition to its practical features, the Hamilton Beach 50754C boasts a sleek design that fits seamlessly into various kitchen styles. Its compact size does not sacrifice performance or cooking capacity, making it a perfect fit for both small and large kitchens alike.

Overall, the Hamilton Beach 50754C toaster oven embodies a combination of convenience, efficiency, and versatility, making it an invaluable tool for anyone looking to enhance their cooking experience. Whether you’re an aspiring chef or simply looking to make meal prep easier, this appliance provides countless possibilities.