LEFT/RIGHT: This line tells the AVR 145 the capabilities of your front left and right speakers. Use the /Buttons to select either SMALL or LARGE for these speakers.

CENTER: Move the cursor to the line for the center speaker, and use the /Buttons to select a setting for this speaker.

NOTE: If the receiver is currently in one of the Logic 7 surround modes, which will be the case the first time you turn on the receiver, you won’t be able to set the center speaker to LARGE, due to the requirements of the Logic 7 processor. You may use the SMALL setting instead. As you listen to the receiver, if you find the SMALL setting is not satisfactory, change the surround mode to one of the Dolby Pro Logic II modes (using the Surround Select menu, accessible from the Master Menu), and then you may come back to this menu and change the center speaker to the LARGE setting.

SURROUND: Move the cursor to the line for the surround, or rear, speakers, and use the /Buttons to select a setting for these two speakers.

SUBWOOFER: Move the cursor to the line for the subwoofer, which is programmed a little differently. The subwoofer’s “size” setting depends upon how you programmed the front left and right speakers.

If you set the front speakers to SMALL, the subwoofer setting will be SUB, and you won’t be able to change it. All low-frequency information will always be sent to the subwoofer. If you don’t have a subwoofer, you may wish to set your front speakers to LARGE so as not to lose this information, but you may need to lower the vol- ume to avoid adverse results.

If you set the front speakers to LARGE, you may select from three possible settings for the subwoofer.

L/R+LFE: This setting sends all low-frequency information to the subwoofer, including both information that would normally be played through the front left and right speakers and the special low-frequency effects (LFE) channel information.

LFE: This setting plays low-frequency information contained in the left and right program channels to the front speakers, and directs only the LFE channel information to the subwoofer.

NONE: This setting steers all low-frequency information to the front speakers, and no information to the subwoofer output. Use this setting if you have a passive subwoofer, or a powered sub- woofer that you connected to the front speaker outputs.

NOTE: If you are using a Harman Kardon HKTS speaker sys- tem, select the SMALL setting for the LEFT/RIGHT, CENTER and SURROUND lines, and the subwoofer will automatically be set to SUB.

BASS MGR: This advanced setting is used if you wish to configure your speakers differently for different sources. For example, you may prefer to set your speakers to LARGE while listening to CDs from your CD player. By changing this setting to INDEPENDENT, you may have different set-

INITIAL SETUP

tings for your CD player and your DVD player or other devices. We rec- ommend that you leave this setting at its factory default of GLOBAL until you have more experience with the AVR.

Move the cursor to the BACK TO MANUAL SETUP line and press the Set Button to return to the Manual Setup Menu.

NOTE: The Speaker/Channel Indicators on the front panel of the receiver will display the speaker size settings as follows. For each speaker configured as SMALL, a single box will appear in the position for that speaker. For each speaker configured as LARGE, a double box will appear in its position. If a speaker is configured as NONE, no box will appear. The subwoofer will be indicated by a single box, or no box if no subwoofer has been configured. The letters inside the boxes appear when a digital signal is being received that has that channel discretely encoded. The letters flash when the signal is not present, such as when a DVD is paused.

Figure 38 – Speaker/Channel Input Indicators

Speaker Crossover Menu

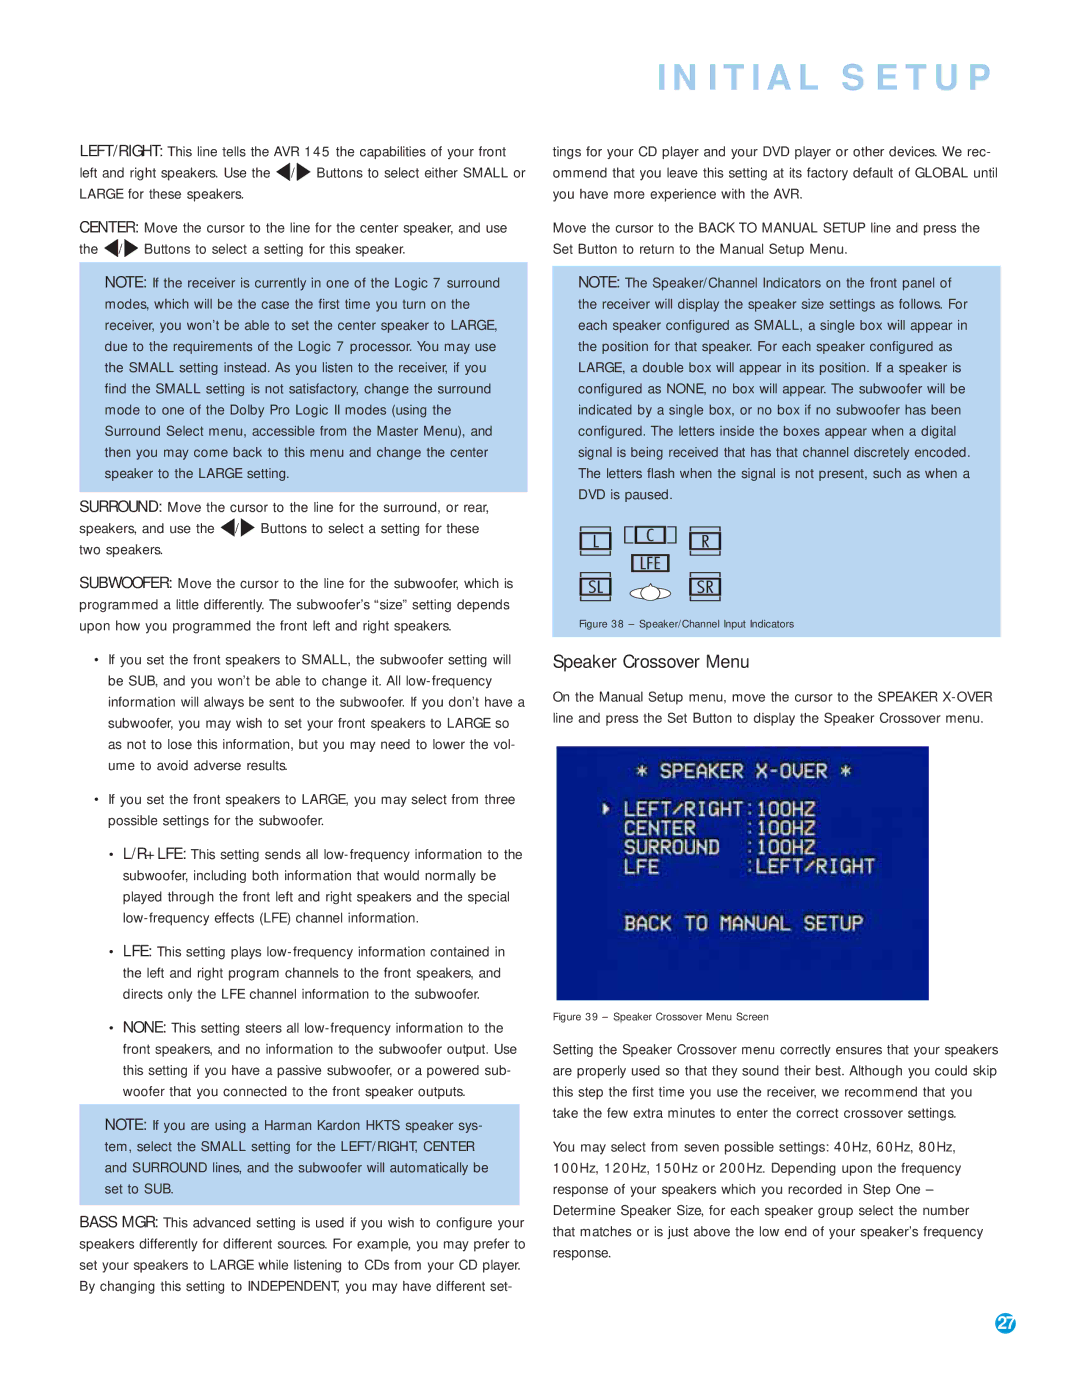
On the Manual Setup menu, move the cursor to the SPEAKER X-OVER line and press the Set Button to display the Speaker Crossover menu.

Figure 39 – Speaker Crossover Menu Screen

Setting the Speaker Crossover menu correctly ensures that your speakers are properly used so that they sound their best. Although you could skip this step the first time you use the receiver, we recommend that you take the few extra minutes to enter the correct crossover settings.

You may select from seven possible settings: 40Hz, 60Hz, 80Hz, 100Hz, 120Hz, 150Hz or 200Hz. Depending upon the frequency response of your speakers which you recorded in Step One – Determine Speaker Size, for each speaker group select the number that matches or is just above the low end of your speaker’s frequency response.

27

Page 27
Image 27
Harman-Kardon AVR 145 owner manual Speaker Crossover Menu, Speaker/Channel Input Indicators

AVR 145 specifications

The Harman-Kardon AVR 145 is a compact yet powerful audio/video receiver designed to deliver an exceptional home theater experience. Launched to meet the needs of both music enthusiasts and movie lovers, the AVR 145 combines advanced technology with user-friendly features, making it a popular choice for those seeking quality sound and versatility.

One of the standout features of the AVR 145 is its impressive power output. The receiver delivers up to 50 watts per channel at 8 ohms, allowing it to produce rich and immersive audio across various media formats. This output ensures that even the most bass-heavy soundtracks and delicate dialogue are rendered with clarity and precision, enhancing the overall listening experience.

Harman-Kardon is known for its commitment to quality sound, and the AVR 145 is no exception. It supports multiple audio formats, including Dolby Digital and DTS, which provide surround sound capabilities that make movies feel like a cinematic experience at home. The receiver also includes High Definition Multimedia Interface (HDMI) inputs, supporting high-resolution video signals while simplifying connectivity between devices.

In terms of connectivity, the AVR 145 is equipped with several inputs and outputs, allowing users to connect multiple audio and video sources. It features composite video, component video, and multiple optical and coaxial digital audio inputs, making it compatible with various devices such as DVD players, game consoles, and media streaming devices. This versatility ensures that users can easily integrate the AVR 145 into their existing entertainment systems.

The user interface of the AVR 145 is thoughtfully designed, making it easy for users to navigate through settings and inputs. The built-in on-screen display offers a straightforward setup experience, and the remote control is intuitive for effortless operation. Additionally, the receiver includes a stereo mode for those who prefer a two-channel audio experience, catering to both modern surround sound setups and traditional stereo configurations.

Another notable characteristic of the AVR 145 is its compact design. With a sleek and elegant appearance, it fits seamlessly into any home entertainment setup without taking up excessive space. This aesthetic appeal, combined with its robust performance, positions the AVR 145 as a brilliant choice for anyone looking to enhance their audio experience without the bulk.

In summary, the Harman-Kardon AVR 145 stands out as a remarkable A/V receiver that combines powerful performance, versatile connectivity, and user-friendly design. Whether for movies, music, or gaming, it is an excellent addition to any home theater system, providing a reliable and high-quality audio experience for years to come.