12
1 | 2 | 3 | 4 | 5 |
|
| 6 | 7 | 8 | 9 |
| 10 |
|
|
|
|
|
|
|
|
|
| DIGITAL | ANALOG |
|
|
|
|
|
|
|
|
|
|
| REC LEVEL | REC LEVEL |
|
| SCROLL | DISPLAY | TITLE/MODE | MONITOR |
|
|
|
| TEXT | MENU/ |
|
|
|
|
|
|
| DELETE |
|
| |||||
|
|
| TRACK NO. |
|
|
|
|
|
|
|
|
|
|
|
| WRITE |
|
|
|
|
|
|
|
|
|
| ERASE | FINALIZE | AUTO | INPUT |
|
|
|
|
| SYNCHRO |
|
|
| MANUAL | SELECTOR |
|
|
|
|
|
|
| |||
| CD TEXT |
|
|
|
|
|
|
|
| PROFESSIONAL | ||
| 11 | 12 13 14 | 15 | 16 | 17 | 18 | 19 20 21 22 23 | 24 | ||||
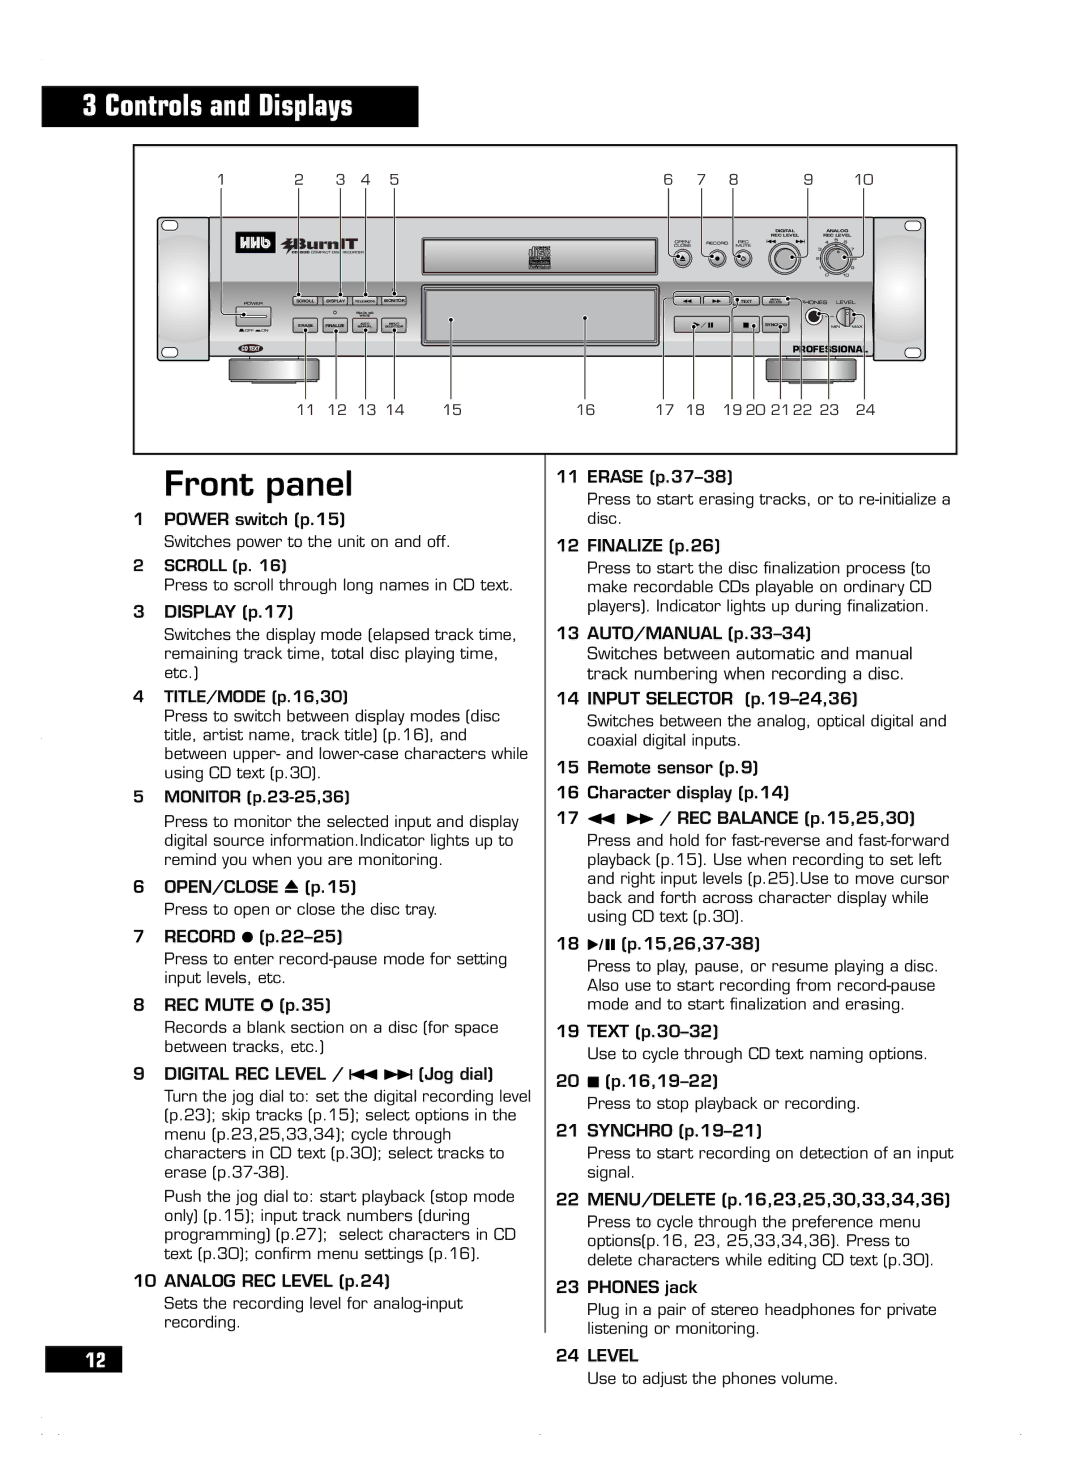
| Front panel | 11 ERASE | |
| Press to start erasing tracks, or to | ||
1 | POWER switch (p.15) | disc. | |
| Switches power to the unit on and off. | 12 FINALIZE (p.26) | |
2 | SCROLL (p. 16) | Press to start the disc finalization process (to | |
| Press to scroll through long names in CD text. | make recordable CDs playable on ordinary CD | |
3 | DISPLAY (p.17) | players). Indicator lights up during finalization. | |
| |||
| Switches the display mode (elapsed track time, | 13 AUTO/MANUAL | |
| remaining track time, total disc playing time, | Switches between automatic and manual | |
| etc.) | track numbering when recording a disc. | |
4 | TITLE/MODE (p.16,30) | 14 INPUT SELECTOR | |
| Press to switch between display modes (disc | Switches between the analog, optical digital and | |
| title, artist name, track title) (p.16), and | ||
| coaxial digital inputs. | ||
| between upper- and | ||
| 15 Remote sensor (p.9) | ||
| using CD text (p.30). | ||
5 | MONITOR | 16 Character display (p.14) | |
| Press to monitor the selected input and display | 17 1 Á / REC BALANCE (p.15,25,30) | |
| digital source information.Indicator lights up to | Press and hold for | |
| remind you when you are monitoring. | playback (p.15). Use when recording to set left | |
6 | OPEN/CLOSE 0 (p.15) | and right input levels (p.25).Use to move cursor | |
back and forth across character display while | |||
| Press to open or close the disc tray. | ||
| using CD text (p.30). | ||
7 | RECORD ¦ | ||
18 6 | |||
| Press to enter | ||
| Press to play, pause, or resume playing a disc. | ||
| input levels, etc. | ||
| Also use to start recording from | ||
| REC MUTE ¥ (p.35) | ||
8 | mode and to start finalization and erasing. | ||
| Records a blank section on a disc (for space | 19 TEXT | |
| between tracks, etc.) | Use to cycle through CD text naming options. | |
9 | DIGITAL REC LEVEL / 4 ¢ (Jog dial) | ||
20 7 | |||
| Turn the jog dial to: set the digital recording level | ||
| Press to stop playback or recording. | ||
| (p.23); skip tracks (p.15); select options in the | ||
| 21 SYNCHRO | ||
| menu (p.23,25,33,34); cycle through | ||
| characters in CD text (p.30); select tracks to | Press to start recording on detection of an input | |
| erase | signal. | |
| Push the jog dial to: start playback (stop mode | 22 MENU/DELETE (p.16,23,25,30,33,34,36) | |
| only) (p.15); input track numbers (during | Press to cycle through the preference menu | |
| programming) (p.27); select characters in CD | ||
| options(p.16, 23, 25,33,34,36). Press to | ||
| text (p.30); confirm menu settings (p.16). | ||
| delete characters while editing CD text (p.30). | ||
|
| ||
10 ANALOG REC LEVEL (p.24) | 23 PHONES jack | ||
| Sets the recording level for | ||
| Plug in a pair of stereo headphones for private | ||
| recording. | ||
| listening or monitoring. | ||
|
| ||
|
| 24 LEVEL | |
|
| Use to adjust the phones volume. | |