SECTION 6 − TROUBLESHOOTING
6-1. Troubleshooting Table
|
|
|
|
|
|
|
| . See Section |
|
|
|
|
|
|
|
| |
|
|
|
|
|
|
|
| and Section 9 for parts location. |
|
|
|
|
|
|
|
| |
|
|
|
|
|
|
|
|
|
|
|
|
|
|
|
|
| |
|
| Trouble |
|
|
|
| Remedy | |
|
|
| ||||||
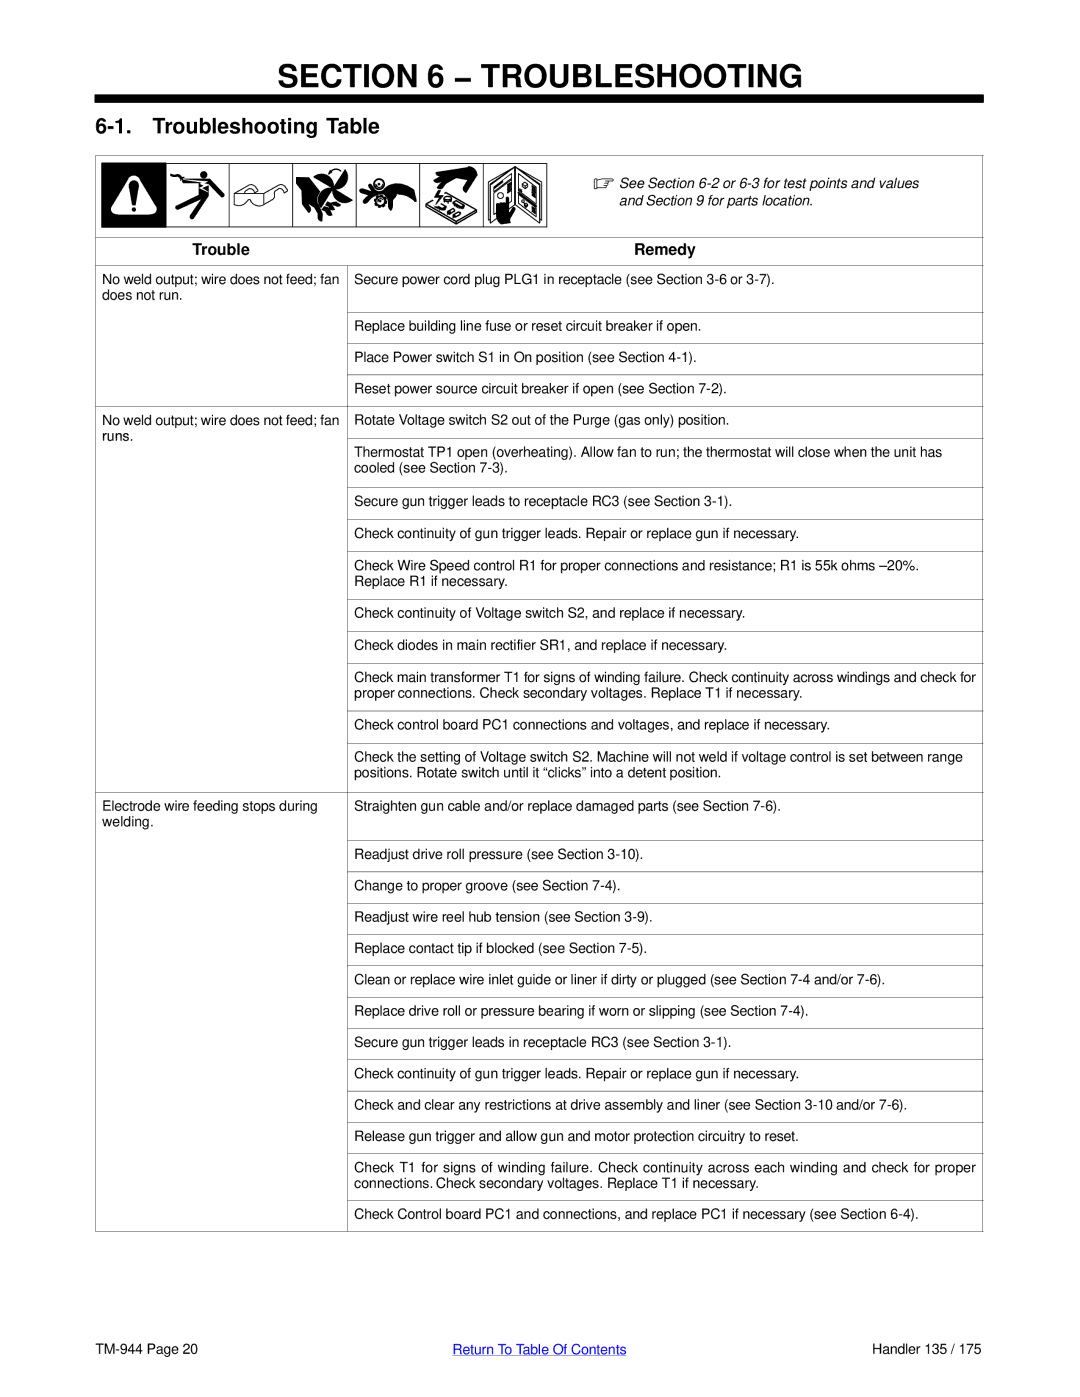
| No weld output; wire does not feed; fan | Secure power cord plug PLG1 in receptacle (see Section | ||||||
| does not run. |
|
|
|
|
| ||
|
|
|
|
| ||||
|
|
|
| Replace building line fuse or reset circuit breaker if open. | ||||
|
|
|
|
| ||||
|
|
|
| Place Power switch S1 in On position (see Section | ||||
|
|
|
|
| ||||
|
|
|
| Reset power source circuit breaker if open (see Section | ||||
|
|
| ||||||
| No weld output; wire does not feed; fan | Rotate Voltage switch S2 out of the Purge (gas only) position. | ||||||
| runs. |
|
|
|
|
| ||
| Thermostat TP1 open (overheating). Allow fan to run; the thermostat will close when the unit has | |||||||
|
|
|
| |||||
|
|
|
| cooled (see Section | ||||
|
|
|
|
| ||||
|
|
|
| Secure gun trigger leads to receptacle RC3 (see Section | ||||
|
|
|
|
| ||||
|
|
|
| Check continuity of gun trigger leads. Repair or replace gun if necessary. | ||||
|
|
|
|
| ||||
|
|
|
| Check Wire Speed control R1 for proper connections and resistance; R1 is 55k ohms ±20%. | ||||
|
|
|
| Replace R1 if necessary. | ||||
|
|
|
|
| ||||
|
|
|
| Check continuity of Voltage switch S2, and replace if necessary. | ||||
|
|
|
|
| ||||
|
|
|
| Check diodes in main rectifier SR1, and replace if necessary. | ||||
|
|
|
|
| ||||
|
|
|
| Check main transformer T1 for signs of winding failure. Check continuity across windings and check for | ||||
|
|
|
| proper connections. Check secondary voltages. Replace T1 if necessary. | ||||
|
|
|
|
| ||||
|
|
|
| Check control board PC1 connections and voltages, and replace if necessary. | ||||
|
|
|
|
| ||||
|
|
|
| Check the setting of Voltage switch S2. Machine will not weld if voltage control is set between range | ||||
|
|
|
| positions. Rotate switch until it “clicks” into a detent position. | ||||
|
|
| ||||||
| Electrode wire feeding stops during | Straighten gun cable and/or replace damaged parts (see Section | ||||||
| welding. |
|
|
|
|
| ||
|
|
|
|
| ||||
|
|
|
| Readjust drive roll pressure (see Section | ||||
|
|
|
|
| ||||
|
|
|
| Change to proper groove (see Section | ||||
|
|
|
|
| ||||
|
|
|
| Readjust wire reel hub tension (see Section | ||||
|
|
|
|
| ||||
|
|
|
| Replace contact tip if blocked (see Section | ||||
|
|
|
|
| ||||
|
|
|
| Clean or replace wire inlet guide or liner if dirty or plugged (see Section | ||||
|
|
|
|
| ||||
|
|
|
| Replace drive roll or pressure bearing if worn or slipping (see Section | ||||
|
|
|
|
| ||||
|
|
|
| Secure gun trigger leads in receptacle RC3 (see Section | ||||
|
|
|
|
| ||||
|
|
|
| Check continuity of gun trigger leads. Repair or replace gun if necessary. | ||||
|
|
|
|
| ||||
|
|
|
| Check and clear any restrictions at drive assembly and liner (see Section | ||||
|
|
|
|
| ||||
|
|
|
| Release gun trigger and allow gun and motor protection circuitry to reset. | ||||
|
|
|
|
| ||||
|
|
|
| Check T1 for signs of winding failure. Check continuity across each winding and check for proper | ||||
|
|
|
| connections. Check secondary voltages. Replace T1 if necessary. | ||||
|
|
|
|
| ||||
|
|
|
| Check Control board PC1 and connections, and replace PC1 if necessary (see Section | ||||
|
|
|
|
|
|
|
|
|
Return To Table Of Contents | Handler 135 / 175 |
