INTRODUCTION IMPORTANT
PRECAUTIONS
ASSEMBLY
BEFORE
YOU BEGIN
TREADMILL CONDITIONING TROUBLESHOOTING LIMITED
OPERATION GUIDELINES & MAINTENANCE WARRANTY
16
TENSIONINGTHE RUNNING BELT
The running belt has been properly adjusted at the factory before it was shipped. At times the belt can move
CAUTION: Running belt should NOT be moving during tensioning.
If you can feel a slipping sensation when running on the treadmill, the running belt must be tightened. In most cases, the belt has stretched from use, causing the belt to slip. This is a normal and common adjustment. To eliminate this slipping, turn the treadmill off and tension both the rear roller bolts using the supplied Allen wrench, turning them 1/4 TURN to the right as shown. Turn the treadmill on and check for slipping. Repeat if necessary, but NEVER TURN the roller bolts more than 1/4 turn at a time. Belt is properly tensioned when the slipping sensation is gone.
Belt is too far to the right side |
Belt is too far to the left side |
CENTERING THE RUNNING BELT
The running belt has been properly adjusted at the factory before it was shipped. At times the belt can move
CAUTION: Do not run belt faster than 1/2 mph while centering. Keep fingers, hair and clothing away from belt at all times.
If the running belt is too far to the right side: With the treadmill running at 1/2 mph, turn the right adjustment bolt clockwise 1/4 turn at a time (using the supplied Allen wrench). Check the belt alignment. Allow belt to run a full cycle to gauge if more adjustment is needed. Repeat if necessary, until the belt remains centered during use.
If the running belt is too far to the left side: With the treadmill running at 1/2 mph, turn the right adjustment bolt
TREADMILL OPERATION
R | D | C | A |
| B | E |
| O | |||||
|
|
|
|
|
|
|
|
|
|
|
|
|
|
|
|
|
|
|
|
|
|
|
|
|
|
|
|
|
|
|
| TIME |
|
|
| DISTANCE |
|
|
|
| |
|
| WEIGHT |
|
|
|
|
|
|
|
|
| SAVED | |
|
|
|
|
|
|
|
|
|
|
| |||
|
| LOSS |
|
|
|
|
|
|
|
|
| WORKOUT | |
|
| EVENT |
|
|
|
|
|
|
|
| SAVED | ||
|
|
| PACE | % COMPLETE |
|
| HEART RATE |
|
| ||||
|
| TRAINING |
|
|
|
|
|
|
|
|
| WORKOUT | |
|
| CARDIO |
|
|
|
|
|
|
|
|
| SAVED | |
|
| TRAINING |
|
|
|
|
|
|
|
|
| WORKOUT | |
|
|
|
| INCLINE | CALORIES |
|
| SPEED |
|
| SAVED | ||
|
|
|
|
|
|
|
|
|
|
|
| WORKOUT | |
|
|
|
|
|
|
|
|
|
|
|
|
|
|
|
|
|
|
|
|
|
|
|
|
|
|
|
|
|
|
|
|
|
|
|
|
|
|
|
|
|
|
SELECT |
|
|
|
|
|
|
|
|
|
|
|
|
|
|
|
|
|
|
|
| SAVE | ||
TRAINING |
|
|
|
|
|
|
|
|
|
|
|
|
|
|
|
|
|
|
|
| |||
| MODE |
|
|
|
|
|
|
|
|
|
|
|
|
|
|
|
|
|
|
| WORKOUT | ||
|
| M y K E Y S ™ |
|
|
| iPod® Controls |
|
| M y K E Y S ™ |
|
| ||||||||||||
|
|
|
|
|
|
|
|
| |||||||||||||||
|
|
|
|
|
| Press and hold a MyKEY™ |
|
|
|
|
|
|
|
|
| Press and hold a MyKEY™ |
|
|
|
|
|
| |
|
|
|
|
|
|
|
|
|
|
|
|
|
|
|
|
|
|
|
|
| |||
| LOW |
| MED |
| HIGH | for three seconds to set |
|
|
|
|
|
|
|
|
| for three seconds to set |
|
|
|
|
|
| |
|
|
| key to current incline. |
|
|
|
|
|
|
|
|
| key to current speed. | SLOW |
| MED |
| FAST | |||||
|
|
|
|
|
|
|
|
|
|
|
|
|
|
|
|
|
|
|
|
|
|
|
|
|
|
|
|
|
|
|
|
|
|
|
|
|
|
|
|
|
|
| Press enter to confirm. |
|
| ||
|
|
|
|
|
|
|
|
|
| ENTER |
|
|
|
|
|
|
|
| |||||
|
|
|
|
|
|
|
|
|
| CHANGE |
|
|
|
|
|
| |||||||
| S T A R T |
|
|
|
|
| DISPL AY |
|
| S T O P |
|
| |||||||||||
|
| I N C L I N E |
|
|
|
|
|
|
|
|
| S P E E D |
|
|
|
| |||||||
| Q U I C K S TA R T |
|
|
|
|
|
|
|
|
|
|
|
| H O L D T O R E S E T | |||||||||
|
|
|
|
|
|
|
|
|
|
|
|
|
|
|
| ||||||||
|
|
|
|
|
|
|
|
|
|
|
|
|
|
|
|
|
|
|
|
|
|
|
|
|
|
|
|
|
|
|
|
|
|
|
|
|
|
|
|
|
|
|
|
|
|
|
|
|
|
|
|
|
|
|
|
|
|
|
|
|
|
|
|
|
|
|
|
|
|
|
|
|
|
|
|
|
|
|
|
|
|
|
|
|
|
|
|
|
|
|
|
|
|
|
|
|
|
|
|
|
|
|
|
|
|
|
|
|
|
|
|
|
|
|
|
|
|
|
|
K M F S J H T I O P G N L
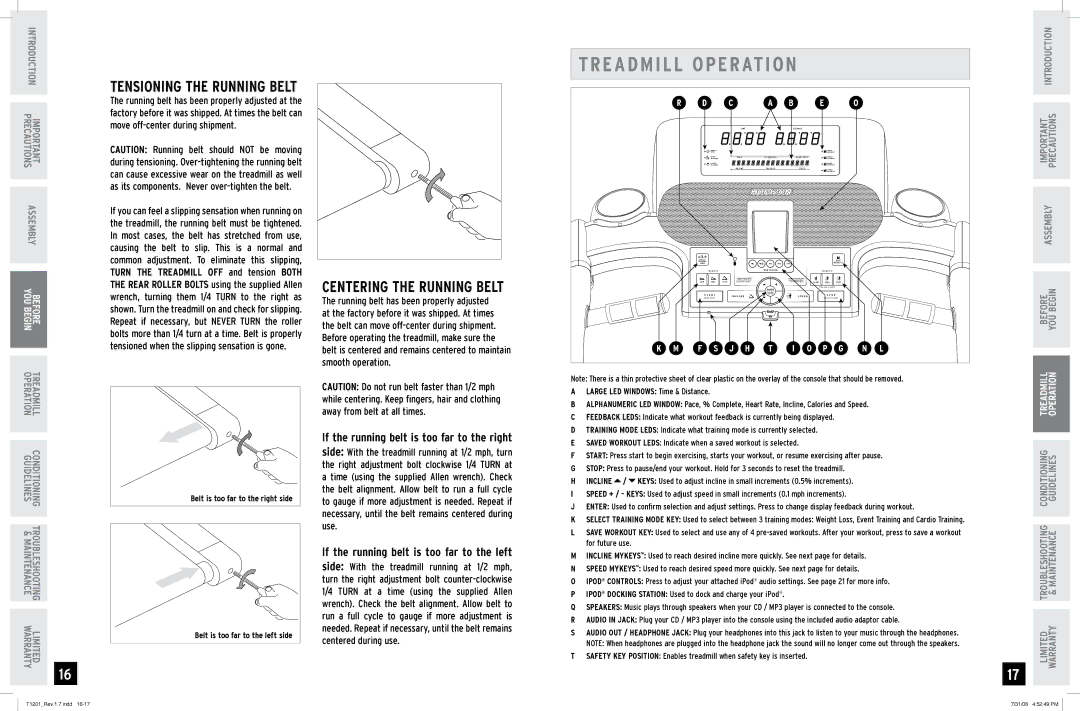
Note: There is a thin protective sheet of clear plastic on the overlay of the console that should be removed.
ALarge LED WINDOWS: Time & Distance.
BALPHANUMERIC LED WINDOW: Pace, % Complete, Heart Rate, Incline, Calories and Speed.
CFeedback LEDS: Indicate what workout feedback is currently being displayed.
DTRAINING MODE LEDS: Indicate what training mode is currently selected.
ESAVED WORKOUT LEDS: Indicate when a saved workout is selected.
FStart: Press start to begin exercising, starts your workout, or resume exercising after pause.
GStop: Press to pause/end your workout. Hold for 3 seconds to reset the treadmill.
HINCLINE ![]() /
/ ![]() keys: Used to adjust incline in small increments (0.5% increments).
keys: Used to adjust incline in small increments (0.5% increments).
ISpeed + / - keys: Used to adjust speed in small increments (0.1 mph increments).
JENTER: Used to confirm selection and adjust settings. Press to change display feedback during workout.
KSELECT TRAINING MODE KEY: Used to select between 3 training modes: Weight Loss, Event Training and Cardio Training.
LSAVE WORKOUT KEY: Used to select and use any of 4
MIncline mykeys™: Used to reach desired incline more quickly. See next page for details.
NSpeed mykeys™: Used to reach desired speed more quickly. See next page for details.
OIPod® Controls: Press to adjust your attached iPod® audio settings. See page 21 for more info.
PiPOD® Docking station: Used to dock and charge your iPod®.
QSPEAKERS: Music plays through speakers when your CD / MP3 player is connected to the console.
RAUDIO IN JACK: Plug your CD / MP3 player into the console using the included audio adaptor cable.
SAUDIO OUT / HEADPHONE JACK: Plug your headphones into this jack to listen to your music through the headphones.
NOTE: When headphones are plugged into the headphone jack the sound will no longer come out through the speakers.
TSafety Key Position: Enables treadmill when safety key is inserted.
17
IMPORTANT PRECAUTIONS INTRODUCTION
ASSEMBLY
BEFORE YOU BEGIN
LIMITED TROUBLESHOOTING CONDITIONING TREADMILL WARRANTY & MAINTENANCE GUIDELINES OPERATION
T1201_Rev.1.7.indd | 7/31/08 4:52:49 PM |