
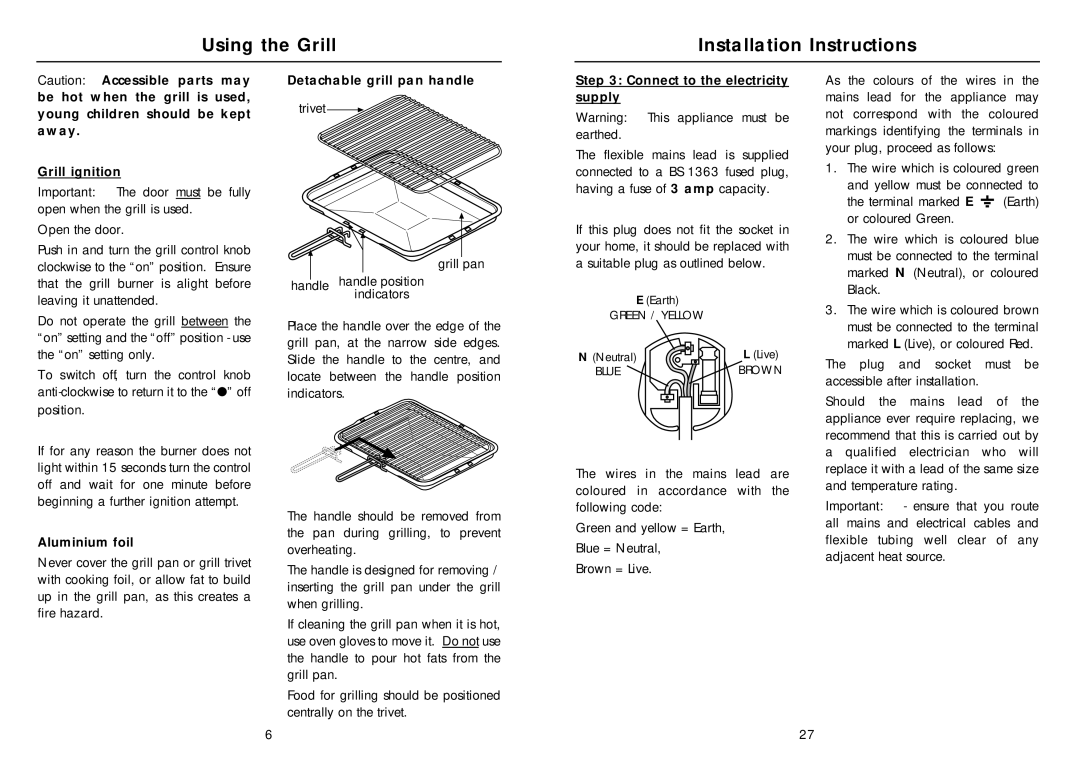
SY22W specifications
The Hotpoint SY22W is a modern freestanding refrigerator designed to meet the demands of today’s households. With its elegant design and practical functionality, this model stands out as a reliable choice for those seeking both style and efficiency in their kitchen.One of the prominent features of the SY22W is its impressive capacity. It offers ample storage space with adjustable shelves, allowing users to easily organize their groceries and maximize the available area. The refrigerator compartment boasts multiple shelves that can accommodate different sizes and types of food items, making it ideal for families and individuals alike.
This model is equipped with Hotpoint's innovative Fresh Zone technology. This feature helps maintain optimal humidity levels inside the refrigerator, ensuring that fruits, vegetables, and other perishables stay fresher for longer. Moreover, the innovative humidity control system reduces food wastage, making it a cost-effective option for the environmentally conscious consumer.
The Hotpoint SY22W also includes a separate freezer compartment, which is spacious and efficient. The freezer features quick-freeze capabilities, allowing users to freeze new items rapidly, preserving their taste and nutritional value. Additionally, the freezer's drawers provide easy access to frozen items, making meal planning and preparation convenient.
Energy efficiency is a key characteristic of this model, as it boasts a high energy rating. This not only helps in lowering energy bills but also contributes to a decrease in environmental impact. The SY22W incorporates advanced insulation technology, ensuring that it maintains a consistent temperature while consuming minimal power.
Furthermore, the design of the Hotpoint SY22W emphasizes user convenience. The exterior is sleek and modern, easily fitting into a variety of kitchen designs. It also features an interior light that illuminates the fridge space, making it easier to find items even in low light conditions.
In terms of usability, the SY22W includes adjustable door bins and shelves, allowing customers to customize the internal space according to their needs. The easy-to-use controls ensure that adjusting temperature settings and other options is straightforward.
Overall, the Hotpoint SY22W is a feature-rich refrigerator that combines practical storage solutions with advanced technologies, energy efficiency, and modern design. It stands as an excellent choice for those looking for a reliable kitchen appliance that enhances both functionality and style.