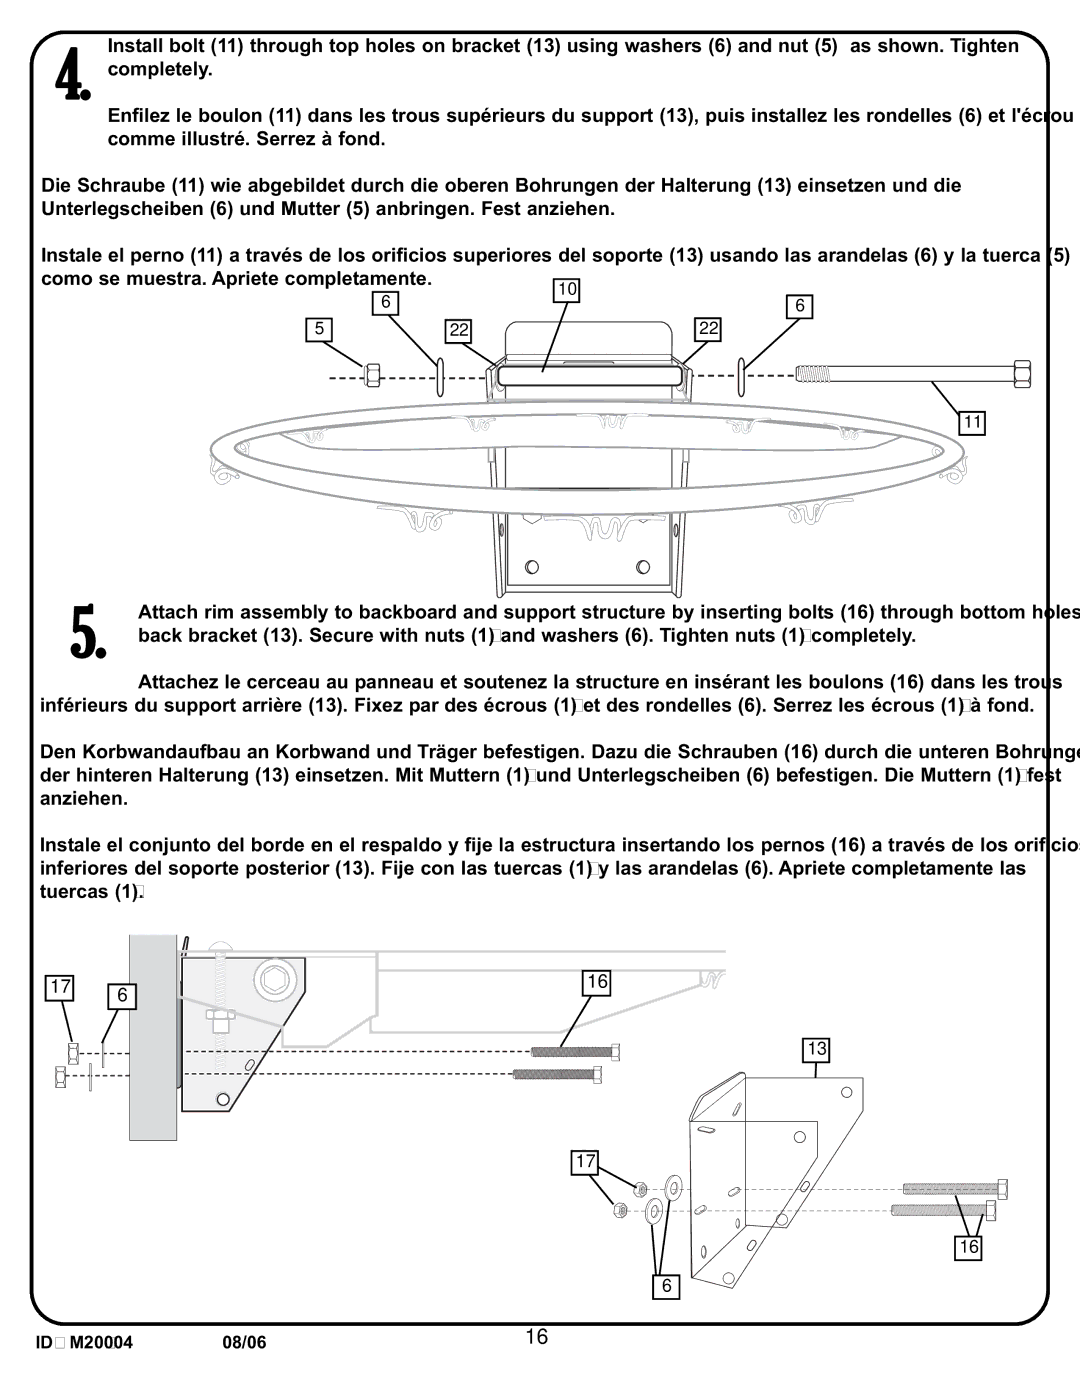
4. Install bolt (11) through top holes on bracket (13) using washers (6) and nut (5) as shown. Tighten completely.
Enfilez le boulon (11) dans les trous supérieurs du support (13), puis installez les rondelles (6) et l'écrou (5), comme illustré. Serrez à fond.
Die Schraube (11) wie abgebildet durch die oberen Bohrungen der Halterung (13) einsetzen und die Unterlegscheiben (6) und Mutter (5) anbringen. Fest anziehen.
Instale el perno (11) a través de los orificios superiores del soporte (13) usando las arandelas (6) y la tuerca (5) | ||||||||||||||||||||||
como se muestra. Apriete completamente. |
|
|
|
|
|
|
|
|
|
|
|
|
|
|
|
| ||||||
|
|
| 10 |
|
|
|
|
|
|
|
|
|
|
|
| |||||||
|
|
|
| 6 |
|
|
|
|
|
|
|
|
|
|
|
|
|
|
|
| ||
|
|
|
|
|
|
|
|
|
|
|
|
|
|
|
| 6 |
| |||||
|
|
|
|
|
|
|
|
|
|
|
|
|
|
|
|
|
| |||||
|
|
|
|
|
|
|
|
|
|
|
|
|
|
|
|
|
|
|
| |||
|
|
|
|
|
|
|
|
|
|
|
|
|
|
|
|
|
|
|
| |||
|
|
|
|
|
|
|
|
|
| |||||||||||||
| 5 |
|
|
|
|
| 22 |
| 22 |
|
|
|
|
| ||||||||
|
|
|
|
|
|
|
|
|
|
|
|
|
|
|
|
|
|
|
|
|
|
|
|
|
|
|
|
|
|
|
|
|
|
|
|
|
|
|
|
|
|
|
|
|
|
|
|
|
|
|
|
|
|
|
|
|
|
|
|
|
|
|
|
|
|
|
|
|
|
|
|
|
|
|
|
|
|
|
|
|
|
|
|
|
|
|
|
|
|
|
|
11
5. Attach rim assembly to backboard and support structure by inserting bolts (16) through bottom holes in back bracket (13). Secure with nuts (17) and washers (6). Tighten nuts (17) completely.
Attachez le cerceau au panneau et soutenez la structure en insérant les boulons (16) dans les trous inférieurs du support arrière (13). Fixez par des écrous (17) et des rondelles (6). Serrez les écrous (17) à fond.
Den Korbwandaufbau an Korbwand und Träger befestigen. Dazu die Schrauben (16) durch die unteren Bohrungen der hinteren Halterung (13) einsetzen. Mit Muttern (17) und Unterlegscheiben (6) befestigen. Die Muttern (17) fest anziehen.
Instale el conjunto del borde en el respaldo y fije la estructura insertando los pernos (16) a través de los orificios inferiores del soporte posterior (13). Fije con las tuercas (17) y las arandelas (6). Apriete completamente las tuercas (17).
17 | 6 | 16 |
|
|
13
17
16
6
ID# M207004 | 08/06 | 16 |