ASSEMBLY

Your new tractor has been assembled at the factory with exception of those parts left unassembled for shipping purposes. To ensure safe and proper operation of your tractor all parts and hardware you assemble must be tightened securely. Use the correct tools as necessary to insure proper tightness.

TOOLS REQUIRED FOR ASSEMBLY

A socket wrench set will make assembly easier. Standard wrench sizes are listed.

(2)

7/16" wrenches

Utility knife

(1)

3/4" wrenches

Tire pressure gauge

(1)

3/4" socket w/drive ratchet

Pliers

When right or left hand is mentioned in this manual, it means when you are in the operating position (seated behind the steering wheel).

TO REMOVE TRACTOR FROM CAR- TON

UNPACK CARTON

Remove all accessible loose parts and parts cartons from carton.

Cut along dashed lines on all four panels of carton. Remove end panels and lay side panels flat.

Check for any additional loose parts or cartons and remove.

BEFORE REMOVING TRACTOR FROM SKID

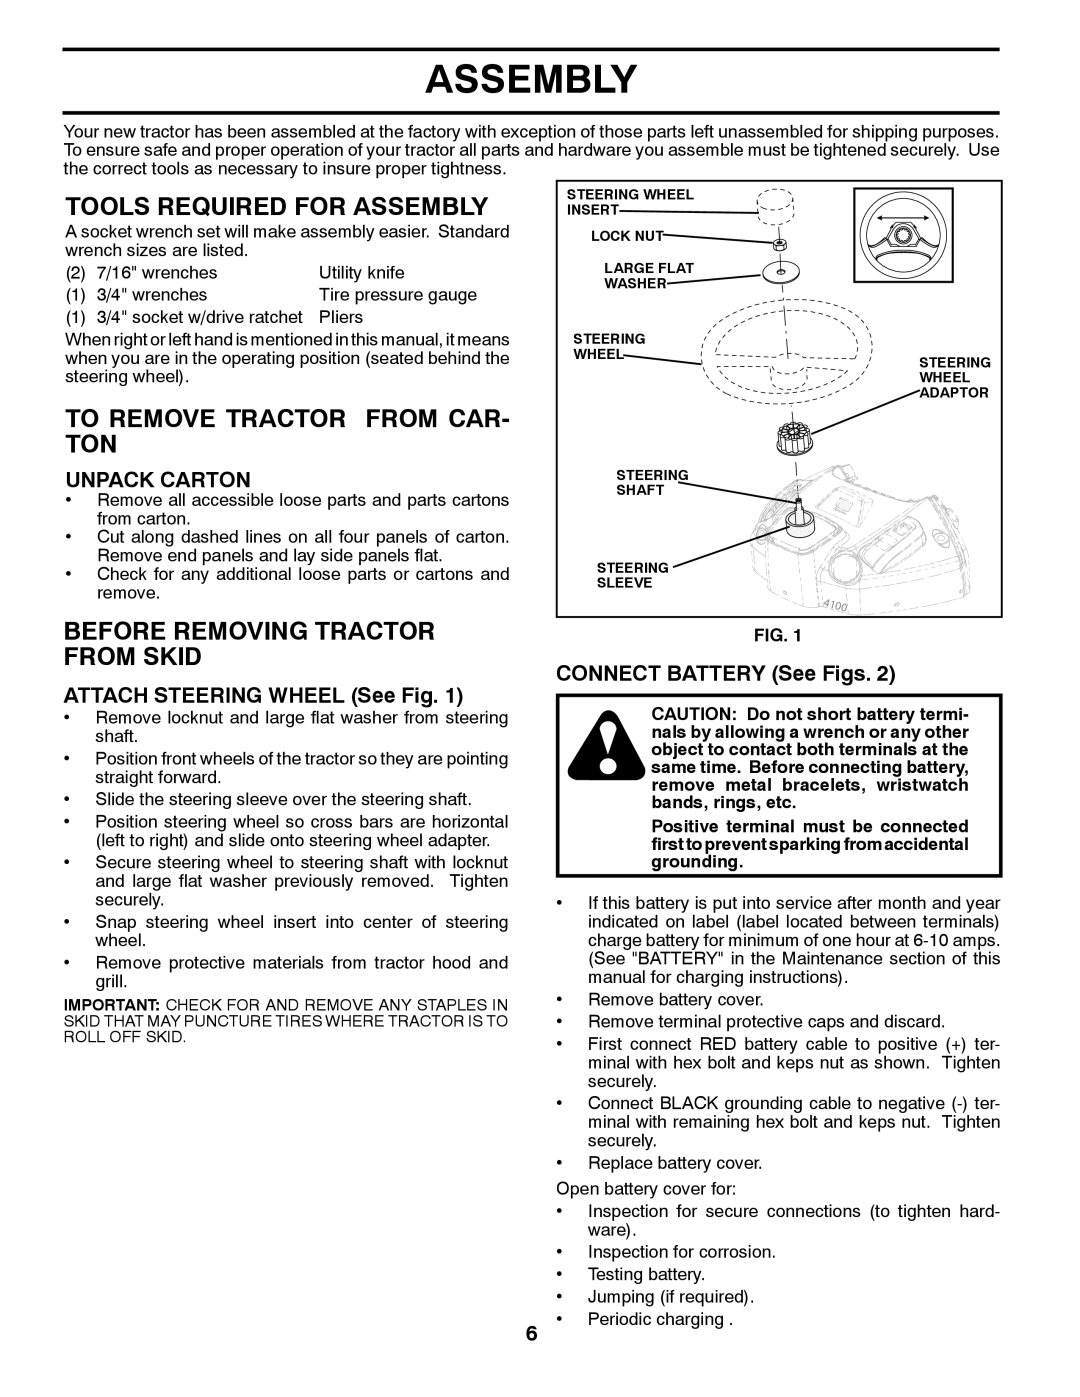
ATTACH STEERING WHEEL (See Fig. 1)

Remove locknut and large flat washer from steering shaft.

Position front wheels of the tractor so they are pointing straight forward.

Slide the steering sleeve over the steering shaft.

Position steering wheel so cross bars are horizontal (left to right) and slide onto steering wheel adapter.

Secure steering wheel to steering shaft with locknut and large flat washer previously removed. Tighten securely.

Snap steering wheel insert into center of steering wheel.

Remove protective materials from tractor hood and grill.

IMPORTANT: CHECK FOR AND REMOVE ANY STAPLES IN SKID THAT MAY PUNCTURE TIRES WHERE TRACTOR IS TO ROLL OFF SKID.

STEERING WHEEL


INSERT


LOCK NUT


LARGE FLAT


WASHER


STEERING


WHEEL

STEERING


WHEEL


ADAPTOR

STEERING


SHAFT


STEERING


SLEEVE


FIG. 1

CONNECT BATTERY (See Figs. 2)

CAUTION: Do not short battery termi- nals by allowing a wrench or any other object to contact both terminals at the same time. Before connecting battery, remove metal bracelets, wristwatch bands, rings, etc.

Positive terminal must be connected first to prevent sparking from accidental grounding.

If this battery is put into service after month and year indicated on label (label located between terminals) charge battery for minimum of one hour at 6-10 amps. (See "BATTERY" in the Maintenance section of this manual for charging instructions).

Remove battery cover.

Remove terminal protective caps and discard.

First connect RED battery cable to positive (+) ter- minal with hex bolt and keps nut as shown. Tighten securely.

Connect BLACK grounding cable to negative (-) ter- minal with remaining hex bolt and keps nut. Tighten securely.

Replace battery cover.

Open battery cover for:

Inspection for secure connections (to tighten hard- ware).

Inspection for corrosion.

Testing battery.

Jumping (if required).

6• Periodic charging .

Page 6
Image 6
Husqvarna CTH2036 Tools Required for Assembly, To Remove Tractor from CAR- TON, Before Removing Tractor from Skid

CTH2036 specifications

The Husqvarna CTH2036 is a robust and versatile ride-on mower designed for homeowners with medium to large lawns. It combines power, efficiency, and advanced technology to make your mowing experience pleasant and effective.

One of the standout features of the CTH2036 is its powerful engine. The mower is equipped with a reliable 19.5 HP Briggs & Stratton V-Twin engine, providing ample power to tackle various terrains. This engine is designed for smooth operation and excellent reliability, ensuring that users can maintain their lawns with minimal hassle.

The cutting deck of the CTH2036 is another highlight. It features a 36-inch cutting width, which allows for efficient mowing in larger spaces without the need for multiple passes. The deck is designed with a reinforced structure that enhances durability, ensuring it stands up to the rigors of frequent use. Additionally, the deck height can be easily adjusted, allowing users to customize their cut to suit different grass types and conditions, ranging from 1 to 4 inches.

User comfort is a critical aspect of the Husqvarna CTH2036. The mower boasts an ergonomic seat with an adjustable backrest, providing excellent support during longer mowing sessions. The steering wheel is designed for easy maneuverability, making it simple to navigate around flower beds, trees, and other obstacles.

Another innovative feature is the integrated mowing technology. The CTH2036 employs an efficient bagging system that collects clippings effectively, reducing the need for additional cleanup after mowing. The mower also supports side discharge for users who prefer that option, offering flexibility in lawn care preferences.

In terms of ease of use, the CTH2036 is equipped with a simple and intuitive control panel that allows users to operate all mowing functions easily. Moreover, it features a hydrostatic transmission, providing smooth acceleration and deceleration without the need for shifting gears.

Durability is a hallmark of the Husqvarna brand, and the CTH2036 is no exception. Built to withstand harsh weather conditions and regular wear, the mower features a solid chassis and high-quality components, ensuring long-lasting performance.

In summary, the Husqvarna CTH2036 is an impressive ride-on mower that combines power, reliability, and ease of use. Its powerful engine, efficient cutting deck, user-friendly design, and innovative technologies make it an ideal choice for homeowners looking to maintain their lawns with excellence and ease. Whether it’s for regular mowing or tackling challenging terrains, the CTH2036 ensures a satisfying lawn care experience.