ASSEMBLY
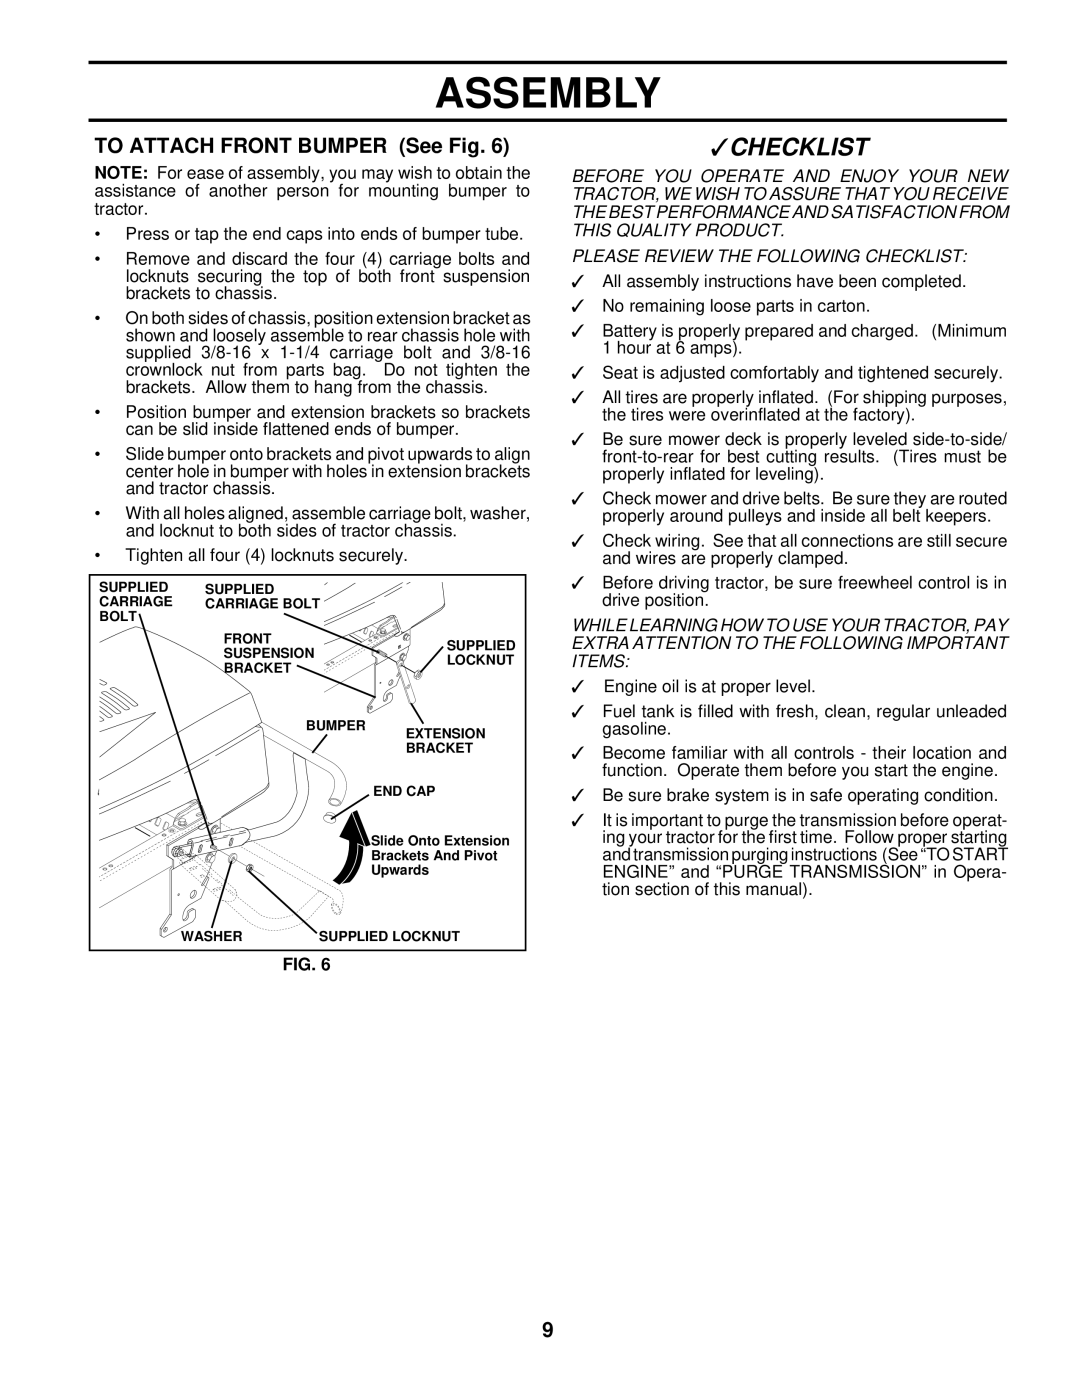
TO ATTACH FRONT BUMPER (See Fig. 6)
NOTE: For ease of assembly, you may wish to obtain the assistance of another person for mounting bumper to tractor.
•Press or tap the end caps into ends of bumper tube.
•Remove and discard the four (4) carriage bolts and locknuts securing the top of both front suspension brackets to chassis.
•On both sides of chassis, position extension bracket as shown and loosely assemble to rear chassis hole with supplied
•Position bumper and extension brackets so brackets can be slid inside flattened ends of bumper.
•Slide bumper onto brackets and pivot upwards to align center hole in bumper with holes in extension brackets and tractor chassis.
•With all holes aligned, assemble carriage bolt, washer, and locknut to both sides of tractor chassis.
•Tighten all four (4) locknuts securely.
SUPPLIED | SUPPLIED |
|
|
CARRIAGE | CARRIAGE BOLT |
| |
BOLT |
|
|
|
| FRONT |
| SUPPLIED |
| SUSPENSION | ||
| LOCKNUT | ||
| BRACKET |
| |
|
|
| |
|
| BUMPER | EXTENSION |
|
|
| |
|
|
| BRACKET |
|
|
| END CAP |
|
|
| Slide Onto Extension |
|
|
| Brackets And Pivot |
|
|
| Upwards |
| WASHER | SUPPLIED LOCKNUT | |
FIG. 6
✓CHECKLIST
BEFORE YOU OPERATE AND ENJOY YOUR NEW TRACTOR, WE WISH TO ASSURE THAT YOU RECEIVE THE BEST PERFORMANCE AND SATISFACTION FROM THIS QUALITY PRODUCT.
PLEASE REVIEW THE FOLLOWING CHECKLIST:
✓All assembly instructions have been completed.
✓No remaining loose parts in carton.
✓Battery is properly prepared and charged. (Minimum 1 hour at 6 amps).
✓Seat is adjusted comfortably and tightened securely.
✓All tires are properly inflated. (For shipping purposes, the tires were overinflated at the factory).
✓Be sure mower deck is properly leveled
✓Check mower and drive belts. Be sure they are routed properly around pulleys and inside all belt keepers.
✓Check wiring. See that all connections are still secure and wires are properly clamped.
✓Before driving tractor, be sure freewheel control is in drive position.
WHILE LEARNING HOW TO USE YOUR TRACTOR, PAY EXTRA ATTENTION TO THE FOLLOWING IMPORTANT ITEMS:
✓Engine oil is at proper level.
✓Fuel tank is filled with fresh, clean, regular unleaded gasoline.
✓Become familiar with all controls - their location and function. Operate them before you start the engine.
✓Be sure brake system is in safe operating condition.
✓It is important to purge the transmission before operat- ing your tractor for the first time. Follow proper starting and transmission purging instructions (See “TO START ENGINE” and “PURGE TRANSMISSION” in Opera- tion section of this manual).
9
