ASSEMBLY

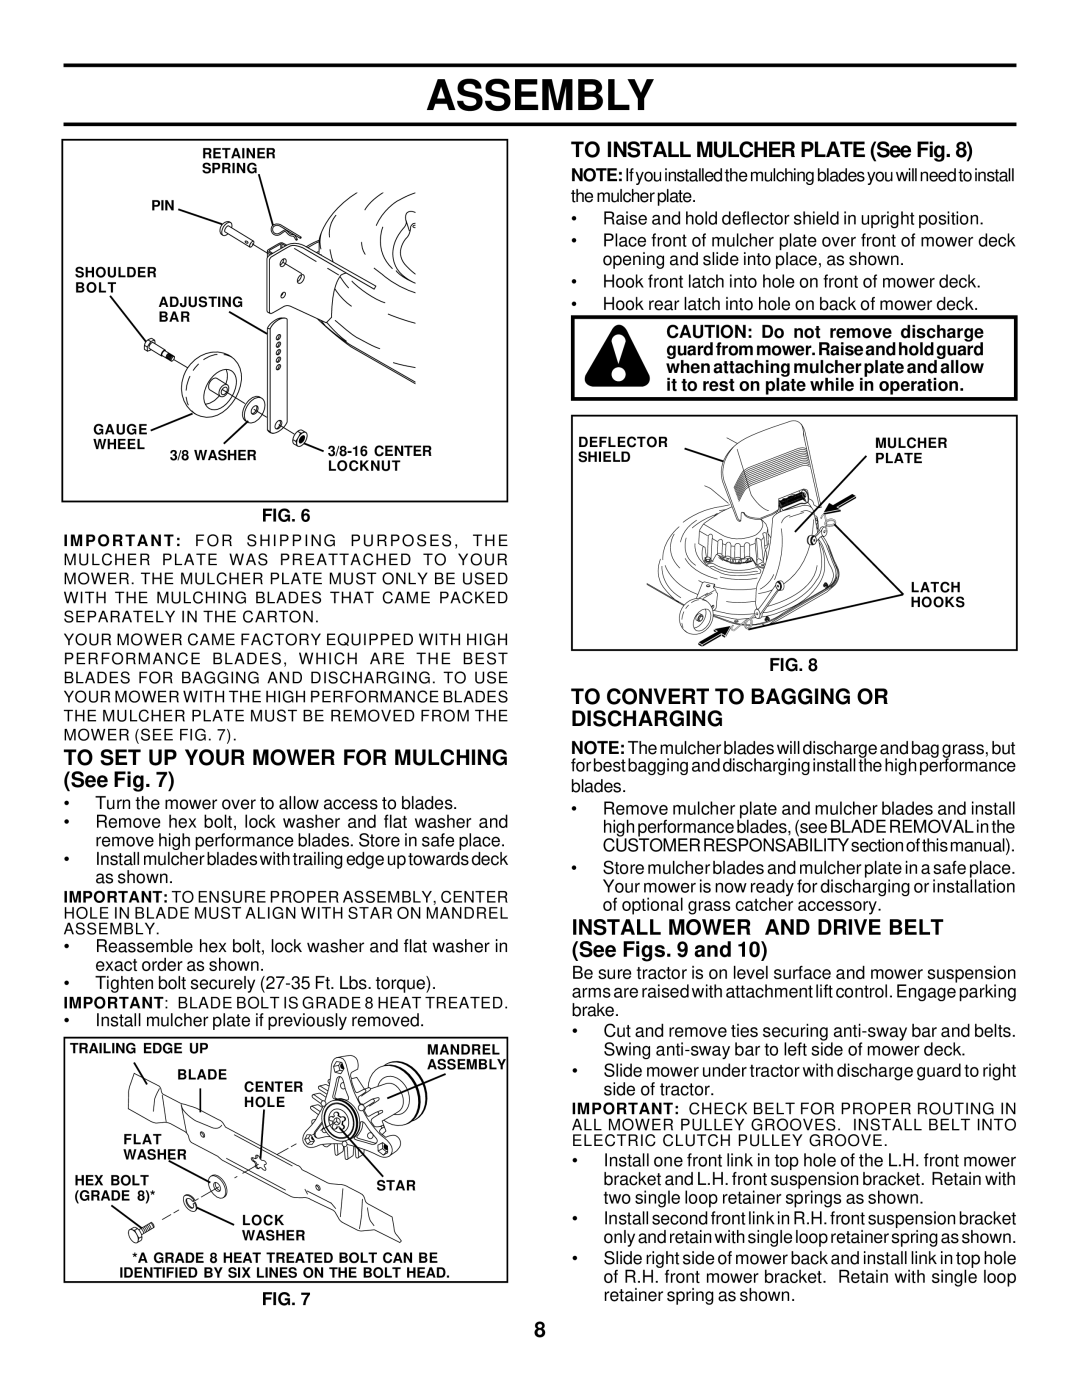
RETAINER

SPRING

PIN

SHOULDER

BOLT

ADJUSTING

BAR

GAUGE


WHEEL

3/8 WASHER

3/8-16 CENTER


LOCKNUT


FIG. 6

I M P O R T A N T : F O R S H I P P I N G P U R P O S E S , T H E MULCHER PLATE WAS PREATTACHED TO YOUR MOWER. THE MULCHER PLATE MUST ONLY BE USED WITH THE MULCHING BLADES THAT CAME PACKED SEPARATELY IN THE CARTON.

YOUR MOWER CAME FACTORY EQUIPPED WITH HIGH PERFORMANCE BLADES, WHICH ARE THE BEST BLADES FOR BAGGING AND DISCHARGING. TO USE YOUR MOWER WITH THE HIGH PERFORMANCE BLADES THE MULCHER PLATE MUST BE REMOVED FROM THE MOWER (SEE FIG. 7).

TO SET UP YOUR MOWER FOR MULCHING (See Fig. 7)

Turn the mower over to allow access to blades.

Remove hex bolt, lock washer and flat washer and remove high performance blades. Store in safe place.

Install mulcher blades with trailing edge up towards deck as shown.

IMPORTANT: TO ENSURE PROPER ASSEMBLY, CENTER HOLE IN BLADE MUST ALIGN WITH STAR ON MANDREL ASSEMBLY.

Reassemble hex bolt, lock washer and flat washer in exact order as shown.

Tighten bolt securely (27-35 Ft. Lbs. torque).

IMPORTANT: BLADE BOLT IS GRADE 8 HEAT TREATED.

Install mulcher plate if previously removed.

TRAILING EDGE UP

MANDREL

BLADE

ASSEMBLY

CENTER


HOLE

FLAT


WASHER


HEX BOLT

STAR

(GRADE 8)*


LOCK


WASHER

*A GRADE 8 HEAT TREATED BOLT CAN BE

IDENTIFIED BY SIX LINES ON THE BOLT HEAD.

FIG. 7

TO INSTALL MULCHER PLATE (See Fig. 8)

NOTE: Ifyouinstalledthemulchingbladesyouwillneedtoinstall the mulcher plate.

Raise and hold deflector shield in upright position.

Place front of mulcher plate over front of mower deck opening and slide into place, as shown.

Hook front latch into hole on front of mower deck.

Hook rear latch into hole on back of mower deck.

CAUTION: Do not remove discharge guard from mower. Raise and hold guard when attaching mulcher plate and allow it to rest on plate while in operation.

DEFLECTOR

MULCHER

SHIELD

PLATE


LATCH


HOOKS

FIG. 8

TO CONVERT TO BAGGING OR

DISCHARGING

NOTE: The mulcher blades will discharge and bag grass, but for best bagging and discharging install the high performance

blades.

Remove mulcher plate and mulcher blades and install high performance blades, (see BLADE REMOVAL in the CUSTOMERRESPONSABILITYsectionofthismanual).

Store mulcher blades and mulcher plate in a safe place. Your mower is now ready for discharging or installation of optional grass catcher accessory.

INSTALL MOWER AND DRIVE BELT (See Figs. 9 and 10)

Be sure tractor is on level surface and mower suspension arms are raised with attachment lift control. Engage parking brake.

Cut and remove ties securing anti-sway bar and belts. Swing anti-sway bar to left side of mower deck.

Slide mower under tractor with discharge guard to right side of tractor.

IMPORTANT: CHECK BELT FOR PROPER ROUTING IN ALL MOWER PULLEY GROOVES. INSTALL BELT INTO ELECTRIC CLUTCH PULLEY GROOVE.

Install one front link in top hole of the L.H. front mower bracket and L.H. front suspension bracket. Retain with two single loop retainer springs as shown.

Install second front link in R.H. front suspension bracket only and retain with single loop retainer spring as shown.

Slide right side of mower back and install link in top hole of R.H. front mower bracket. Retain with single loop retainer spring as shown.

8

Page 8
Image 8
Husqvarna GTH225 owner manual To SET UP Your Mower for Mulching See Fig, To Install Mulcher Plate See Fig

GTH225 specifications

The Husqvarna GTH225 is a standout riding mower designed for those who seek a blend of performance, comfort, and reliability in lawn care. Engineered for durability and versatility, this model is perfect for homeowners who manage medium to large yards.

At the heart of the GTH225 is a robust and efficient engine. Powered by a 22 HP Kohler engine, it delivers consistent performance for cutting even the toughest grass. The engine is designed to ensure smooth operation and offers the torque needed for impressive cutting power. Additionally, the hydrostatic transmission allows for seamless speed adjustments, providing an easy and responsive driving experience.

One of the key features of the Husqvarna GTH225 is its cutting deck, which spans a wide 48 inches. This substantial deck size means fewer passes are required to cover large areas, making lawn maintenance quicker and more efficient. The cutting height can be adjusted from 1.5 to 4 inches, catering to different grass types and seasonal growth patterns. The deck is also equipped with high-quality blades, which provide clean cuts and a professional finish.

Comfort is a major consideration with the GTH225. The operator's seat is well-cushioned and ergonomically designed, enabling users to mow for extended periods without discomfort. The steering wheel and controls are intuitively placed, ensuring that operation is user-friendly and requires minimal effort.

The Husqvarna GTH225 is also built to enhance maneuverability. With a tight turning radius, it easily navigates around obstacles like trees and flower beds. This agility is complemented by its durable construction, featuring a sturdy frame that can withstand the rigors of regular use.

Another innovative feature is the optional mulching kit, which enhances the mower's versatility. It allows for superior grass recycling, thereby enriching the lawn without the need for bagging clippings. Additionally, the model can be equipped with a tow hitch for added functionality, enabling users to attach various gardening tools or trailers.

In line with Husqvarna’s commitment to environmental sustainability, the GTH225 is designed with fuel efficiency in mind, helping homeowners reduce their carbon footprint while keeping their lawns pristine. Overall, the Husqvarna GTH225 combines advanced technology, comfort, and performance, making it a reliable choice for anyone serious about maintaining their outdoor space.