SERVICE AND ADJUSTMENTS

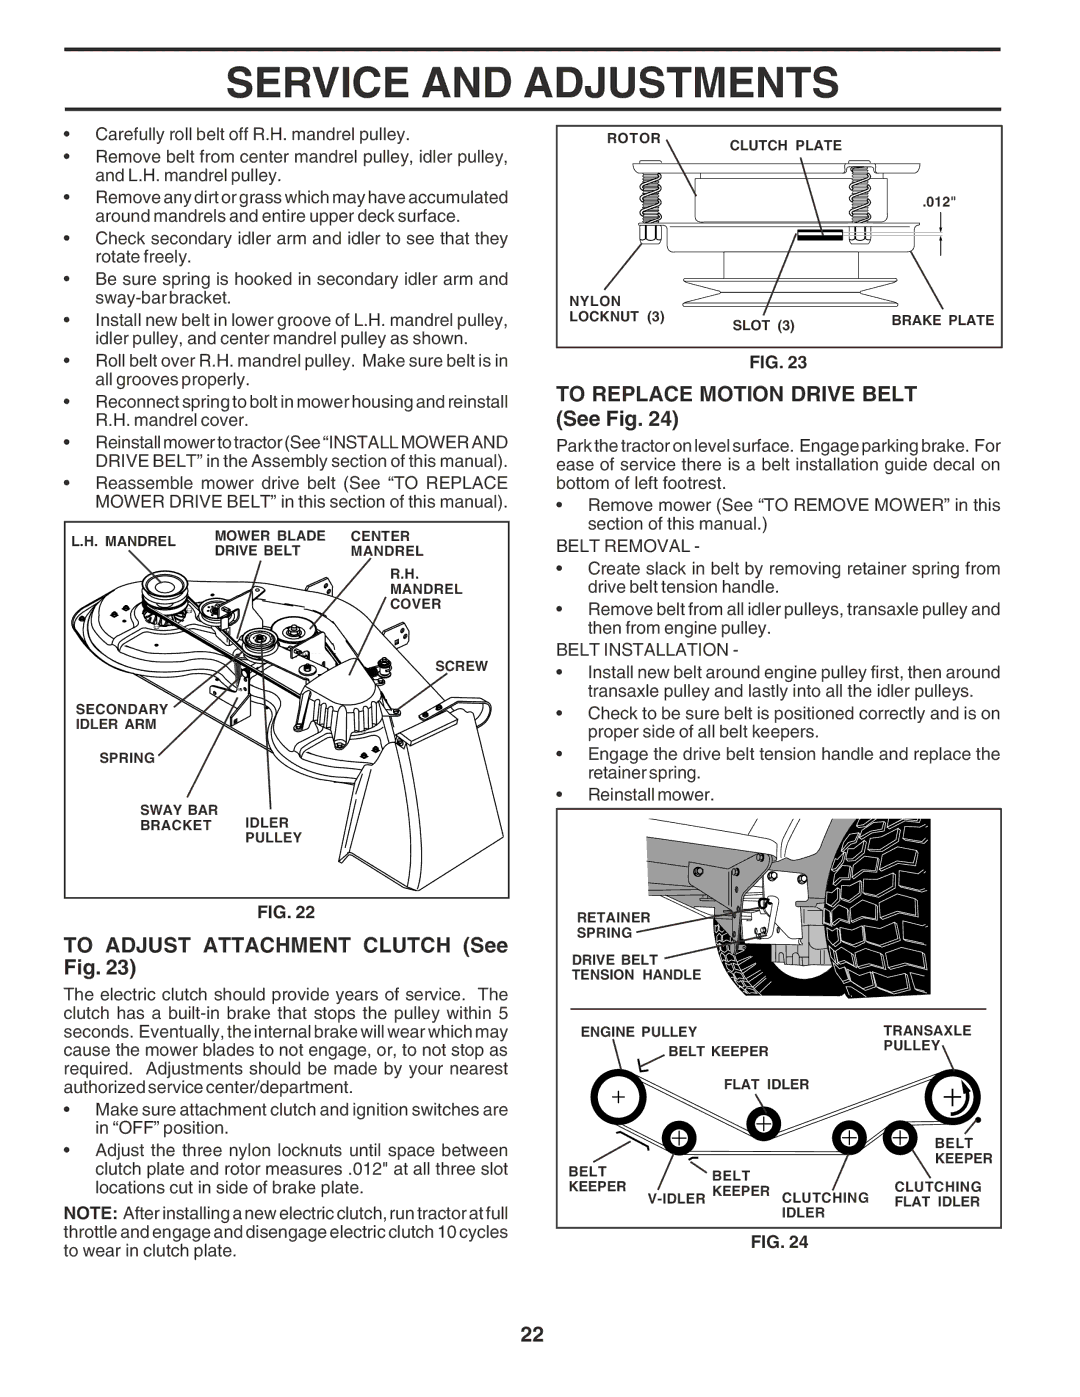
Carefully roll belt off R.H. mandrel pulley.

Remove belt from center mandrel pulley, idler pulley, and L.H. mandrel pulley.

Remove any dirt or grass which may have accumulated around mandrels and entire upper deck surface.

Check secondary idler arm and idler to see that they rotate freely.

Be sure spring is hooked in secondary idler arm and sway-bar bracket.

Install new belt in lower groove of L.H. mandrel pulley, idler pulley, and center mandrel pulley as shown.

Roll belt over R.H. mandrel pulley. Make sure belt is in all grooves properly.

Reconnect spring to bolt in mower housing and reinstall R.H. mandrel cover.

Reinstall mower to tractor (See “INSTALL MOWER AND DRIVE BELT” in the Assembly section of this manual).

Reassemble mower drive belt (See “TO REPLACE MOWER DRIVE BELT” in this section of this manual).

L.H. MANDREL

MOWER BLADE

CENTER

DRIVE BELT

MANDREL


R.H.


MANDREL


COVER


SCREW

SECONDARY


IDLER ARM


SPRING


SWAY BAR


BRACKET

IDLER


PULLEY


FIG. 22

TO ADJUST ATTACHMENT CLUTCH (See Fig. 23)

The electric clutch should provide years of service. The clutch has a built-in brake that stops the pulley within 5 seconds. Eventually, the internal brake will wear which may cause the mower blades to not engage, or, to not stop as required. Adjustments should be made by your nearest authorized service center/department.

Make sure attachment clutch and ignition switches are in “OFF” position.

Adjust the three nylon locknuts until space between clutch plate and rotor measures .012" at all three slot locations cut in side of brake plate.

NOTE: After installing a new electric clutch, run tractor at full throttle and engage and disengage electric clutch 10 cycles to wear in clutch plate.

ROTOR

CLUTCH PLATE


.012"

NYLON


LOCKNUT (3)

SLOT (3)

BRAKE PLATE


FIG. 23

TO REPLACE MOTION DRIVE BELT (See Fig. 24)

Park the tractor on level surface. Engage parking brake. For ease of service there is a belt installation guide decal on bottom of left footrest.

Remove mower (See “TO REMOVE MOWER” in this section of this manual.)

BELT REMOVAL -

Create slack in belt by removing retainer spring from drive belt tension handle.

Remove belt from all idler pulleys, transaxle pulley and then from engine pulley.

BELT INSTALLATION -

Install new belt around engine pulley first, then around transaxle pulley and lastly into all the idler pulleys.

Check to be sure belt is positioned correctly and is on proper side of all belt keepers.

Engage the drive belt tension handle and replace the retainer spring.

Reinstall mower.


RETAINER


SPRING


DRIVE BELT


TENSION HANDLE


ENGINE PULLEY


TRANSAXLE


BELT KEEPER


PULLEY


FLAT IDLER


BELT


BELT


KEEPER


BELT


KEEPER


CLUTCHING


KEEPER

CLUTCHING


V-IDLER

FLAT IDLER


IDLER


FIG. 24

22

Page 22
Image 22
Husqvarna GTH2350 owner manual To Adjust Attachment Clutch See Fig, To Replace Motion Drive Belt See Fig, Belt Removal

GTH2350 specifications

The Husqvarna GTH2350 is a robust and versatile garden tractor designed for homeowners seeking a reliable solution for lawn maintenance. This mower boasts an impressive combination of performance, comfort, and durability, making it a standout choice in its category.

Powered by a reliable Kohler engine, the GTH2350 delivers 23 horsepower, providing sufficient power to tackle a variety of terrains and mowing tasks. The engine's overhead valve design enhances fuel efficiency and reduces emissions, contributing positively to the environment while ensuring long-lasting performance.

One of the main features of the GTH2350 is its 50-inch cutting deck. This expansive deck allows for efficient mowing over large areas, reducing the time required to get the job done. The deck is made from durable materials, ensuring it can withstand the rigors of frequent use. Additionally, the cutting height can be easily adjusted to achieve the desired grass length, with multiple settings to accommodate different grass types and conditions.

The GTH2350 utilizes a hydrostatic transmission, which provides smooth and effortless operation. This technology allows the driver to move forward or backward without the need for changing gears, making mowing more intuitive and comfortable, especially when navigating tight spaces or uneven terrain.

For added comfort, the GTH2350 features an ergonomic seat with armrests, ensuring that operators can enjoy extended mowing sessions without discomfort. The conveniently placed controls allow for easy access and operation, enhancing the overall user experience.

Maneuverability is another strong point of the Husqvarna GTH2350. With its tight turning radius, users can easily navigate around trees, flower beds, and other obstacles, making it an ideal choice for intricately landscaped yards. Additionally, the tractor comes equipped with large, durable wheels that provide stability and traction, promoting safe operation on various surfaces.

In terms of attachment capabilities, the GTH2350 is designed to accommodate numerous accessories. Users can attach a bagger for efficient grass collection, a mulching kit for returning nutrients to the soil, or even snow removal equipment for winter use. This versatility allows for year-round usability, making it an excellent investment for homeowners.

In conclusion, the Husqvarna GTH2350 is a well-rounded garden tractor that offers powerful performance, comfort, and adaptability. Its reliable engine, hydrostatic transmission, and cutting versatility make it suitable for a wide range of mowing tasks, making it a dependable choice for any homeowner's lawn care needs.