Manuals
/
IBM
/
Computer Equipment
/
Computer Drive
IBM
48X-20X
manual
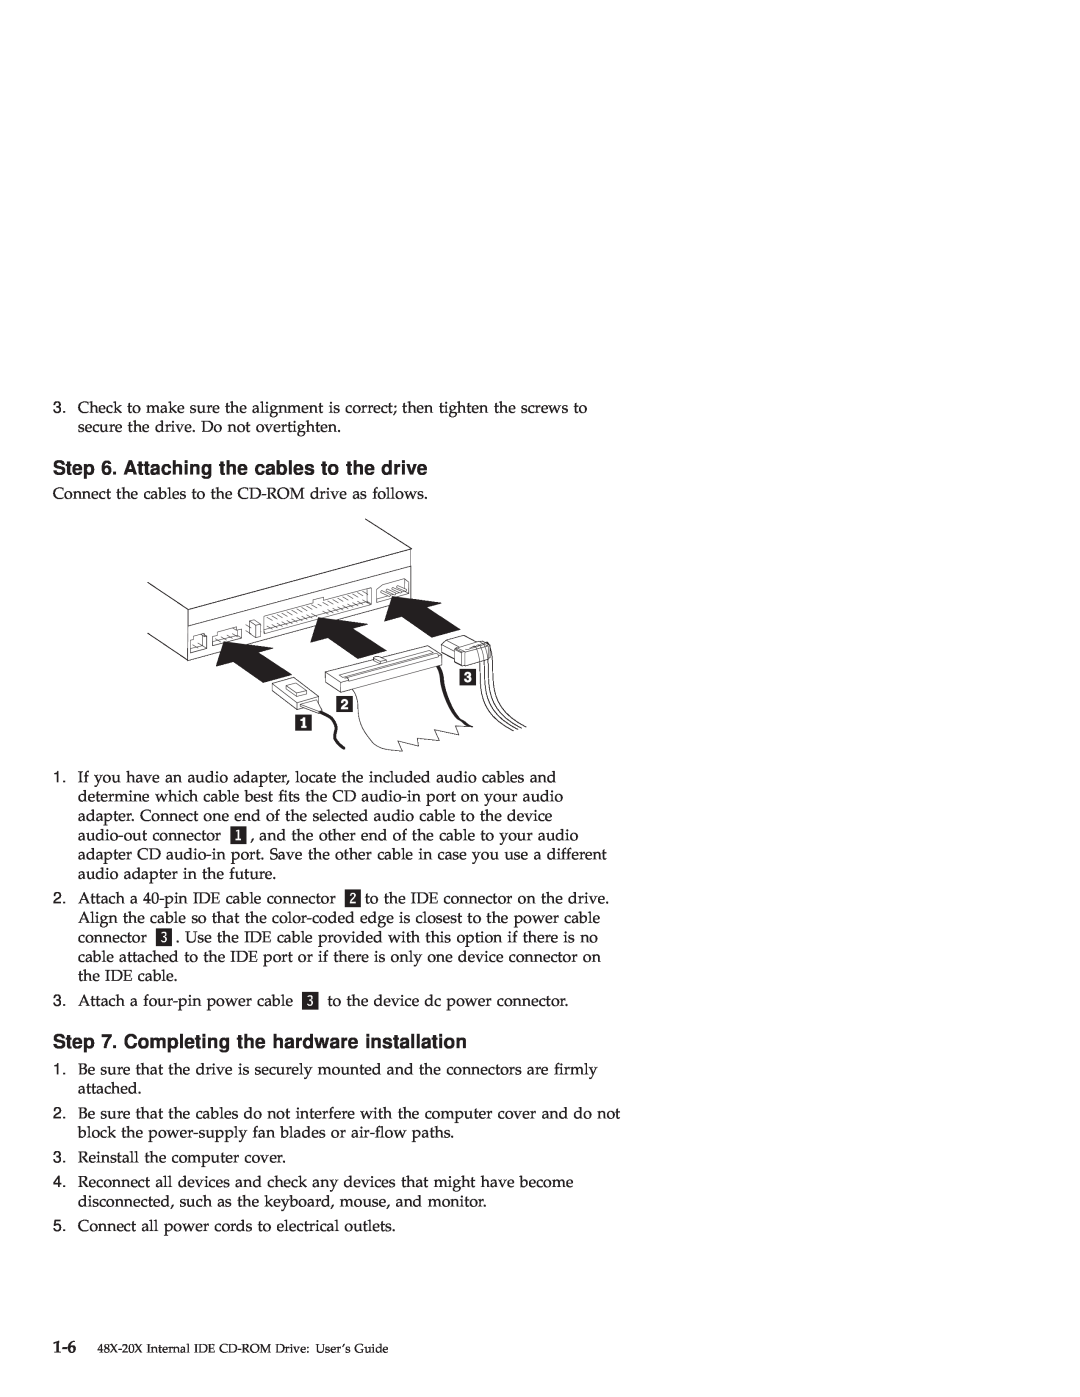
Attaching the cables to the drive, Completing the hardware installation
Models:
48X-20X
1
14
50
50
Download
50 pages
19.66 Kb
11
12
13
14
15
16
17
18
Install
Warranty
Appendix B. Problem solving
Safety
Warranty Service
Using a data CD
Page 14
Image 14
Page 13
Page 15
Page 14
Image 14
Page 13
Page 15
Contents
OPTIONS
48X-20X Internal IDE CD-ROM Drive
Users Guide
by IBM
First Edition September
Contents
iv 48X-20X Internal IDE CD-ROM Drive Users Guide
Registering your option
Part 1 Installation and users guide
About this book
Part 2 Appendixes
vi 48X-20X Internal IDE CD-ROM Drive Users Guide
Safety information
Antes de instalar este produto, leia as Informações sobre Segurança
Pred inštaláciou tohto zariadenia si pečítaje Bezpečnostné predpisy
Läs säkerhetsinformationen innan du installerar den här produkten
Antes de instalar este producto lea la información de seguridad
Before you begin
Part 1 Installation and users guide
Product description
System requirements
Handling instructions
«1¬Reserved
Back view of the drive
Front view of the drive
Step 2. Unpacking the drive
Installing the drive
Step 1. Opening the computer
Step 3. Selecting the IDE port
Step 4. Setting the configuration jumper
Step 5. Mounting the drive in the bay
Step 7. Completing the hardware installation
Step 6. Attaching the cables to the drive
Step 8. Updating your computer configuration
Step 9. Installing device drivers
Caring for the CD-ROM drive
Use and care of the drive
Caring for a CD
Loading a CD
To load a CD into a vertically mounted CD-ROM drive do the following
Playing an audio CD
Using a data CD
Manually ejecting a CD
Windows 95, Windows 98, Windows NT 4.0, Windows 2000, or Windows Me
3. Double-click My Computer
1. Click Start--Settings--Control Panel
Appendix A. Customizing device driver configuration settings
Changing the Windows 98 and Windows Me device-driver settings
Changing the Windows 2000 desktop device driver
7. Click the Advanced Settings tab
Appendix B. Problem solving
Problem descriptions
To verify that the icon is there do the following
Appendix B. Problem solving
1. Click Start -- Settings -- Control Panel
b. Click Properties
B-4 48X-20X Internal IDE CD-ROM Drive Users Guide
The CD cannot be read
The CD does not play sound
You receive a common error message
v CDR-101
v CDR-103
2. Select Properties
Telephone technical support
Appendix C. Help and service information
Online technical support
Canada all other
Support 24 hours a day, 7 days a week
Canada Toronto only
U.S.A. and Puerto Rico
Appendix D. Product warranties and notices
Warranty Statements
The IBM Warranty for Machines
WARRANTIES OF ANY KIND
Extent of Warranty
Items Not Covered by Warranty
OF ANY KIND
Warranty Service
D-4 48X-20X Internal IDE CD-ROM Drive Users Guide
Production Status
Limitation of Liability
The IBM Warranty for Machines
OF ANY KIND Warranty Service
D-6 48X-20X Internal IDE CD-ROM Drive Users Guide
Production Status
ASIA PACIFIC
AUSTRALIA The IBM Warranty for Machines The following paragraph is
Part 2 - Worldwide Country-Unique Terms
D-8 48X-20X Internal IDE CD-ROM Drive Users Guide
EUROPE, MIDDLE EAST, AFRICA EMEA
NEW ZEALAND The IBM Warranty for Machines The following paragraph
PEOPLES REPUBLIC OF CHINA Governing Law The following is added to
The following terms apply to all EMEA countries
The following terms apply to the country specified
D-11
D-12 48X-20X Internal IDE CD-ROM Drive Users Guide
UNITED STATES OF AMERICA Warranty Service The following is added to
NORTH AMERICA
Notices
D-13
Trademarks
48X-20X CD-ROM Drive
Federal Communications Commission FCC statement
D-15
Industry Canada Class B emission compliance statement
European Union - emission directive
Avis de conformite a la reglementation dIndustrie Canada
Deutsche EMV-Direktive electromagnetische Verträglichkeit
Union Européenne - Directive Conformité électromagnétique
Union Europea - Normativa EMC
D-17
Unione Europea - Directiva EMC Conformidad électromagnética
D-18 48X-20X Internal IDE CD-ROM Drive Users Guide
Page
1P P/N 10K3783
IBMR
Part Number 10K3783
Top
Page
Image
Contents