Manuals
/
InFocus
/
Computer Equipment
/
Projector
InFocus
IN3118HD Top view-On-screen Display OSD buttons and LEDs, DLP Projector - User’s Manual
Models:
IN3118HD
1
10
54
54
Download
54 pages
15.95 Kb
7
8
9
10
11
12
13
14
Troubleshooting
Specs
Install
Error codes
Signal
Presentation Timer
Symbols Used
Dimension
Maintenance
Image Problems
Page 10
Image 10
Page 9
Page 11
Page 10
Image 10
Page 9
Page 11
Contents
Page
Disclaimer
Copyright
Trademark Recognition
General Safety Information
Important Safety Information
Symbols Used
IN3118HD User’s Manual
Power Safety
Projector Installation Notice
Preface
About this Manual
Cleaning the Projector
Symbol Explanations
Replacing the Lamp
MAINTENANCE AND SECURITY
SETUP AND OPERATION
ON-SCREEN DISPLAY OSD MENU SETTINGS
TROUBLESHOOTING
PROJECTION DISTANCE VS. PROJECTION SIZE
PROJECTOR DIMENSIONS
SAFETY CERTIFICATIONS
TIMING MODE TABLE
GETTING STARTED
Packing Checklist
DLP Projector - User’s Manual
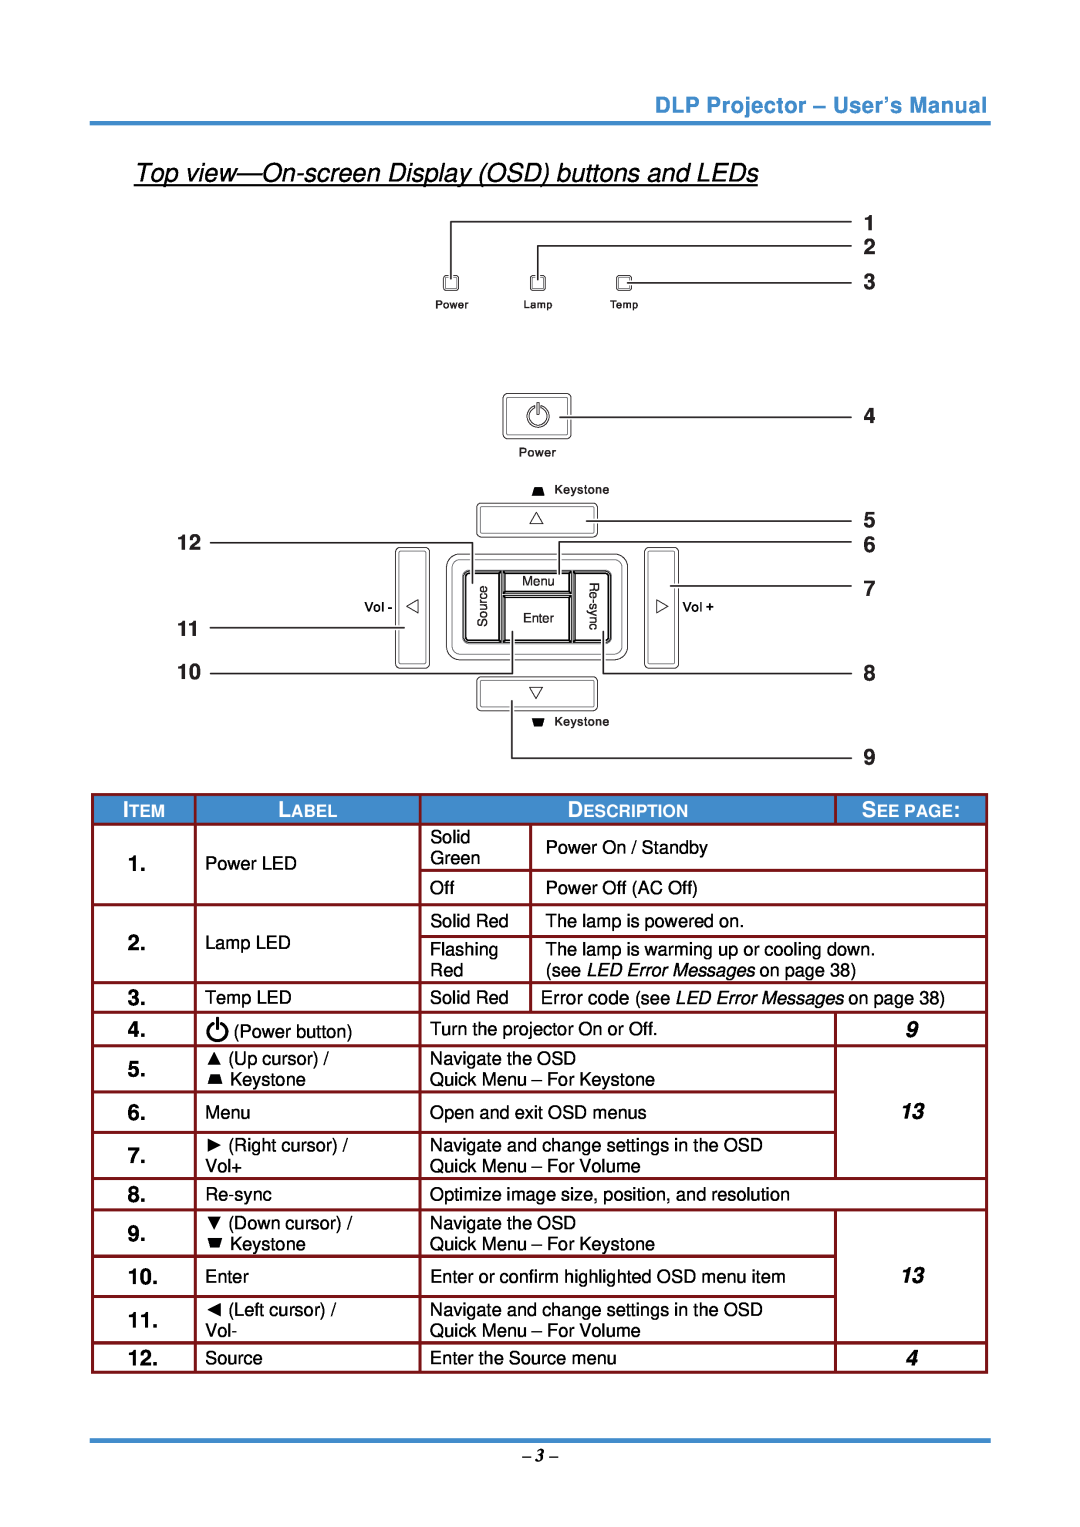
LABEL
Front-right View
Views of Projector Parts
DESCRIPTION
see LED Error Messages on page
Top view-On-screen Display OSD buttons and LEDs
Error code see LED Error Messages on page
DESCRIPTION
Rear view
LABEL
SEE PAGE
Bottom view
Remote Control Parts
Adjust overscan
SETUP AND OPERATION
Inserting the Remote Control Batteries
Starting and Shutting down the Projector
Adjusting the Projector Level
Adjusting the Zoom ring, Focus and Keystone
2. Use the Vol +/- buttons on the projector or the remote control
Adjusting the Volume
1. Press the Volume but- tons on the projector or the remote control
The volume control appears on the display
Navigating the OSD
ON-SCREEN DISPLAY OSD MENU SETTINGS
OSD Menu Controls
2. Press the cursor button until Language is highlighted
Setting the OSD Language
Set the OSD language to your preference before continuing
3. Press the cursor button until the language you want is selected
SETUP Advanced
OSD Menu Overview
SETUP Basic
PICTURE Basic
PICTUREBasic Menu
PICTUREAdvanced Menu
HSG Adjustment
Press the ENTER/SELECT button to enter the HSG Adjustment sub menu
Press to change values for settings
DISPLAY Menu
See PC Detail Adjustment on page
PC Detail Adjustment
SETUPBasic Menu
Press the ENTER/SELECT button to enter the Menu Settings sub menu
Menu Settings
Source
Press the ENTER/SELECT button to enter the Source sub menu
Lan Control Settings
Network State
DLP Projector - User’s Manual
Preparing Email Alerts
Select the alert conditions by checking the desired boxes
SETUPAdvanced Menu
Press the ENTER/SELECT button to enter the Audio sub menu
Audio
Lamp
Press the ENTER/SELECT button to enter the Lamp sub menu
Press the ENTER/SELECT button to enter the HDMI sub menu
HDMI
Closed Caption
Press the ENTER/SELECT button to enter the Closed Caption sub menu
Presentation Timer
STATUS Menu
MAINTENANCE AND SECURITY
Replacing the Projection Lamp
Remove the three screws from the lamp module
Remove the single screw on the lamp compartment cover
Remove the lamp com- partment cover
Lift the module handle up
6. Pull firmly on the module handle to remove the lamp module
Cleaning the Case
Cleaning the Lens
Cleaning the Projector
Common Problems and Solutions
TROUBLESHOOTING
Tips for Troubleshooting
Problem No image appears on the screen
LED Error Messages
Image Problems
Problem The image is blurred
Problem The image is streaked
Lamp Problems
Remote Control Problems
Problem The image is flat with no contrast
Problem There is no sound
Audio Problems
Having the Projector Serviced
Problem The sound is distorted
Q. How do I run HDMI cables longer than 10 meters?
HDMI Q & A
Q. How can I tell if a cable is an HDMI certified cable?
Model Display type Native Resolution Projection distance
SPECIFICATIONS
Specifications
Safety certification Operation temperature Dimensions W x D x H
169 SCREEN
Projection Distance and Size Table
Projection Distance vs. Projection Size
PROJECTION DISTANCE
V-S YNC
Timing Mode Table
H-S YNC
HDMI
V-S YNC
Projector Dimensions
FCC Warning
Safety Certifications
REGULATORY COMPLIANCE
Canada
Top
Page
Image
Contents