FIGURE 3 | Wall Mount Installation | FIGURE 4 |
|
| |||
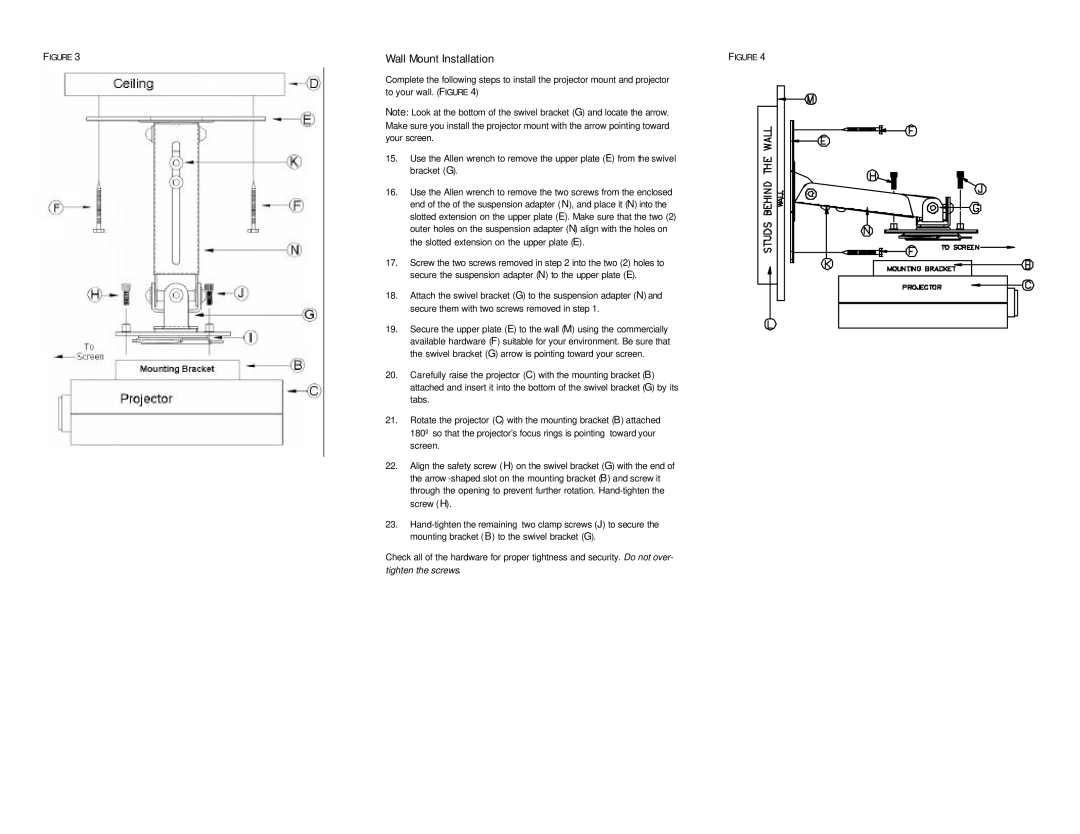
| Complete the following steps to install the projector mount and projector |
|
| ||||
| to your wall. (FIGURE 4) |
|
|
|
|
| |
| Note: Look at the bottom of the swivel bracket (G) and locate the arrow. |
|
|
|
| ||
|
|
|
|
| |||
| Make sure you install the projector mount with the arrow pointing toward |
|
|
|
| ||
| your screen. |
|
|
|
|
| |
| 15. | Use the Allen wrench to remove the upper plate (E) from the swivel |
|
|
|
| |
|
| bracket (G). |
|
|
|
|
|
| 16. | Use the Allen wrench to remove the two screws from the enclosed |
|
|
|
| |
|
| end of the of the suspension adapter ( N), and place it (N) into the |
|
|
|
| |
|
| slotted extension on the upper plate (E). Make sure that the two (2) |
|
|
|
| |
|
| outer holes on the suspension adapter (N) align with the holes on |
|
|
|
| |
|
| the slotted extension on the upper plate (E). |
|
|
|
|
|
| 17. | Screw the two screws removed in step 2 into the two (2) holes to |
|
|
|
| |
|
| secure the suspension adapter (N) to the upper plate (E). |
|
|
|
| |
|
|
|
|
|
| ||
|
|
|
|
|
|
| |
| 18. | Attach the swivel bracket (G) to the suspension adapter (N) and |
|
|
| ||
|
| secure them with two screws removed in step 1. |
|
|
|
|
|
|
|
|
|
|
| ||
|
|
|
|
|
| ||
| 19. | Secure the upper plate (E) to the wall (M) using the commercially |
|
|
| ||
|
|
|
| ||||
|
| available hardware (F) suitable for your environment. Be sure that |
|
| |||
|
| the swivel bracket (G) arrow is pointing toward your screen. |
|
| |||
| 20. | Carefully raise the projector (C) with the mounting bracket (B) |
|
| |||
|
| attached and insert it into the bottom of the swivel bracket (G) by its |
|
| |||
|
| tabs. |
|
|
|
|
|
| 21. | Rotate the projector (C) with the mounting bracket (B) attached |
|
| |||
|
| 180º so that the projector’s focus rings is pointing | toward your |
|
| ||
|
| screen. |
|
|
|
|
|
| 22. | Align the safety screw (H) on the swivel bracket (G) with the end of |
|
| |||
|
| the arrow |
|
| |||
|
| through the opening to prevent further rotation. |
|
| |||
|
| screw ( H). |
|
|
|
|
|
| 23. |
|
| ||||
|
| mounting bracket ( B) to the swivel bracket (G). |
|
|
|
|
|
Check all of the hardware for proper tightness and security. Do not over-
tighten the screws.