Positioning speakers


TV or Screen


Front

Sub-

Center

Front


speaker

woofer

speaker

speaker

speaker


Right

Left


Surround


Surround

speaker


speaker

Left


Listener

Right


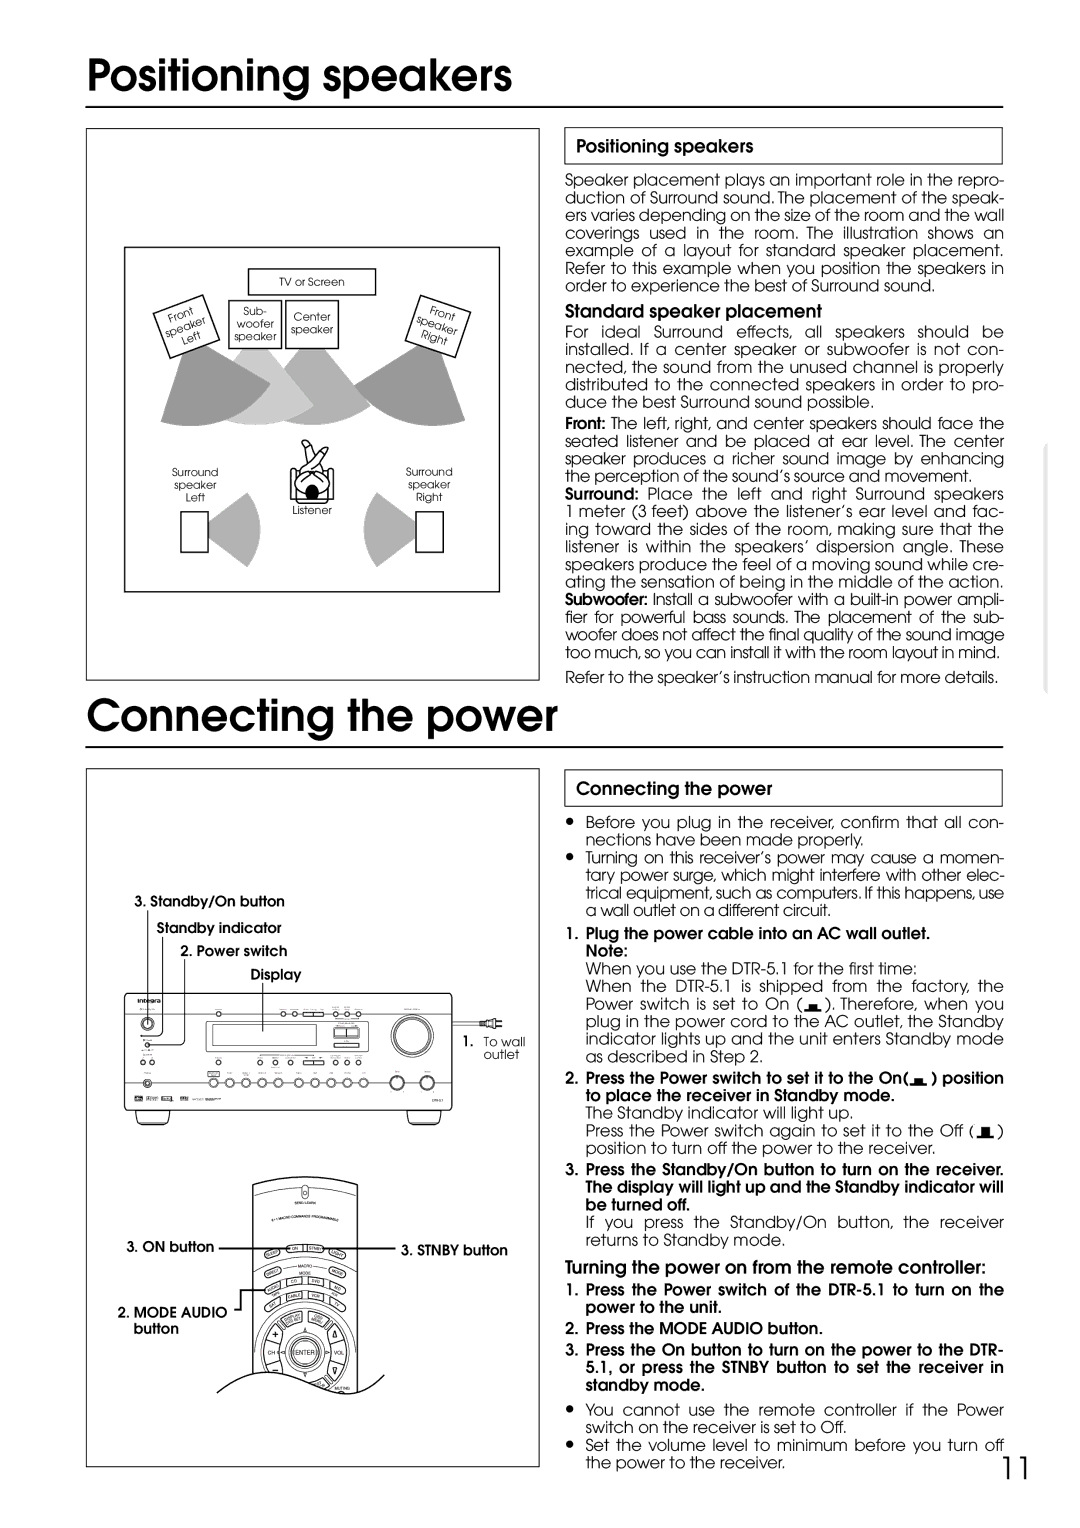
Positioning speakers

Speaker placement plays an important role in the repro- duction of Surround sound. The placement of the speak- ers varies depending on the size of the room and the wall coverings used in the room. The illustration shows an example of a layout for standard speaker placement. Refer to this example when you position the speakers in order to experience the best of Surround sound.

Standard speaker placement

For ideal Surround effects, all speakers should be installed. If a center speaker or subwoofer is not con- nected, the sound from the unused channel is properly distributed to the connected speakers in order to pro- duce the best Surround sound possible.

Front: The left, right, and center speakers should face the seated listener and be placed at ear level. The center speaker produces a richer sound image by enhancing the perception of the sound’s source and movement.

Surround: Place the left and right Surround speakers 1 meter (3 feet) above the listener’s ear level and fac- ing toward the sides of the room, making sure that the listener is within the speakers’ dispersion angle. These speakers produce the feel of a moving sound while cre- ating the sensation of being in the middle of the action. Subwoofer: Install a subwoofer with a built-in power ampli- fier for powerful bass sounds. The placement of the sub- woofer does not affect the final quality of the sound image too much, so you can install it with the room layout in mind.

Refer to the speaker’s instruction manual for more details.

Connecting the power

3. Standby/On button


Standby indicator


2. Power switch


Display


Standby/On


Digital/

SP/SYS


Dimmer


Memory

FM Mode

Down Tuning

Up

Analog

Setup

CH Level


Master Volume


Mode


Preset/Mode ADJ


Down

Up


Standby


1.

To wall

Power


Enter


On Off


Speakers


Listening Mode


Late Night/


LFE Level


outlet

A B

Display


Stereo

/DTS 5 CH Stereo

DSP


Front Effect

Re-EQ

Control


Surround


Phones

Multi CH

DVD

Video 1 Video 2

Video 3

Tape

FM


AM

Phono

CD

Bass

Treble


Input


VCR


3. ON button


3. STNBY button

2. MODE AUDIO


button


Connecting the power

Before you plug in the receiver, confirm that all con- nections have been made properly.

Turning on this receiver’s power may cause a momen- tary power surge, which might interfere with other elec- trical equipment, such as computers. If this happens, use a wall outlet on a different circuit.

1.Plug the power cable into an AC wall outlet. Note:

When you use the DTR-5.1 for the first time:

When the DTR-5.1 is shipped from the factory, the Power switch is set to On ( ). Therefore, when you plug in the power cord to the AC outlet, the Standby indicator lights up and the unit enters Standby mode as described in Step 2.

2.Press the Power switch to set it to the On( ) position

to place the receiver in Standby mode. The Standby indicator will light up.

Press the Power switch again to set it to the Off ) position to turn off the power to the receiver.

3.Press the Standby/On button to turn on the receiver. The display will light up and the Standby indicator will be turned off.

If you press the Standby/On button, the receiver returns to Standby mode.

Turning the power on from the remote controller:

1.Press the Power switch of the DTR-5.1 to turn on the power to the unit.

2.Press the MODE AUDIO button.

3.Press the On button to turn on the power to the DTR- 5.1, or press the STNBY button to set the receiver in standby mode.

You cannot use the remote controller if the Power switch on the receiver is set to Off.

Set the volume level to minimum before you turn off

the power to the receiver.

11


Page 11
Image 11
Integra DTR-5.1 appendix Positioning speakers, Connecting the power

DTR-5.1 specifications

The Integra DTR-5.1 is a high-performance AV receiver that caters to audiophiles and home theater enthusiasts. Known for its powerful sound and versatile features, the DTR-5.1 stands out in a crowded market of home theater equipment.

One of the main features of the Integra DTR-5.1 is its robust amplification system. With 7.1 channels of power, it delivers impressive sound clarity and depth across all audio formats. The unit is equipped with 100 watts per channel. This powerful output allows users to enjoy dynamic music and movie soundtracks with the kind of fidelity that brings an immersive experience to the living room.

The DTR-5.1 supports various surround sound formats, including Dolby Digital EX, DTS-ES, and Neo:6. Its ability to decode multi-channel audio formats provides an expansive soundstage, enveloping listeners in rich soundscapes. For those interested in music, the unit offers built-in equalization settings and multiple sound field modes, accommodating different preferences and listening environments.

In terms of connectivity, the Integra DTR-5.1 is loaded with features. It includes multiple HDMI inputs, allowing users to connect various devices such as Blu-ray players, gaming consoles, and streaming devices. The presence of component, composite, and optical inputs ensures compatibility with older equipment, making it a versatile choice for any setup. The receiver supports video scaling, enabling upscaling of lower-resolution video sources to 1080p for improved picture quality on high-definition displays.

The DTR-5.1 features proprietary technologies that enhance its overall performance. The Wide Range Amplification Technology (WRAT) ensures low distortion at high volumes, while the Automatic Speaker Setup system simplifies the process of calibrating speaker levels and delays, ensuring optimal audio performance in any room layout.

Additionally, the Integra DTR-5.1 is built with a solid chassis that reduces interference, promoting cleaner sound. Its user-friendly interface and remote control provide straightforward operation, making it accessible for users of all experience levels.

In conclusion, the Integra DTR-5.1 combines powerful amplification, versatile connectivity, and advanced audio technologies, making it a remarkable choice for anyone looking to elevate their home entertainment system. With its capacity to deliver stunning sound quality and support for a wide range of audio formats, the DTR-5.1 is a flagship model that truly enhances the audio-visual experience.