Control Position and Names
Front Panel
For operational instructions, see the page indicated in brackets [ ].
1 2 | 3 | 4 | 5 |
| 6 | 7 | ||||||||
|
|
|
|
|
|
|
|
|
|
|
|
|
|
|
|
|
|
|
|
|
|
|
|
|
|
|
|
|
|
|
|
|
|
|
|
|
|
|
|
|
|
|
|
|
|
|
|
|
|
|
|
|
|
|
|
|
|
|
|
|
|
|
|
|
|
|
|
|
|
|
|
|
|
|
|
|
|
|
|
|
|
|
|
|
|
|
|
|
|
|
|
|
|
|
|
|
|
|
|
|
|
|
|
|
|
|
|
|
|
|
|
|
|
|
|
|
|
|
|
|
|
|
|
|
|
|
|
|
|
|
|
|
|
|
8 | 9 | 0 | - |
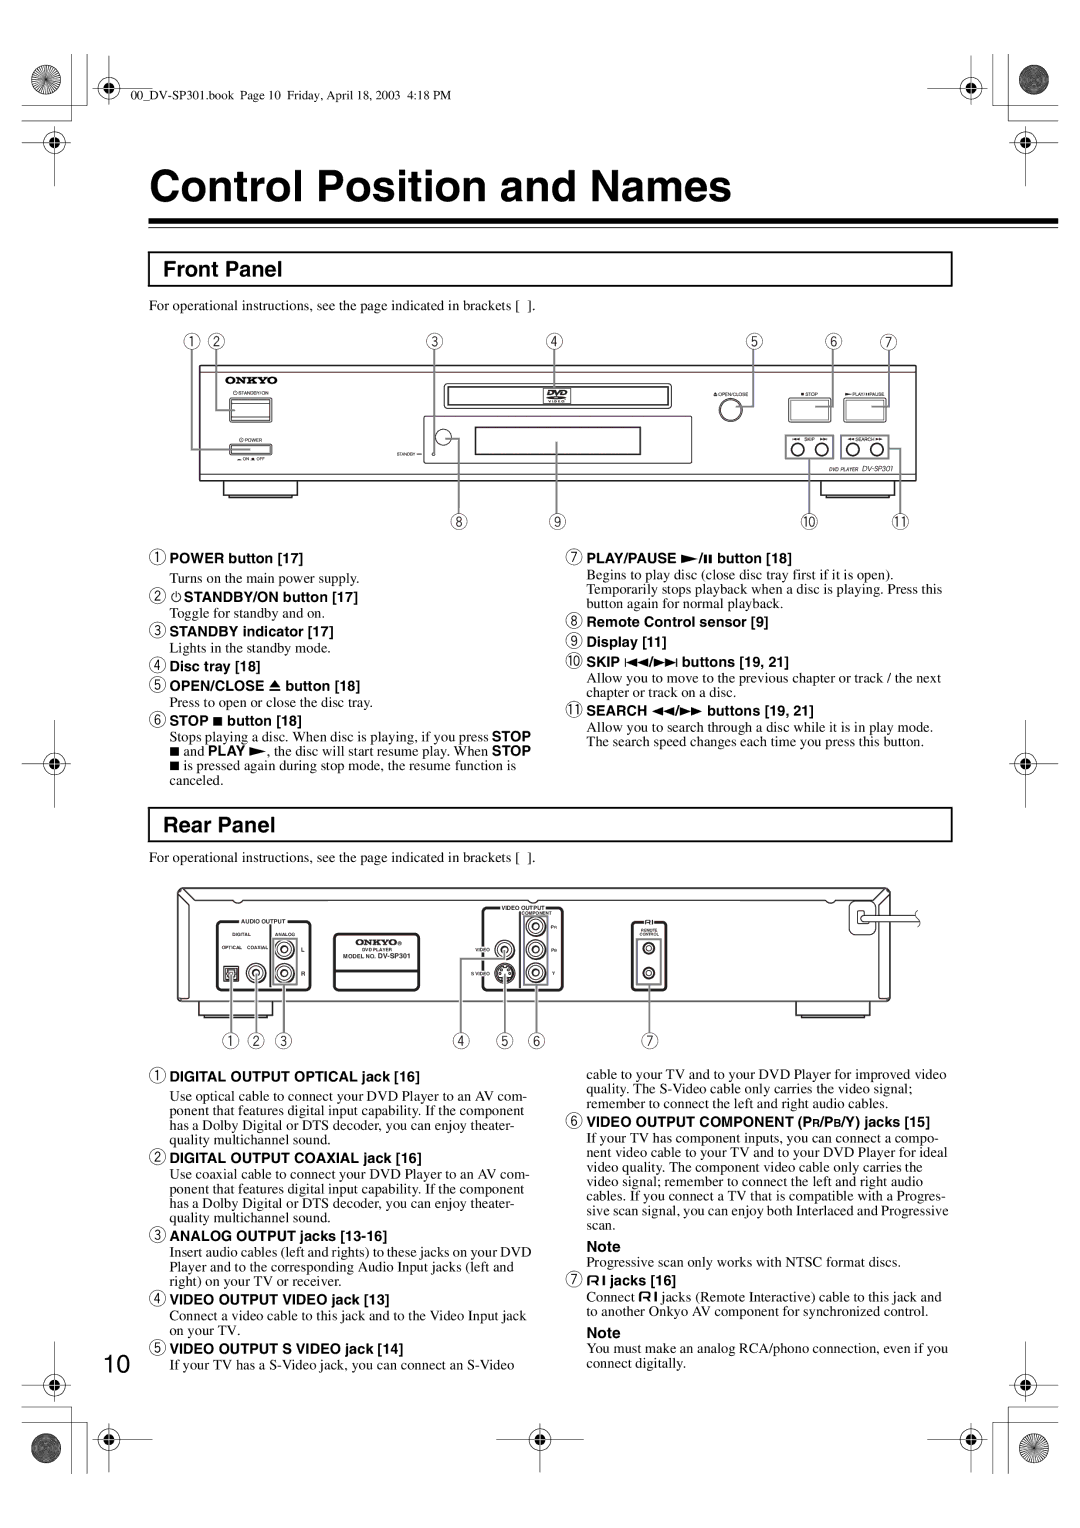
1POWER button [17]
Turns on the main power supply.
2 ![]() STANDBY/ON button [17]
STANDBY/ON button [17]
Toggle for standby and on.
3STANDBY indicator [17]
Lights in the standby mode.
4Disc tray [18]
5OPEN/CLOSE 0 button [18]
Press to open or close the disc tray.
6STOP 7 button [18]
Stops playing a disc. When disc is playing, if you press STOP 7 and PLAY £, the disc will start resume play. When STOP 7 is pressed again during stop mode, the resume function is canceled.
7PLAY/PAUSE £/8 button [18]
Begins to play disc (close disc tray first if it is open). Temporarily stops playback when a disc is playing. Press this button again for normal playback.
8Remote Control sensor [9]
9 Display [11]
0SKIP 4/¢ buttons [19, 21]
Allow you to move to the previous chapter or track / the next chapter or track on a disc.
-SEARCH 1/¡ buttons [19, 21]
Allow you to search through a disc while it is in play mode. The search speed changes each time you press this button.
Rear Panel
For operational instructions, see the page indicated in brackets [ ].
|
|
|
| VIDEO OUTPUT |
|
|
|
| COMPONENT |
AUDIO OUTPUT |
|
| PR | |
|
|
|
| |
DIGITAL | ANALOG |
|
| REMOTE |
|
| CONTROL | ||
OPTICAL COAXIAL | L | DVD PLAYER | VIDEO | PB |
| ||||
MODEL NO.
R | S VIDEO |
Y
|
| 1 2 3 | 4 | 5 6 | |
|
| 1 DIGITAL OUTPUT OPTICAL jack [16] |
|
| |
|
|
| Use optical cable to connect your DVD Player to an AV com- | ||
|
|
| ponent that features digital input capability. If the component | ||
|
|
| has a Dolby Digital or DTS decoder, you can enjoy theater- | ||
|
|
| quality multichannel sound. |
|
|
|
| 2 DIGITAL OUTPUT COAXIAL jack [16] |
|
| |
|
|
| Use coaxial cable to connect your DVD Player to an AV com- | ||
|
|
| ponent that features digital input capability. If the component | ||
|
|
| has a Dolby Digital or DTS decoder, you can enjoy theater- | ||
|
|
| quality multichannel sound. |
|
|
|
| 3 ANALOG OUTPUT jacks |
|
| |
|
|
| Insert audio cables (left and rights) to these jacks on your DVD | ||
|
|
| Player and to the corresponding Audio Input jacks (left and | ||
|
|
| right) on your TV or receiver. |
|
|
|
| 4 VIDEO OUTPUT VIDEO jack [13] |
|
| |
|
|
| Connect a video cable to this jack and to the Video Input jack | ||
|
|
| on your TV. |
|
|
10 | 5 VIDEO OUTPUT S VIDEO jack [14] |
|
| ||
| If your TV has a | ||||
|
|
|
|
|
|
|
|
|
|
|
|
|
|
|
|
|
|
7
cable to your TV and to your DVD Player for improved video quality. The
6VIDEO OUTPUT COMPONENT (PR/PB/Y) jacks [15]
If your TV has component inputs, you can connect a compo- nent video cable to your TV and to your DVD Player for ideal video quality. The component video cable only carries the video signal; remember to connect the left and right audio cables. If you connect a TV that is compatible with a Progres- sive scan signal, you can enjoy both Interlaced and Progressive scan.
Note
Progressive scan only works with NTSC format discs.
7 z jacks [16]
Connect zjacks (Remote Interactive) cable to this jack and to another Onkyo AV component for synchronized control.
Note
You must make an analog RCA/phono connection, even if you connect digitally.