Special Maintenance

Occasionally, it is necessary to maintain or replace some parts that are subject to wear and tear. Specific instructions are given below for each type of maintenance.

Before carrying out maintenance, switch off the power supply to the cooker and close the gas taps.

Removing the oven door

The oven door can be removed completely to make cleaning the oven easier. Though this is possible, the door is heavy, therefore this job should only be carried out by someone with the strength to lift and carry the door. It also requires a little expertise to refit it. If you are not you will be able to do this, we recommend that you clean the oven doors without removing them. In certain circumstances, you contact the nearest authorized service centre (see "Repairs - After Sales Service" on page 27).

To remove the door, proceed as follows:

Open the oven door fully and release the safety catches on the hinges (one for each hinge) by lifting them (A) (see diagram below) back towards the oven door.

Partially close the door until there is no more load tension on the springs (the door will form an angle of about 30°).

Using both hands, grip the oven door on each side and close the door whilst simultaneously lifting it upwards.

Pull the lower part of the door towards you to release the hinges (B, see diagram below) from their seats.

If you need to clean between the panes of glass, turn the door upside down (see diagram below), slide a soft bottle brush into the space between the glass panes and brush gently.


$

ƒ

$

$

%


%

To refit the oven door, carry out the above


instructions the reverse. When the hinges

$

(B) are back in their seats, lower the oven

door fully down and lower the safety catches


on each hinge securely back in place (A)


CAUTION: After refitting the door, always be sure to refit the hinge safety catches.

Removing the shelf supports

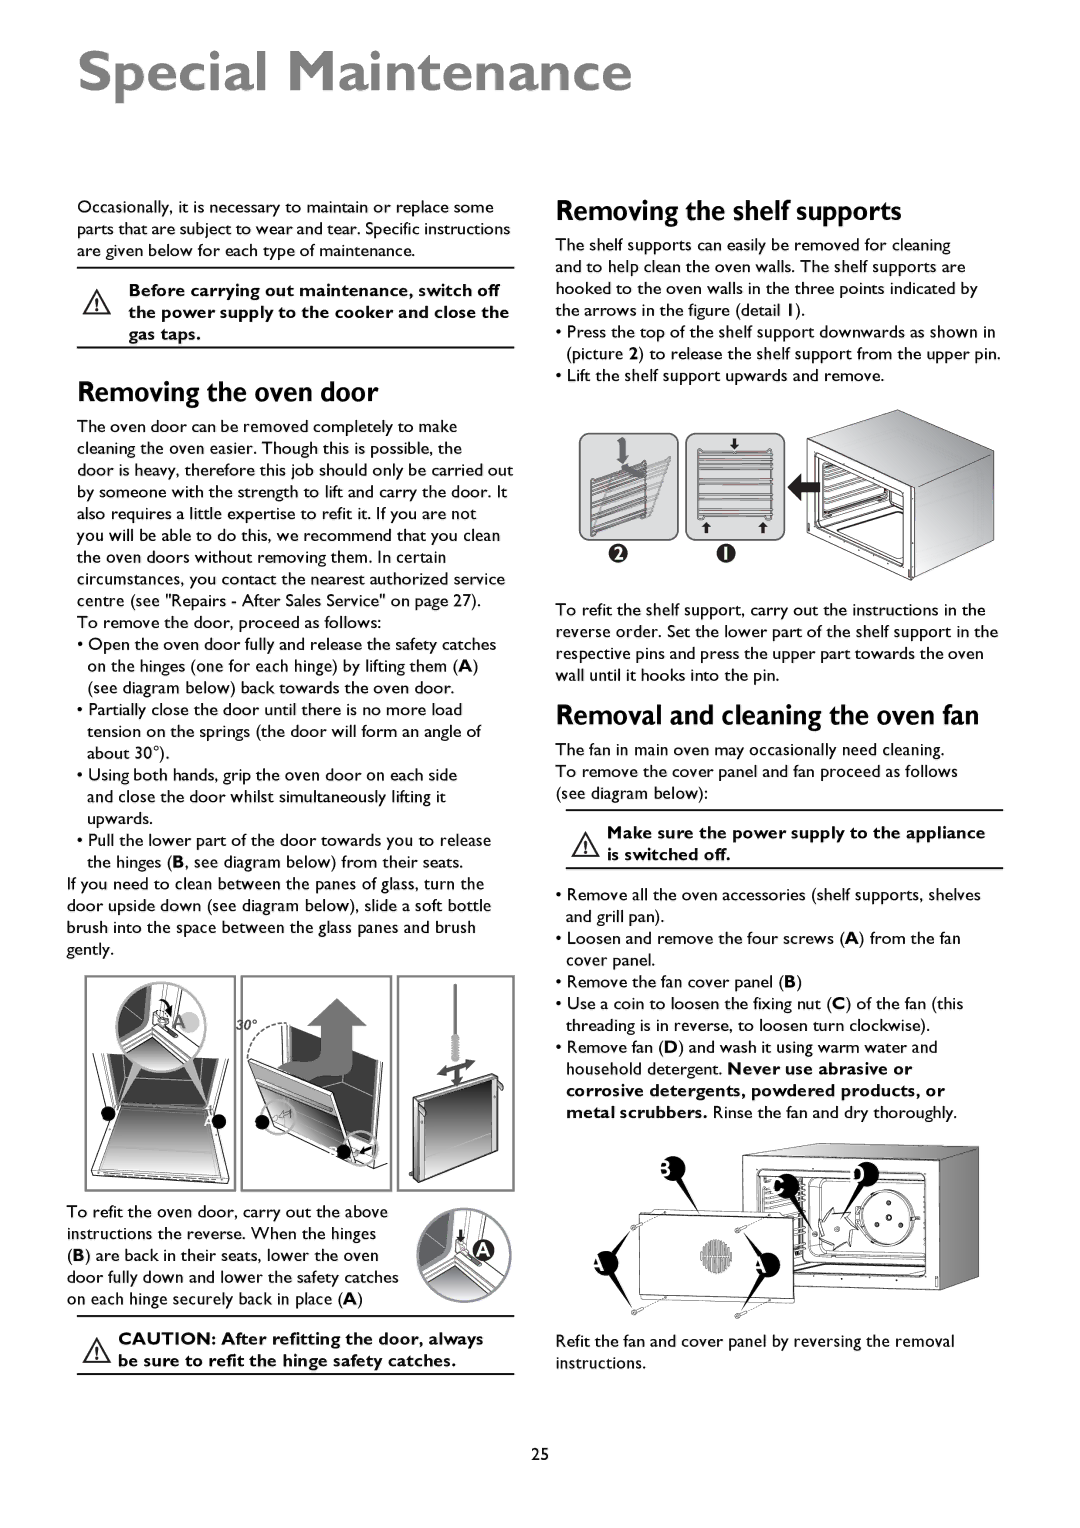
The shelf supports can easily be removed for cleaning and to help clean the oven walls. The shelf supports are hooked to the oven walls in the three points indicated by the arrows in the figure (detail 1).

Press the top of the shelf support downwards as shown in (picture 2) to release the shelf support from the upper pin.

Lift the shelf support upwards and remove.


To refit the shelf support, carry out the instructions in the reverse order. Set the lower part of the shelf support in the respective pins and press the upper part towards the oven wall until it hooks into the pin.

Removal and cleaning the oven fan

The fan in main oven may occasionally need cleaning. To remove the cover panel and fan proceed as follows (see diagram below):

Make sure the power supply to the appliance is switched off.

Remove all the oven accessories (shelf supports, shelves and grill pan).

Loosen and remove the four screws (A) from the fan cover panel.

Remove the fan cover panel (B)

Use a coin to loosen the fixing nut (C) of the fan (this threading is in reverse, to loosen turn clockwise).

Remove fan (D) and wash it using warm water and household detergent. Never use abrasive or corrosive detergents, powdered products, or metal scrubbers. Rinse the fan and dry thoroughly.

%

&

'


$$

Refit the fan and cover panel by reversing the removal instructions.

25

Page 25
Image 25
John Lewis JLRC101 instruction manual Special Maintenance, Removing the oven door, Removing the shelf supports

JLRC101 specifications

The John Lewis JLRC101 is an exceptional robotic vacuum cleaner that offers a blend of advanced technology and user-friendly design, making it a fantastic addition to any home. Renowned for its efficient cleaning capabilities, the JLRC101 is perfect for tackling dust, dirt, and pet hair, ensuring your floors remain spotless with minimal effort.

One of the standout features of the JLRC101 is its powerful suction technology. Equipped with a robust motor, this robotic vacuum can easily pick up debris from both hard floors and carpets. Its smart suction adjustment mechanism allows the vacuum to adapt its suction power based on the surface it’s cleaning, optimizing performance and battery life.

The JLRC101 also features advanced navigation technology, including a combination of LIDAR and infrared sensors. This enables the vacuum to create a detailed map of your home, allowing it to plan the most efficient cleaning route. It can navigate around furniture and avoid obstacles, ensuring a thorough clean without getting stuck. With a slim profile, the JLRC101 can easily access hard-to-reach areas, including under beds and couches.

Another impressive characteristic of the JLRC101 is its programmable scheduling feature. Users can set specific cleaning times, allowing the vacuum to operate automatically even when it's not in use. This is particularly convenient for busy households, as it ensures that cleaning is taken care of without supervision.

The JLRC101 comes with a user-friendly app that provides real-time monitoring and control. Users can start, stop, or schedule cleans directly from their smartphones, offering flexibility and convenience. The app also allows users to customize cleaning settings and receive notifications, enhancing the overall cleaning experience.

Battery life is another area where the JLRC101 excels. It features a high-capacity lithium-ion battery that provides long run times, ensuring that it can cover larger areas on a single charge. When the battery runs low, the JLRC101 can automatically return to its charging dock, ensuring it's always ready for the next cleaning session.

In summary, the John Lewis JLRC101 embodies cutting-edge cleaning technology, impressive suction power, advanced navigation, and user-friendly features. With its ability to adapt to various floor types, schedule cleaning sessions, and integrate with smart devices, the JLRC101 is designed to make your cleaning routine easier and more effective.