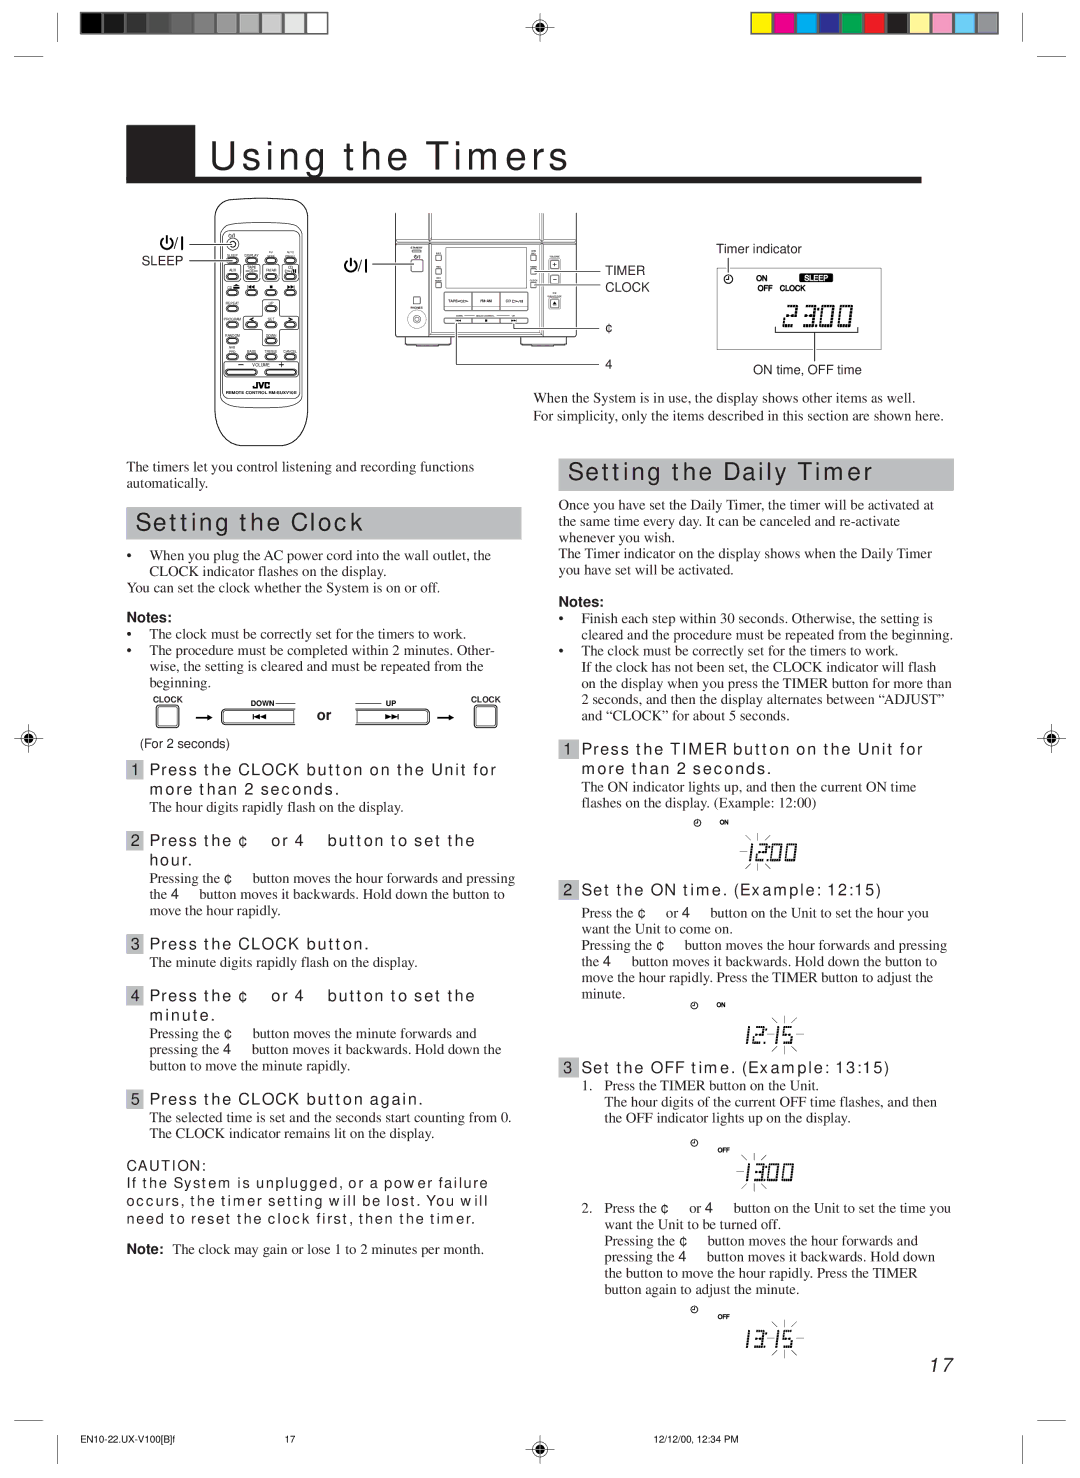
Using the Timers


FM

AUTO

AUX


PRO


Timer indicator


STANDBY


AHB


SLEEP

SLEEP

DISPLAY

MODE

PRESET


VOLUME


AUX

TAPE

FM/AM

CD

REC


TIMER

TIMER


REV


MODE


CLOCK

CLOCK

ON

SLEEP


CD


CD

OFF

CLOCK


OPEN/CLOSE


REPEAT


UP

DISPLAY

TAPE

FM/AM

CD


MODE


PHONES


DOWN

MULTI CONTROL

UP


PROGRAM


SET


¢


RANDOM


DOWN


AHB


PRO

BASS

TREBLE

CANCEL


VOLUME


4

ON time, OFF time


REMOTE CONTROL RM-SUXV10E

When the System is in use, the display shows other items as well.

For simplicity, only the items described in this section are shown here.

The timers let you control listening and recording functions

Setting the Daily Timer

automatically.


Once you have set the Daily Timer, the timer will be activated at

Setting the Clock


the same time every day. It can be canceled and re-activate


whenever you wish.


• When you plug the AC power cord into the wall outlet, the

The Timer indicator on the display shows when the Daily Timer

CLOCK indicator flashes on the display.

you have set will be activated.

You can set the clock whether the System is on or off.

Notes:


Notes:

The clock must be correctly set for the timers to work.

The procedure must be completed within 2 minutes. Other- wise, the setting is cleared and must be repeated from the

beginning.

CLOCK

DOWN

UP

CLOCK

or

(For 2 seconds)

1Press the CLOCK button on the Unit for more than 2 seconds.

The hour digits rapidly flash on the display.

Finish each step within 30 seconds. Otherwise, the setting is cleared and the procedure must be repeated from the beginning.

The clock must be correctly set for the timers to work.

If the clock has not been set, the CLOCK indicator will flash on the display when you press the TIMER button for more than 2 seconds, and then the display alternates between “ADJUST” and “CLOCK” for about 5 seconds.

1Press the TIMER button on the Unit for more than 2 seconds.

The ON indicator lights up, and then the current ON time flashes on the display. (Example: 12:00)

ON

2Press the ¢ or 4 button to set the hour.

Pressing the ¢button moves the hour forwards and pressing the 4button moves it backwards. Hold down the button to move the hour rapidly.

3Press the CLOCK button.

The minute digits rapidly flash on the display.

4Press the ¢ or 4 button to set the minute.

Pressing the ¢button moves the minute forwards and pressing the 4button moves it backwards. Hold down the button to move the minute rapidly.

5Press the CLOCK button again.

The selected time is set and the seconds start counting from 0. The CLOCK indicator remains lit on the display.

CAUTION:

If the System is unplugged, or a power failure occurs, the timer setting will be lost. You will need to reset the clock first, then the timer.

Note: The clock may gain or lose 1 to 2 minutes per month.

2Set the ON time. (Example: 12:15)

Press the ¢or 4button on the Unit to set the hour you want the Unit to come on.

Pressing the ¢button moves the hour forwards and pressing the 4button moves it backwards. Hold down the button to move the hour rapidly. Press the TIMER button to adjust the

minute.

ON

3Set the OFF time. (Example: 13:15)

1.Press the TIMER button on the Unit.

The hour digits of the current OFF time flashes, and then the OFF indicator lights up on the display.

OFF

2.Press the ¢ or 4button on the Unit to set the time you want the Unit to be turned off.

Pressing the ¢button moves the hour forwards and pressing the 4button moves it backwards. Hold down the button to move the hour rapidly. Press the TIMER button again to adjust the minute.

OFF

17

EN10-22.UX-V100[B]f

17

12/12/00, 12:34 PM

Page 21
Image 21
JVC 20981IEN manual Using the Timers, Setting the Daily Timer, Setting the Clock

20981IEN specifications

The JVC 20981IEN is a noteworthy addition to the audio and visual equipment market, designed to deliver an immersive experience for users across various applications. Packed with advanced features and cutting-edge technologies, this model has quickly gained recognition among enthusiasts and professionals alike.

One of the standout features of the JVC 20981IEN is its exceptional visual quality. It boasts a high-resolution display that ensures sharp images and vibrant colors, making it ideal for both entertainment and professional presentations. The screen combines advanced LED technology with excellent contrast ratios, allowing for stunning visuals even in brightly lit environments.

The sound quality is equally impressive, thanks to JVC's long-standing reputation for superior audio technology. The 20981IEN incorporates integrated high-fidelity speakers that provide crystal-clear sound. Additionally, it features a wide soundstage, making it perfect for movies, music, and gaming. The model also supports various audio formats, ensuring compatibility with an extensive range of media sources.

Connectivity options are abundant with the JVC 20981IEN. It comes equipped with multiple HDMI ports, USB inputs, and wireless capabilities, allowing users to connect a plethora of devices, including gaming consoles, streaming devices, and more. The inclusion of Bluetooth technology facilitates seamless pairing with compatible devices, enabling users to enjoy music and audio content wirelessly.

User-friendliness is another hallmark of the JVC 20981IEN. The model features an intuitive interface, making navigation effortless for users of all tech-savviness levels. The remote control is ergonomically designed for comfort and ease of use, ensuring that users can access their favorite features without difficulty.

Durability and energy efficiency are also key characteristics of the JVC 20981IEN. Constructed with high-quality materials, it is built to withstand regular use while providing reliable performance. Furthermore, energy-efficient technologies minimize power consumption, making it a more environmentally friendly option for those looking to reduce their carbon footprint.

In summary, the JVC 20981IEN is a versatile and high-performing unit that seamlessly combines visual excellence and robust audio technology. With its extensive connectivity options, user-friendly interface, and durability, it represents a compelling choice for anyone in the market for a new audio-visual solution. Whether for personal use or professional settings, the JVC 20981IEN sets a high standard in the industry.