Using a Keyboard & Mouse to Control Recording

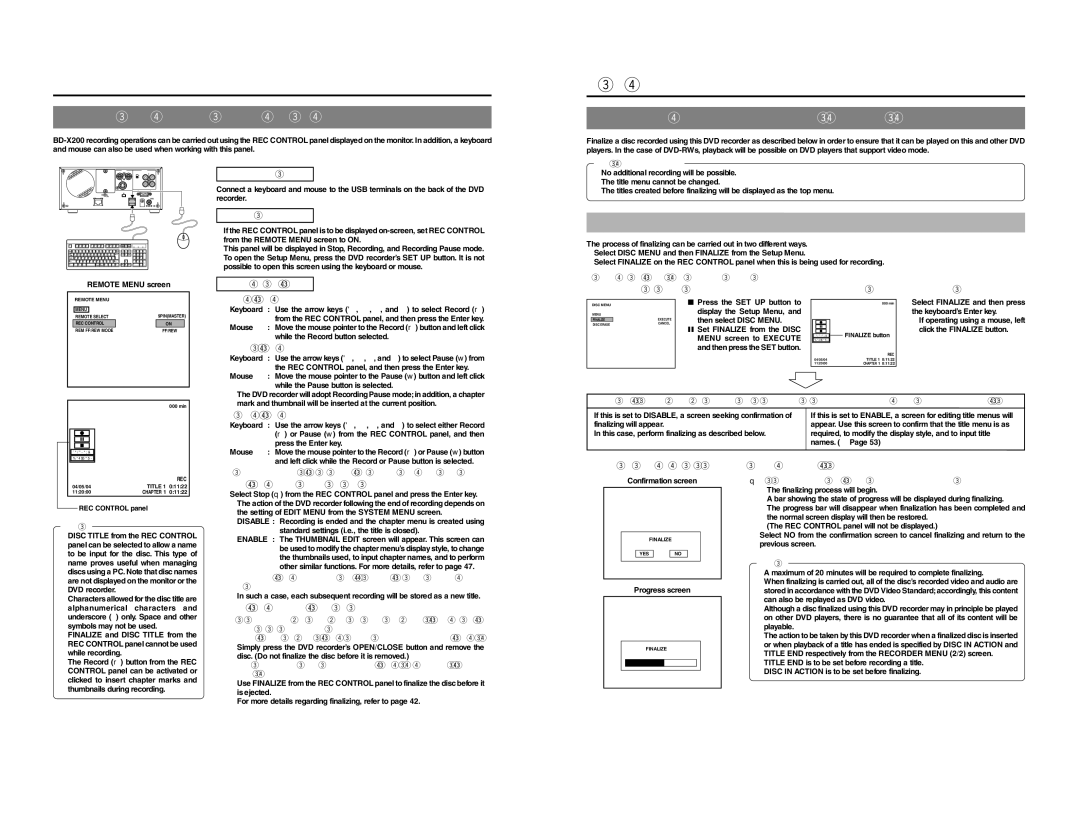
BD-X200 recording operations can be carried out using the REC CONTROL panel displayed on the monitor. In addition, a keyboard and mouse can also be used when working with this panel.

Recording

Finalizing (for playback on this and other DVD players)

Finalize a disc recorded using this DVD recorder as described below in order to ensure that it can be played on this and other DVD players. In the case of DVD-RWs, playback will be possible on DVD players that support video mode.

After finalizing a disc;

REMOTE

DV IN/OUT

USB

DC 19V

*

Signal Connections

Connect a keyboard and mouse to the USB terminals on the back of the DVD recorder.

Settings

If the REC CONTROL panel is to be displayed on-screen, set REC CONTROL from the REMOTE MENU screen to ON.

This panel will be displayed in Stop, Recording, and Recording Pause mode.

To open the Setup Menu, press the DVD recorder’s SET UP button. It is not possible to open this screen using the keyboard or mouse.

No additional recording will be possible.

The title menu cannot be changed.

The titles created before finalizing will be displayed as the top menu.

Finalizing

The process of finalizing can be carried out in two different ways.

Select DISC MENU and then FINALIZE from the Setup Menu.

Select FINALIZE on the REC CONTROL panel when this is being used for recording.

REMOTE MENU screen

REMOTE MENU


MENU


REMOTE SELECT

9PIN(MASTER)

REC CONTROL

ON

REM FF/REW MODE

FF/REW


Procedure

1.

Start recording.


Keyboard

:

Use the arrow keys (©, , , and ) to select Record (r)


from the REC CONTROL panel, and then press the Enter key.


Mouse

:

Move the mouse pointer to the Record (r) button and left click


while the Record button selected.

2.

Pause recording.


Keyboard

:

Use the arrow keys (©, , , and ) to select Pause (w) from


the REC CONTROL panel, and then press the Enter key.


Mouse

:

Move the mouse pointer to the Pause (w) button and left click


while the Pause button is selected.

Setup Procedure: Insert the disc to be finalized.

1. If using the Setup Menu:

DISC MENU


q Press the SET UP button to

MENU


display the Setup Menu, and

FINALIZE

EXECUTE

then select DISC MENU.

DISC ERASE

CANCEL

w Set FINALIZE from the DISC


MENU screen to EXECUTE


and then press the SET button.

1.

If using the REC CONTROL panel:


000 min

Select FINALIZE and then press


the keyboard’s Enter key.

*If operating using a mouse, left click the FINALIZE button.

FINALIZE

FINALIZE button

DISC TITLE


REC

04/05/04

TITLE 1 0:11:22

11:20:00

CHAPTER 1 0:11:22


000 min


FINALIZE


DISC TITLE


The DVD recorder will adopt Recording Pause mode; in addition, a chapter mark and thumbnail will be inserted at the current position.

3.

Restart recording.


Keyboard

:

Use the arrow keys (©, , , and ) to select either Record


(r) or Pause (w) from the REC CONTROL panel, and then


press the Enter key.


Mouse

:

Move the mouse pointer to the Record (r) or Pause (w) button


and left click while the Record or Pause button is selected.

Steps 2 and 3 can be repeated to create a single, partitioned title.

The screen that will now be displayed depends on the setting of EDIT MENU from the SYSTEM MENU screen.

If this is set to DISABLE, a screen seeking confirmation of

If this is set to ENABLE, a screen for editing title menus will

finalizing will appear.

appear. Use this screen to confirm that the title menu is as

In this case, perform finalizing as described below.

required, to modify the display style, and to input title


names. (Page 53)

2. Make the appropriate selection in the confirmation screen.


REC

04/05/04

TITLE 1 0:11:22

11:20:00

CHAPTER 1

0:11:22

REC CONTROL panel


Notes


DISC TITLE from the REC CONTROL panel can be selected to allow a name to be input for the disc. This type of name proves useful when managing discs using a PC. Note that disc names are not displayed on the monitor or the DVD recorder.

Characters allowed for the disc title are alphanumerical characters and underscore (_) only. Space and other symbols may not be used.

FINALIZE and DISC TITLE from the REC CONTROL panel cannot be used while recording.

The Record (r) button from the REC CONTROL panel can be activated or clicked to insert chapter marks and

thumbnails during recording.

4.

End recording (i.e., close the title)


Select Stop (q) from the REC CONTROL panel and press the Enter key.

The action of the DVD recorder following the end of recording depends on the setting of EDIT MENU from the SYSTEM MENU screen.

DISABLE : Recording is ended and the chapter menu is created using standard settings (i.e., the title is closed).

ENABLE : The THUMBNAIL EDIT screen will appear. This screen can be used to modify the chapter menu’s display style, to change the thumbnails used, to input chapter names, and to perform other similar functions. For more details, refer to page 47.

If additional recording is to be carried out, repeat steps 1 through 4 above.

In such a case, each subsequent recording will be stored as a new title.

5.

End recording and remove the disc.


Depending on how the disc will be used, one of two different procedures


is implemented at this time.

If more content will be recorded to the disc using this DVD recorder: Simply press the DVD recorder’s OPEN/CLOSE button and remove the disc. (Do not finalize the disc before it is removed.)

If the disc is to be played on this DVD recorder or on a different DVD player:

Use FINALIZE from the REC CONTROL panel to finalize the disc before it is ejected.

For more details regarding finalizing, refer to page 42.

Confirmation screen

FINALIZE


YES

NO

Progress screen

FINALIZE


q Select YES and then press the SET button to continue finalizing.

The finalizing process will begin.

A bar showing the state of progress will be displayed during finalizing.

The progress bar will disappear when finalization has been completed and the normal screen display will then be restored.

(The REC CONTROL panel will not be displayed.)

Select NO from the confirmation screen to cancel finalizing and return to the previous screen.

Notes

A maximum of 20 minutes will be required to complete finalizing.

When finalizing is carried out, all of the disc’s recorded video and audio are stored in accordance with the DVD Video Standard; accordingly, this content can also be replayed as DVD video.

Although a disc finalized using this DVD recorder may in principle be played on other DVD players, there is no guarantee that all of its content will be playable.

The action to be taken by this DVD recorder when a finalized disc is inserted or when playback of a title has ended is specified by DISC IN ACTION and TITLE END respectively from the RECORDER MENU (2/2) screen.

TITLE END is to be set before recording a title. DISC IN ACTION is to be set before finalizing.

41

42

Page 24
Image 24
JVC BD-X200U manual Using a Keyboard & Mouse to Control Recording, Finalizing for playback on this and other DVD players

BD-X200U specifications

The JVC BD-X200U is a professional-grade Blu-ray player that represents a significant advancement in the realm of high-definition multimedia playback. Designed for a variety of applications, including commercial settings, educational institutions, and home theaters, the BD-X200U delivers exceptional performance in video and audio quality, making it an ideal choice for anyone seeking a robust multimedia solution.

One of the standout features of the BD-X200U is its support for a wide range of disc formats. This device is capable of playing Blu-ray Discs, DVDs, and CDs, providing users with versatile playback options. The player also supports the BDXL format, which allows for the use of triple-layer Blu-ray discs, enabling storage capacities of up to 128 GB. This is particularly beneficial for users looking to store large amounts of data or high-definition video content without the need to frequently change discs.

Equipped with JVC's advanced image processing technology, the BD-X200U ensures that video playback is not only smooth but also exhibits outstanding clarity and color accuracy. The player supports 4K upscaling, enhancing standard and Blu-ray content to near-4K quality, which means users can experience improved resolution and detail on compatible displays. Additionally, the player incorporates HDR (High Dynamic Range) technology, allowing for a broader range of colors and improved contrast between light and dark elements in videos.

Audio quality is another focal point of the BD-X200U, as it supports various high-definition audio formats, including Dolby TrueHD and DTS-HD Master Audio. This enables users to enjoy an immersive audio experience that complements the stunning visual prowess of the player. The unit also features balanced XLR outputs, which are essential for professional audio setups, ensuring low noise and high-quality sound transmission.

Networking capabilities are also part of the BD-X200U's feature set. The player includes HDMI inputs and outputs, as well as USB ports, allowing for easy connection to a variety of devices. It supports streaming services, giving users access to online content directly from the player. Furthermore, the BD-X200U can integrate with control systems, making it suitable for complex setups.

In summary, the JVC BD-X200U is a versatile and high-performance Blu-ray player that serves as a powerful tool for both professionals and home entertainment enthusiasts. Its diverse format support, superior image and audio quality, and advanced connectivity options position it as a leading choice in the market for high-definition multimedia playback.