CA-MXS5RMD
If in Doubt Consult a Competent Electrician
Class Laser Product
Introduction
Precautions
Contents
Front Panel Display Window
Location of the Buttons and Controls
Become familiar with the buttons and controls on your unit
About the indications in the main display
Front Panel
See pages in the parentheses for details
CD 0open/close buttons
FM/AM button 15
Remote Control
Remote Control
Disc number buttons CD 1, CD 2, and CD
FM antenna
Connecting Antennas
Getting Started
Unpacking
To connect an outdoor AM antenna
Connecting Speakers
You can connect the speakers using the speaker cords
AM antenna
To connect a cassette deck
Connecting Other Equipment
To start the display demonstration manually
Putting the Batteries into the Remote Control
See Changing the Main Display Screen on
Remote control
Basic Settings
To switch off the power supply completely, unplug
Turning On the Power
Setting the Clock
To adjust the clock again
Changing the Main Display Screen
How these settings work
Normal screens
To change the brightness
To store the selected main display screen in backup memory
Press SET to finish the adjustment
Changing the Display Brightness and Contrast
Basic and Common Operations
Reinforcing the Bass Sound
Adjusting the Volume
To turn down the volume level temporarily
Selecting the Sources and Starting Play
Selecting the Sound Modes
Creating Your Own Sound Mode Manual Mode
To use your own sound mode
Manual mode
Listening to FM and AM MW/LW Broadcasts
Presetting Stations
Tuning in a Station
To change the FM reception mode
Receiving FM Stations with RDS
Tuning in a Preset Station
More about RDS
If No PS, PTY, or RT signals are sent by a station
Changing the RDS Information
Searching for Programs by PTY Codes PTY Search
Info
Switching to a Program Type of Your Choice Temporarily
Press PTY Search again
News
Test function
Alarm function
More about the EON function
Description of the PTY codes
Playing Back CDs
To exchange CDs during playback of another
Loading CDs
Playing Back the Entire Discs Continuous Play
Basic CD Operations
To go to another track
To go to another track directly using the number buttons
Program Play
To stop playback for a moment
To modify the program
To check the program contents
Playing at Random Random Play
Repeating Tracks or CDs Repeat Play
Playing Back an MD
Press MD #
Basic MD Operations
To locate a particular point in a track during play
Insert an MD into the MD loading slot
Repeat to program other tracks you want Press MD #
Load an MD
If the total playing time exceed 150 minutes
Tracks of the loaded MD will play at random
Random play also stops when you eject the MD
Repeating Tracks Repeat Play
Prohibiting Disc Ejection Disc Lock
Recording on MDs
To put a track mark manually while recording an
Before You Start Recording
About the track marks
To avoid erasing important recordings
For details, see the manual supplied with your equipment
Recording Any Sound Source Standard Recording
To select the sound input level
Recording lamp on the unit starts flashing
Synchronized Recording
Recording CDs
First Track Recording
To resume recording, press MD #/ 8 again
Press PLAY/REC Mode on the unit
Sound Sync Select for a sound synchronized recording
When selecting Stereo Press MD #
Select for normal stereo
Recording
Editing MDs
Introducing MD Editing Functions
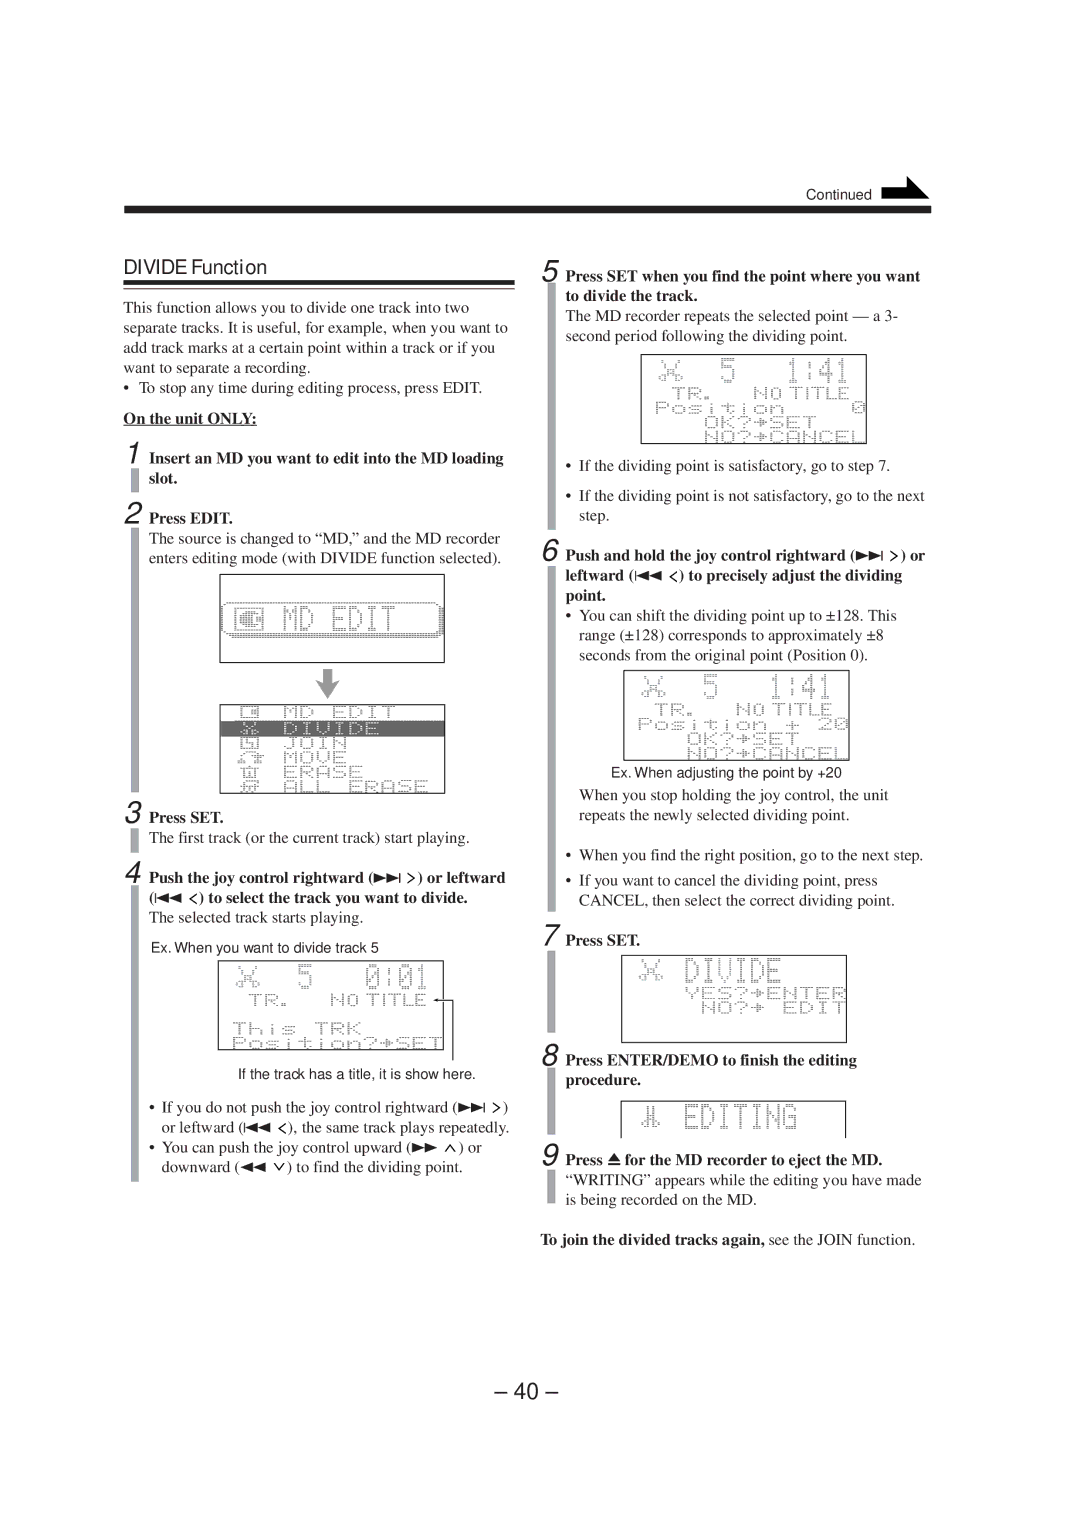
To join the divided tracks again, see the Join function
Divide Function
First track or the current track start playing
Selected track starts playing
Move Function
Join Function
To divide the joined tracks, see the Divide function
Push the joy control downward 1 or upward
Erase Function
Press SET On the unit only
Slot
Repeat and 5 to select all the track you want to erase
ALL Erase Function
You can select up to 15 tracks
Making Your Own Titles and Screens
Assigning Titles to an MD
Title entry mode changes as follows
Press SET to enter the selected title entry mode
Title when the MD recorder stops
Repeat steps 5 and 6 to enter other characters
Ex. When entering H
Input a character
Press ENTER/DEMO to finish the current title entry
To erase all the characters
Changing the Title
You can make a correction or change the title
Make sure that the character you want to change is flashing
Press the button for the next character you want to input
Available Symbols are as follows
Press Enter to finish the current title entry
STANDBY/ON lamp lights red
Creating Your Own Opening and Ending Screens
To erase your own screen
On the unit only Press to turn off the unit if it is on
Using the Timers
Source changes as follows
Using Recording Timer
How Recording Timer actually works
REC indicator stops flashing, and remains lit
Press to turn off the unit on standby if necessary
Using Daily Timer
To turn on or off Recording Timer after its setting is done
How Daily Timer actually works
Daily indicator stops flashing and remains lit
To set the hour of the timer-off time, then
Timer Priority
Using Sleep Timer
How Sleep Timer actually works
Handling CDs
Maintenance
To clean the CD
General Notes
Atrac Adaptive TRansform Acoustic Coding
Utoc User Table Of Contents
Additional Information
MD Disc Types
MD limitations
Sound Skip Guard Memory
MD Messages
When you turn on the unit in the Power Saving mode
Troubleshooting
Specifications
JVC 0899KSMMDWJEM