1

MENU


SET

2

3

ENTER


1

MENU

2

3

SET


5

SET

6

7

ENTER

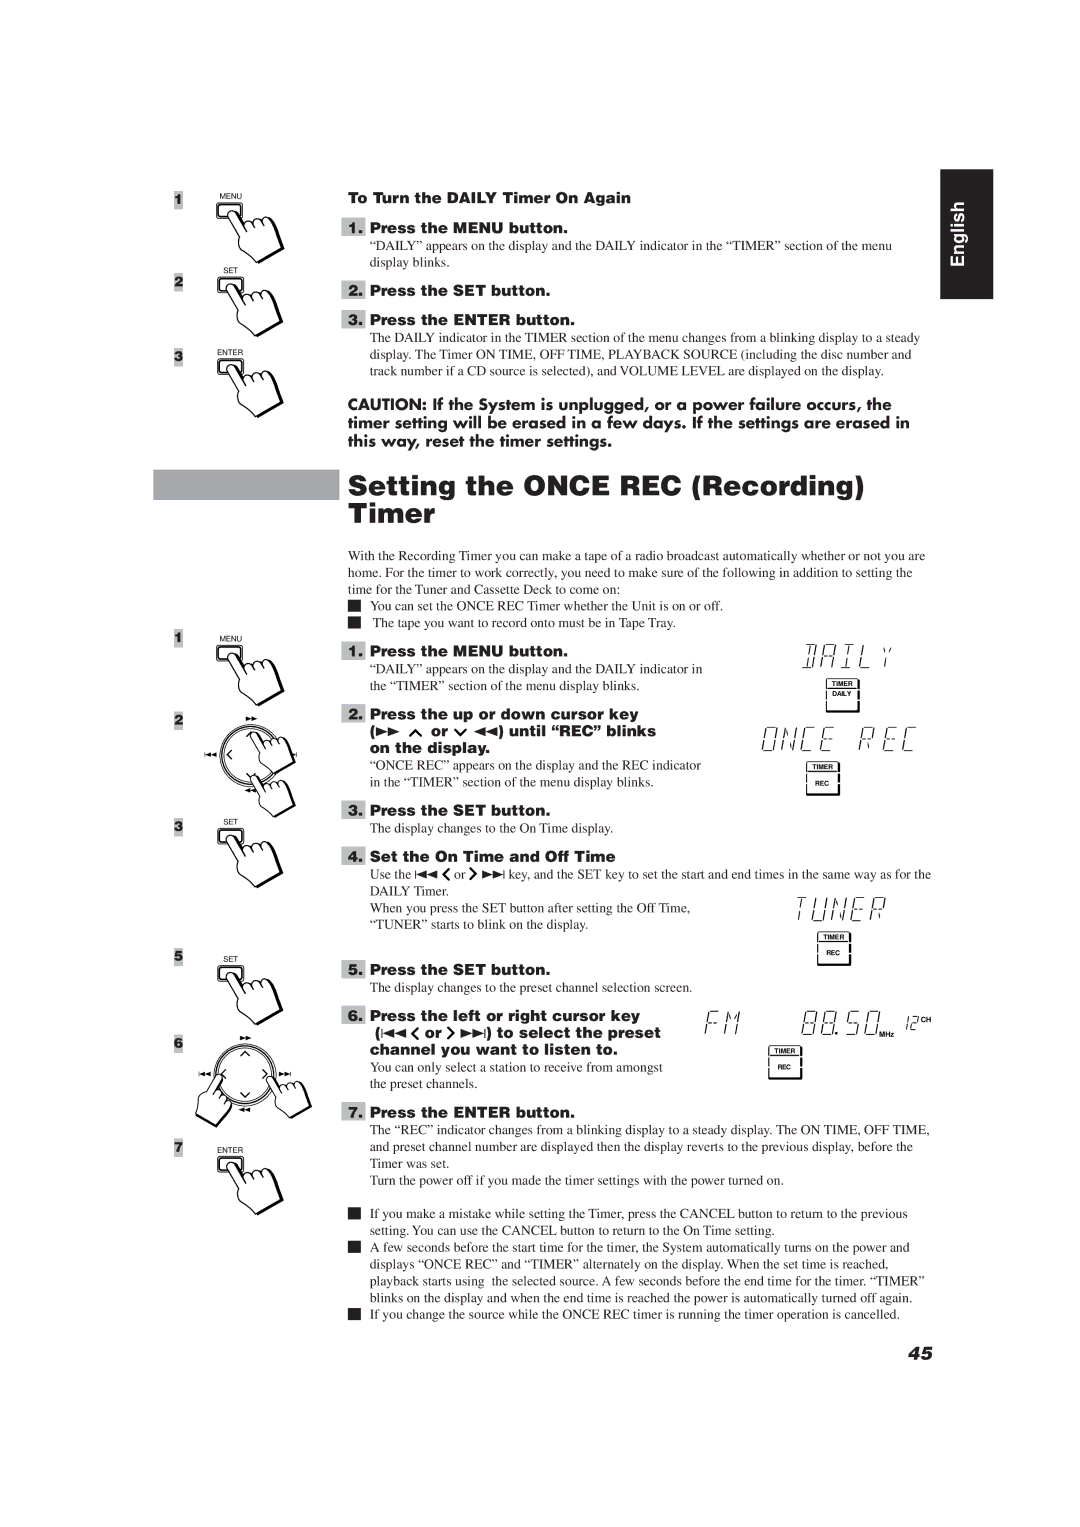
To Turn the DAILY Timer On Again

1.Press the MENU button.

“DAILY” appears on the display and the DAILY indicator in the “TIMER” section of the menu display blinks.

2.Press the SET button.

3.Press the ENTER button.

The DAILY indicator in the TIMER section of the menu changes from a blinking display to a steady display. The Timer ON TIME, OFF TIME, PLAYBACK SOURCE (including the disc number and track number if a CD source is selected), and VOLUME LEVEL are displayed on the display.

CAUTION: If the System is unplugged, or a power failure occurs, the timer setting will be erased in a few days. If the settings are erased in this way, reset the timer settings.

Setting the ONCE REC (Recording) Timer

With the Recording Timer you can make a tape of a radio broadcast automatically whether or not you are home. For the timer to work correctly, you need to make sure of the following in addition to setting the time for the Tuner and Cassette Deck to come on:

oYou can set the ONCE REC Timer whether the Unit is on or off. o The tape you want to record onto must be in Tape Tray.

1. Press the MENU button.

“DAILY” appears on the display and the DAILY indicator in


the “TIMER” section of the menu display blinks.

TIMER


DAILY

2.

Press the up or down cursor key


(Á

or 1) until “REC” blinks


on the display.


“ONCE REC” appears on the display and the REC indicator

TIMER


in the “TIMER” section of the menu display blinks.

REC

3.Press the SET button.

The display changes to the On Time display.

4.Set the On Time and Off Time

Use the 4 or ¢ key, and the SET key to set the start and end times in the same way as for the DAILY Timer.

When you press the SET button after setting the Off Time, “TUNER” starts to blink on the display.

TIMER

REC

5.Press the SET button.

The display changes to the preset channel selection screen.

6.

Press the left or right cursor key


CH


(4 or ¢) to select the preset


MHz


channel you want to listen to.

TIMER


You can only select a station to receive from amongst

REC


the preset channels.


7.Press the ENTER button.

The “REC” indicator changes from a blinking display to a steady display. The ON TIME, OFF TIME, and preset channel number are displayed then the display reverts to the previous display, before the Timer was set.

Turn the power off if you made the timer settings with the power turned on.

oIf you make a mistake while setting the Timer, press the CANCEL button to return to the previous setting. You can use the CANCEL button to return to the On Time setting.

oA few seconds before the start time for the timer, the System automatically turns on the power and displays “ONCE REC” and “TIMER” alternately on the display. When the set time is reached,

playback starts using the selected source. A few seconds before the end time for the timer. “TIMER” blinks on the display and when the end time is reached the power is automatically turned off again.

o If you change the source while the ONCE REC timer is running the timer operation is cancelled.

English

45

Page 49
Image 49
JVC RX-TD77R, CATD77, XT-TD77R Setting the Once REC Recording Timer, To Turn the Daily Timer On Again Press the Menu button

XT-TD77R, RX-TD77R, CATD77 specifications

The JVC CATD77, RX-TD77R, and XT-TD77R are part of JVC's esteemed line of audio and multimedia equipment, each designed to deliver an impressive audio experience. These models showcase advanced features that cater to audiophiles and casual listeners alike, combining cutting-edge technology with user-friendly interfaces.

The JVC CATD77 is a compact stereo system that stands out for its versatility and performance. One of its primary features includes a built-in CD player that supports various disc formats, ensuring that users can enjoy their favorite music without hassle. It also incorporates a digital AM/FM tuner with preset stations, making it easy to access a range of radio channels. The CATD77 is designed with an appealing, sleek aesthetic, making it a stylish addition to any home decor. Additionally, the model boasts Bluetooth capability, allowing for seamless wireless streaming of music from smartphones, tablets, or other Bluetooth-enabled devices.

In the same vein, the RX-TD77R receiver is packed with features that enhance audio quality and connectivity. It supports multiple audio inputs and outputs, including digital audio inputs for modern devices and traditional analog connections, ensuring compatibility with a wide array of sources. The RX-TD77R also features an integrated equalizer that allows users to tweak the sound according to their preferences, providing a customized listening experience. With its robust power output, this receiver can drive larger speakers while maintaining clarity and depth, making it ideal for both music playback and home theater setups.

Lastly, the XT-TD77R takes portability and functionality up a notch. Designed for active users, this model is lightweight yet durable, making it perfect for outdoor activities or travel. It features an integrated rechargeable battery, ensuring that users can enjoy music on the go without worrying about power outlets. The XT-TD77R also supports multiple audio formats, offering flexibility in music playback. Its water-resistant design further enhances its suitability for outdoor use, allowing users to enjoy their favorite tracks in various environments.

Together, the JVC CATD77, RX-TD77R, and XT-TD77R models represent a harmonious blend of sound quality, advanced technology, and user convenience. They cater to diverse needs, whether at home or on the move, symbolizing JVC's commitment to excellent audio performance in all settings.