X70R/DLA-X30
JVC Kenwood Corporation
Instrucción para el cliente
PC021082599-1
Safety Precautions
About the installation place
Getting started
Machine Noise Information Germany only
Power source indicated on the label. If you are
Not sure of the type of power supply to your
Power company
This product is equipped with a three-wire plug
Do not allow any unqualified person to install the unit
Fragments from a broken light-source lamp may cause injuries
Power Connection United Kingdom only
Power cord
Important Europe only
Do not cut off the main plug from this equipment
Battery Products
Batterie
Produkte
Pile
Baterías/pilas
Productos
Batteria
Prodotti
Batteri
Produkter
Akku
Tuotteet
Батарея
Изделия
Baterie
Produkty
Baterija Produkt
Samo u zemljama gde se primenjuje
THX Certification 90
THX Certification
For detail information about ISF, please refer web site 90
Contents
Accessories/Optional Accessories
Check the Accessories
Optional Accessories
Please check with your authorized dealer for details
Controls and features
Main body Front
Main body Bottom
⑪ Light receiving section Remote control rear
⑫ Power input terminal
Main body Rear
Left button Down button
Main body About the indicator display
Stand BYLight onGreen
Stand by BlinkingGreen
Duringstandby
Lighting/flashing lights Blinking Content Confirmation
Main body Warning display and confirmation/response
Action
Frequency Countermeasures
Main body Input terminal
Remote Control
To turn off the power
How to insert batteries into the remote control
To switch picture mode
Reference
Display the information menu
About installation
Important points concerning the installation
How to adjust the vertical angle
Preparation
Installing the Projector and Screen
Lens shift correlation chart
Left/Right position
Up/Down position
Precautions for Mounting
Fixation of the projector
Bottom Surface
Effective Range of Remote Control Unit
When directing the remote control toward this unit
When reflecting off a screen
Screen Size and Projection Distance
Types of possible input signals
About the connection
Types of possible input signals PC compatible
Connection to the unit
BD/DVD Recorder BD/DVD Player
VCR
Camcorder
Connecting via Hdmi Cable
Connecting via HDMI-DVI Conversion Cable
This unit
BD/DVD recorder
Connecting via Component Video Cable
Connecting via RGB Video Cable
Connecting via PC Cable 90
Connected by a 3D Synchro terminal
3D synchro emitter
This unit
Connecting via Trigger Cable
Connected by RS-232C connection cable
Sold separatelyTrigger input terminal Φ
Terminal
Connected by LAN terminal
Connected by a Remote terminal
Network
Server
Connection of the power cord provided
Be carful to avoid fire and electric shocks
Memo
Basic operation procedures
Basic Operation
Adjust the shift image position
Turn off power source
About Cool Down mode
Adjust accordingly By pressing Up/down/left/right Buttons
Frequently used useful functions
Project the image
Aspect the image
Input Image and Projected Image by Different Screen Size
To end
Example
When there is a 3D input signal, adjustment is not possible
Example When the Mask value is changed from Off 5%
Mask the image
Image for which quality at the outer area has deteriorated
You can hide the image temporarily
① Selec ② Confirm
Up and down
Adjustments and settings in the menu
Picture Adjust
Structure of the menu hierarchy summary
Color Temp
Advanced
Sharpness
Custom Gamma
Color Management
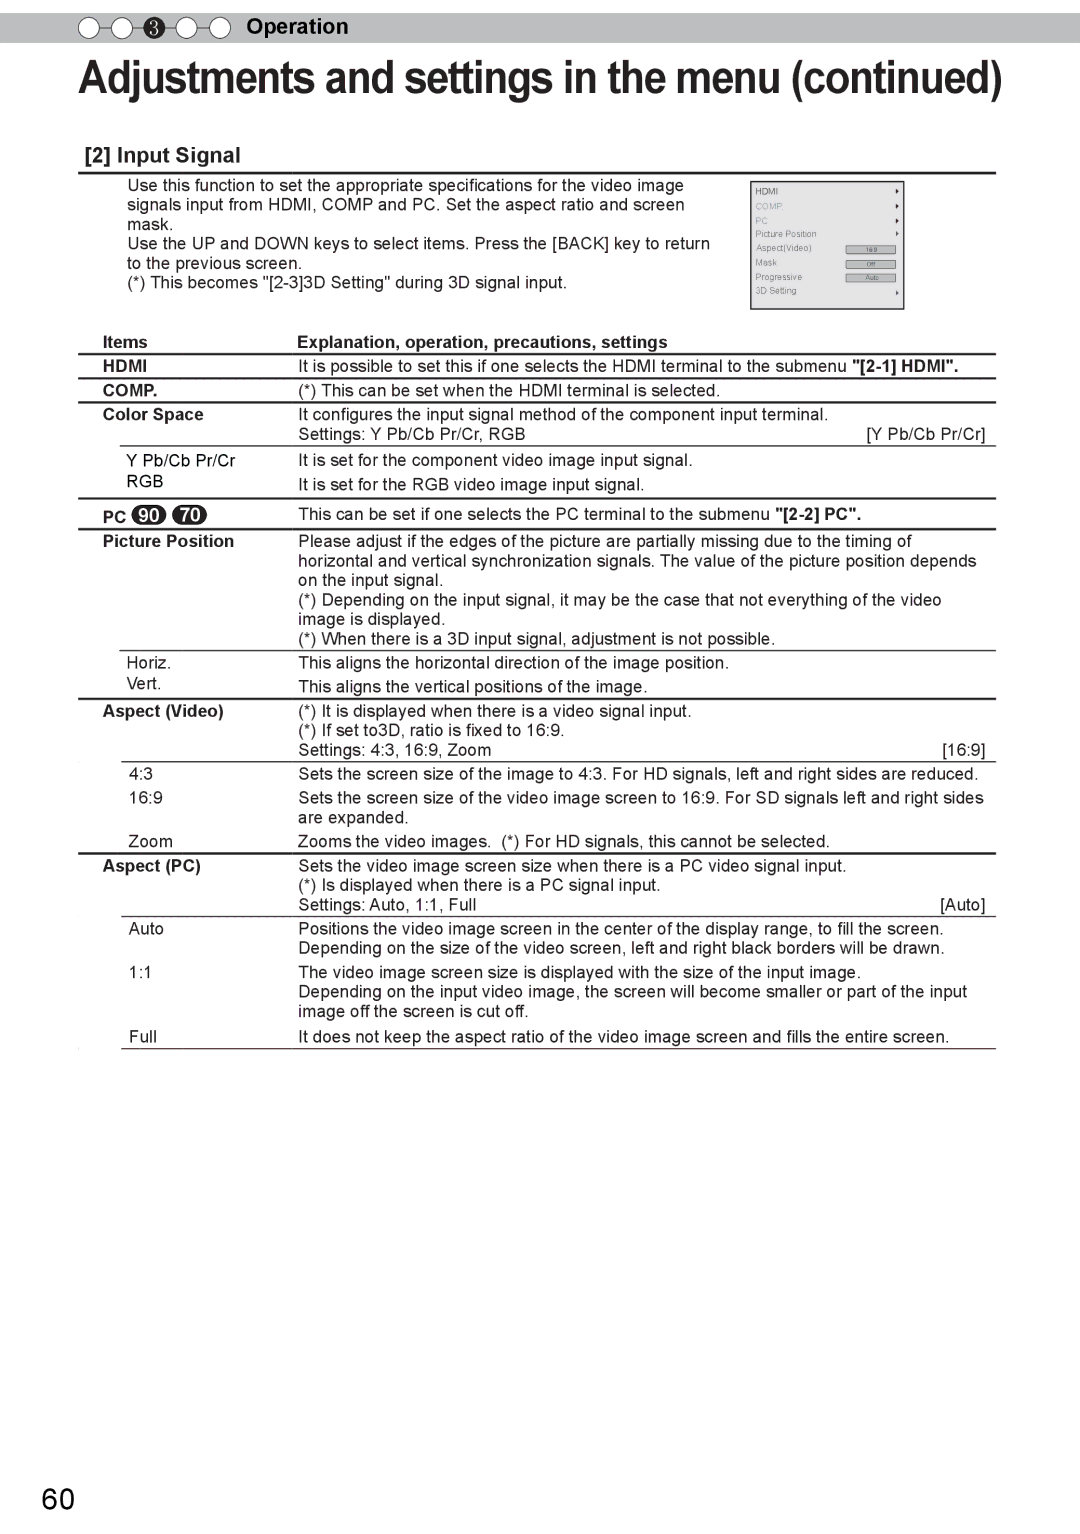
Input Signal
When there is a PC signal Input, Aspect PC is Displayed
Hdmi
3D Setting
Installation
Pixel Adjust
Lens Control
Display Setup
Function
Network
When inputting Hdmi signals
Information
Menu operation button
Menu
Menu operation procedure
Picture Adjust
Menu item description
Color Profile
This is the default value according to the picture mode
To sub-menu1-2 Advanced Reset
Color Temp
To 1-1 Color Temp. of the submenu Gamma
Dark/Bright Level
Color Temp
Advanced
Color Space
Custom Gamma
Color Management
Lamp Power
Clear Motion Drive
CMD Demo
Lens Aperture
Sharpness
Custom Gamma
Detail Enhance
Color Management 90
Input Signal
Items Explanation, operation, precautions, settings
Picture Position
Aspect Video
3D Setting
Items Explanation, operation, precautions, settings Input
Hdmi
Mask
Phase
PC 90
Level Check
Control with Hdmi
3D Setting
Installation
Screen Adjust
Keystone
Anamorphic
Lens Control
Pixel Adjust 90
Items Explanation, operation, precautions, settings Adjust
Adjust Area
Lens Cover
Pixel Adjust
Adjust Color
Adjust Pattern Color
AdjustPixel
Pixel Adjust Whole Adjust Pixel Red
Vercital Horizontal
See Pixel Adjust Flow and Operation AdjustFine
(-20/-20) ( 5 / 5 )
Pixel Adjust Zone Adjust Red
Horizontal
Vercital V10 H10
Position
Display Setup
Function
Network
Information
Operation guide glossary
Gamma Curve
100%
Description of the 3D method
Original
Eye
Left-eye image Right-eye image Stereoscopic video image
Close
Eye
3D-glasses
Left- eye image
Lamp replacement procedure
Replacing the Lamp
Install the new lamp unit
Unit
Attach the lamp cover
After Replacing the Lamp
Resetting lamp Time
SelectFunction Lamp Reset
Re-confirm
Reset the lamp time by remote control
Red Lights
Arrangement is used for Operations in this explanation
Method for cleaning and replacing filters
Clean the filter
Reinstall the inner filter
If the filter is damaged or too dirty to be cleaned
Memo
Troubleshooting
Others
Off timer?
Is the lamp near exhaustion?
Reference page 78 to
Input terminal is connected but there is no signal
Input the video signals
Input video signals that can be used
No device is connected to the input terminal
RS-232C Specifications
RS-232C Interface
TCP/IP-connection
Command Format
Command and data
Binary code
Unit ID
Command Type Data description
Remote control code
End
Binary code
Type Command Description
Reference command
Operating command
This section shows the communication examples of RS-232C
ILA Device Characteristics
When Unit is Unused for a Long Time
Parts Replacement
Maintenance Procedures
Operation Environment Temperature 5ºC to 35ºC
Accessories Reference
Specifications
Others
Dimensions
Unit mm
Lens
Index
Remote control
Message
Lamp
Lens

![]()
![]() Operation
Operation