KD-R414/KD-R314
CD RECEIVER : INSTRUCTIONS/INSTALLATION
Thank you for purchasing a JVC product.
Please read all instructions carefully before operation, to ensure your complete understanding and to obtain the best possible performance from the unit.
IMPORTANT FOR LASER PRODUCTS
1.CLASS 1 LASER PRODUCT
2.CAUTION: Do not open the top cover. There are no user serviceable parts inside the unit; leave all servicing to qualified service personnel.
3.CAUTION: Visible and/or invisible class 1M laser radiation when open. Do not view directly with optical instruments.
4.REPRODUCTION OF LABEL: CAUTION LABEL, PLACED OUTSIDE THE UNIT.
|
|
|
|
| Warning: |
|
|
|
| [European Union only] | If you need to operate the unit while driving, be sure |
|
|
|
| ||
|
|
|
| to look around carefully or you may be involved in a | |
|
|
|
|
| traffic accident. |
|
|
|
|
|
|
1009DTSMDTJEIN |
|
EN | |
© 2009 Victor Company of Japan, Limited | [UI] |
Canceling the display demonstration 
1 | Turn on the power. | 4 | Select <DEMO OFF>. |
2 | [Hold] | 5 |
|
|
| ||
3 | (Initial setting) |
|
|
| 6 | Finish the procedure. | |
|
|
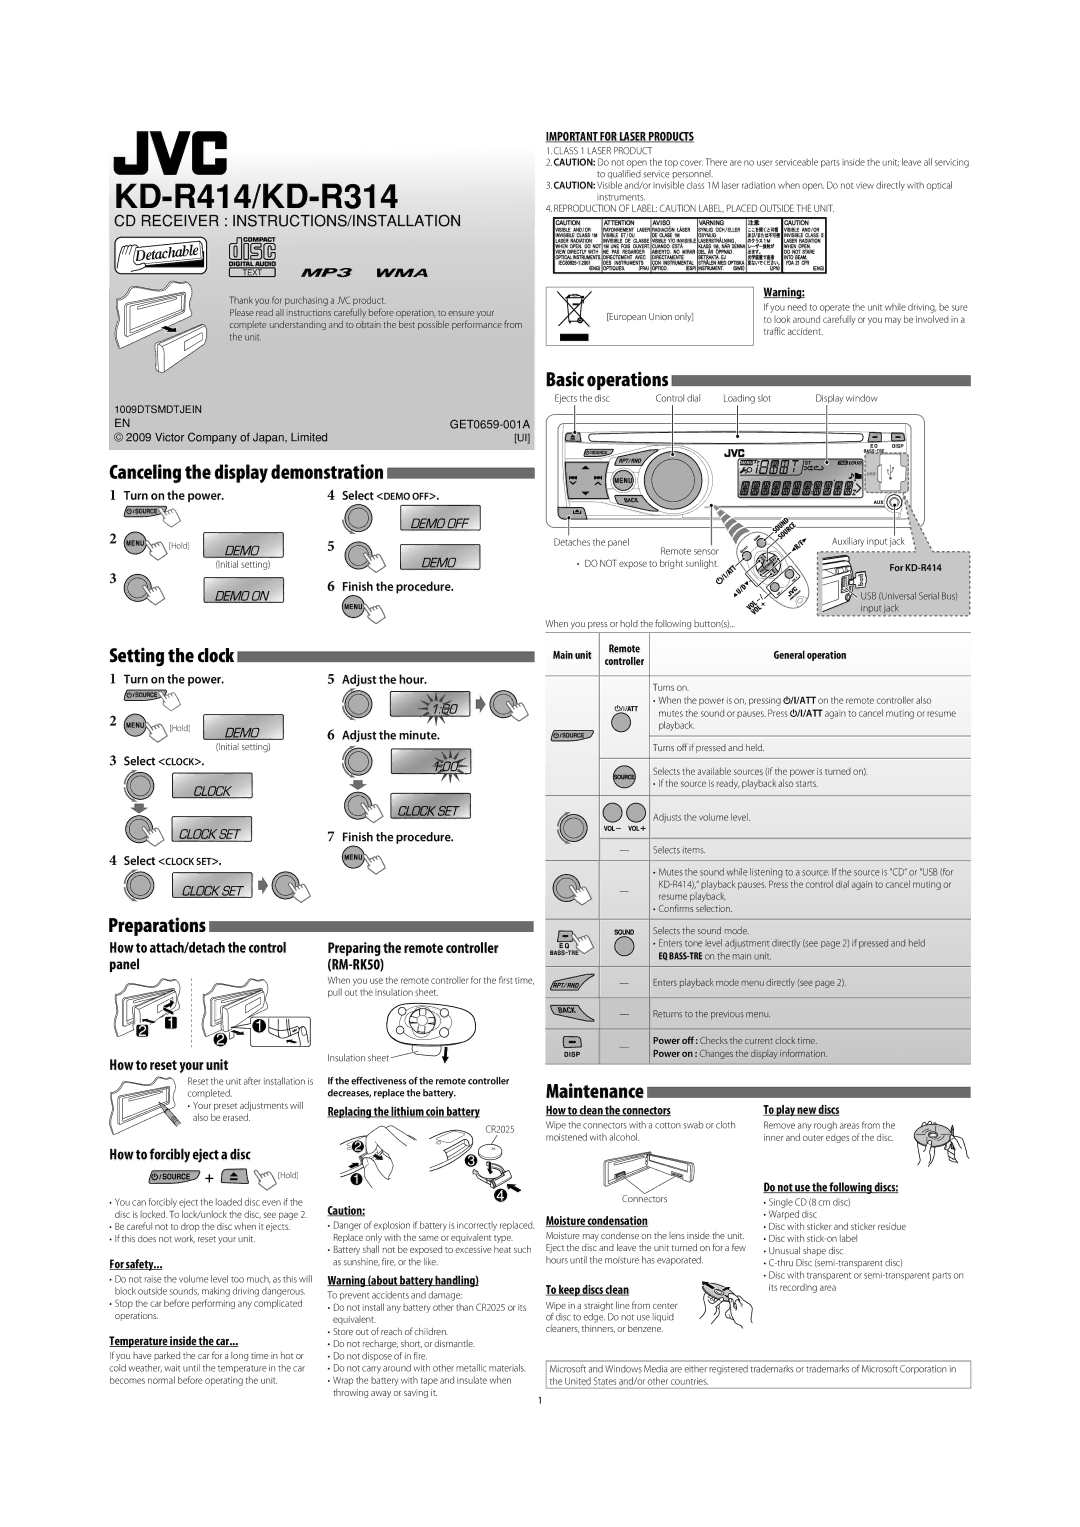
Basic operations
Ejects the disc | Control dial | Loading slot | ||||||
|
|
|
|
|
|
|
|
|
|
|
|
|
|
|
|
|
|
|
|
|
|
|
|
|
|
|
|
|
|
|
|
|
|
|
|
|
|
|
|
|
|
|
|
|
Detaches the panel
Remote sensor
• DO NOT expose to bright sunlight.
When you press or hold the following button(s)...
Display window
Auxiliary input jack
For KD-R414
![]() USB (Universal Serial Bus) input jack
USB (Universal Serial Bus) input jack
Setting the clock
1Turn on the power.
2
[Hold]
(Initial setting)
3Select <CLOCK>.
4Select <CLOCK SET>.
Preparations
How to attach/detach the control panel
How to reset your unit
5Adjust the hour.
6Adjust the minute.
7Finish the procedure.
Preparing the remote controller (RM-RK50)
When you use the remote controller for the first time, pull out the insulation sheet.
Insulation sheet ![]()
Main unit | Remote | General operation | |
controller | |||
|
|
Turns on.
•When the power is on, pressing ![]() /I/ATT on the remote controller also mutes the sound or pauses. Press
/I/ATT on the remote controller also mutes the sound or pauses. Press ![]() /I/ATT again to cancel muting or resume playback.
/I/ATT again to cancel muting or resume playback.
Turns off if pressed and held.
Selects the available sources (if the power is turned on).
• If the source is ready, playback also starts.
Adjusts the volume level.
—Selects items.
• Mutes the sound while listening to a source. If the source is “CD“ or “USB (for
| — | |
| resume playback. | |
|
| |
|
| • Confirms selection. |
|
|
|
|
| Selects the sound mode. |
|
| • Enters tone level adjustment directly (see page 2) if pressed and held |
|
| EQ |
|
|
|
| — | Enters playback mode menu directly (see page 2). |
|
|
|
| — | Returns to the previous menu. |
|
|
|
| — | Power off : Checks the current clock time. |
| Power on : Changes the display information. | |
|
| |
|
|
Reset the unit after installation is completed.
• Your preset adjustments will also be erased.
How to forcibly eject a disc
 [Hold]
•You can forcibly eject the loaded disc even if the disc is locked. To lock/unlock the disc, see page 2.
•Be careful not to drop the disc when it ejects.
•If this does not work, reset your unit.
For safety...
•Do not raise the volume level too much, as this will block outside sounds, making driving dangerous.
•Stop the car before performing any complicated operations.
Temperature inside the car...
If the effectiveness of the remote controller decreases, replace the battery.
Replacing the lithium coin battery
CR2025
Caution:
•Danger of explosion if battery is incorrectly replaced. Replace only with the same or equivalent type.
•Battery shall not be exposed to excessive heat such as sunshine, fire, or the like.
Warning (about battery handling)
To prevent accidents and damage:
• Do not install any battery other than CR2025 or its |
equivalent. |
• Store out of reach of children. |
• Do not recharge, short, or dismantle. |
Maintenance
How to clean the connectors
Wipe the connectors with a cotton swab or cloth moistened with alcohol.
Connectors
Moisture condensation
Moisture may condense on the lens inside the unit. Eject the disc and leave the unit turned on for a few hours until the moisture has evaporated.
To keep discs clean
Wipe in a straight line from center of disc to edge. Do not use liquid cleaners, thinners, or benzene.
To play new discs
Remove any rough areas from the inner and outer edges of the disc.
Do not use the following discs:
•Single CD (8 cm disc)
•Warped disc
•Disc with sticker and sticker residue
•Disc with
•Unusual shape disc
•
•Disc with transparent or
If you have parked the car for a long time in hot or cold weather, wait until the temperature in the car becomes normal before operating the unit.
• Do not dispose of in fire. |
• Do not carry around with other metallic materials. |
• Wrap the battery with tape and insulate when |
throwing away or saving it. |
Microsoft and Windows Media are either registered trademarks or trademarks of Microsoft Corporation in the United States and/or other countries.
1