Listening to the radio 
~ |
| Ÿ |
| ] “FM” or “AM” | “ST” lights up when receiving an FM stereo broadcast with |
|
| |
|
| sufficient signal strength. |
Selecting the playback modes
You can use only one of the following playback modes at a time.
1
2
Caution on volume setting:
Discs produce very little noise compared with other sources. Lower the volume before playing a disc to avoid damaging the speakers by the sudden increase of the output level.
Changing the display information
Manual search
“M” flashes, then press the button repeatedly.
[Hold]
When an FM stereo broadcast is hard to receive
1
[Hold]
2
]<TUNER> ] <MONO> ] <MONO ON> Reception improves, but stereo effect will be lost.
To restore the stereo effect, repeat the same procedure to select <MONO OFF>.
Selecting a preset station
1
or 2
Assigning title to a station
You can assign titles to 30 station frequencies (FM and AM) using 8 characters (maximum) for each title.
1
]“FM” or “AM”
2
[Hold]
]“REPEAT” ![]() “RANDOM”
“RANDOM”
3
REPEAT |
|
TRACK RPT | : Repeats current track |
FOLDER RPT | : Repeats current folder |
RANDOM |
|
FOLDER RND | : Randomly plays all tracks of |
| current folder, then tracks of |
| next folders |
ALL RND | : Randomly plays all tracks |
To cancel repeat play or random play, select “RPT OFF” or “RND OFF.”
Disc title/Album name/performer (folder name)*
=Track title (file name)* = Current track number with the elapsed playing time = Current track number with the clock time = (back to the beginning)
* If the current disc is an audio CD, “NO NAME” appears. If an MP3/WMA file does not have Tag information or <TAG DISPLAY> is set to <TAG OFF>, folder name and file name appear.
Automatic presetting (FM)—
SSM (Strong-station Sequential Memory)
You can preset up to 18 stations for FM.
While listening to a station...
1
[Hold]
2
]<TUNER> ] <SSM> ] <SSM 01 – 06> / <SSM 07 – 12> / <SSM 13 – 18>
“SSM” flashes and local stations with the strongest signals are searched and stored automatically.
To preset another 6 stations, repeat the above procedure by selecting one of the other 6 SSM setting ranges.
Manual presetting (FM/AM)
]Show the title entry screen.
3
]Selects a character.
4
]Move to the next (or previous) character position.
5Repeat steps 3 and 4 until you have finished entering the title.
6
To erase the entire title, press and hold DISP after step 2, then press the control dial.
Available characters
A | B | C | D | E | F | G | H | I |
J | K | L | M | N | O | P | Q | R |
S | T | U | V | W | X | Y | Z | 0 |
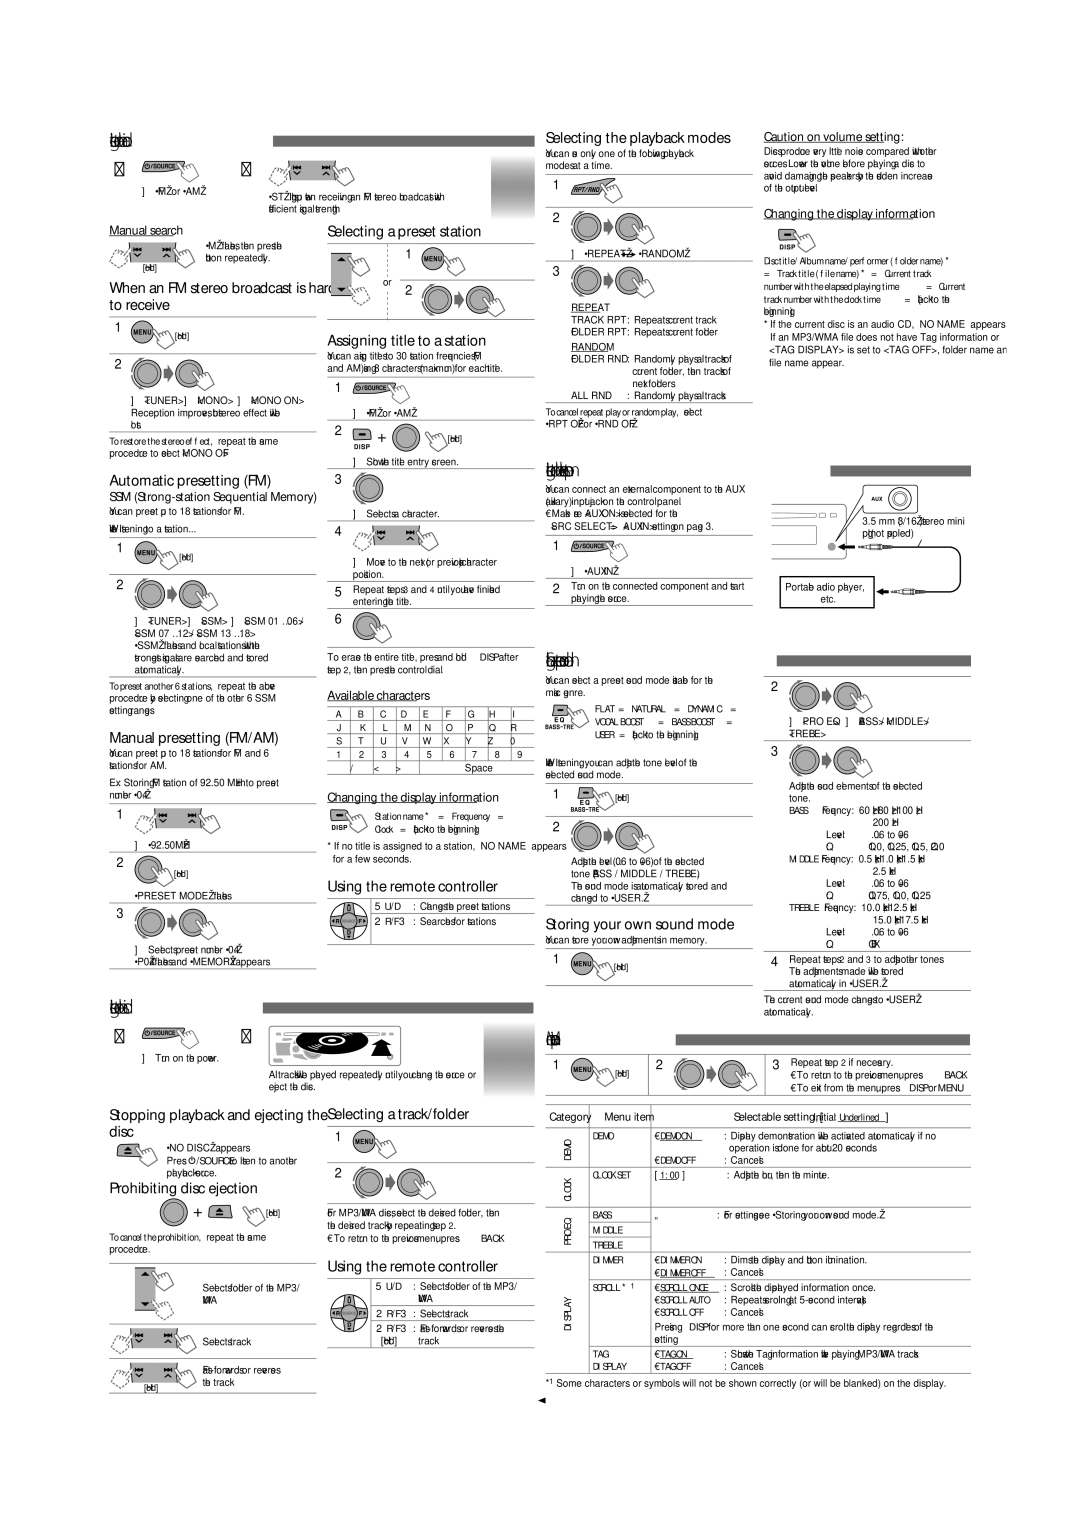
Listening to the external components 
You can connect an external component to the AUX |
| |
(auxiliary) input jack on the control panel. |
| |
• Make sure <AUX ON> is selected for the | 3.5 mm (3/16”) stereo mini | |
<SRC SELECT> = <AUX IN> setting on page 3. | ||
plug (not supplied) | ||
|
1
] “AUX IN” |
| |
2 Turn on the connected component and start |
| Portable audio player, |
playing the source. | etc. | |
|
|
|
Selecting a preset sound mode 
You can select a preset sound mode suitable for the | 2 |
music genre. | |
FLAT = NATURAL = DYNAMIC = |
|
VOCAL BOOST = BASS BOOST = | ] <PRO EQ> ] <BASS> / <MIDDLE> / |
USER = (back to the beginning) | <TREBLE> |
You can preset up to 18 stations for FM and 6 stations for AM.
Ex.: Storing FM station of 92.50 MHz into preset number “04.”
1
]“92.50MHz”
2
 [Hold]
“PRESET MODE” flashes.
3
]Selects preset number “04.”
“P04” flashes and “MEMORY” appears.
1 | 2 | 3 | 4 | 5 | 6 | 7 | 8 | 9 |
— | / | < | > |
|
| Space |
|
|
Changing the display information
Station name * = Frequency =
Clock = (back to the beginning)
*If no title is assigned to a station, “NO NAME” appears for a few seconds.
Using the remote controller
5 U/D ∞ | : Changes the preset stations |
2 R/F 3 | : Searches for stations |
While listening, you can adjust the tone level of the selected sound mode.
1
 [Hold]
2
Adjust the level
The sound mode is automatically stored and changed to “USER.”
Storing your own sound mode
You can store your own adjustments in memory.
1
[Hold]
3
Adjust the sound elements of the selected
tone. |
|
BASS Frequency: | 60 Hz, 80 Hz, 100 Hz, |
| 200 Hz |
Level: |
Q:Q1.0, Q1.25, Q1.5, Q2.0 MIDDLE Frequency: 0.5 kHz, 1.0 kHz, 1.5 kHz,
2.5kHz
Level: |
Q:Q0.75, Q1.0, Q1.25 TREBLE Frequency: 10.0 kHz, 12.5 kHz,
15.0kHz, 17.5 kHz
Level: |
Q:Q FIX
4Repeat steps 2 and 3 to adjust other tones. The adjustments made will be stored automatically in “USER.”
Listening to the disc ![]()
~ ![]() Ÿ
Ÿ
Menu operations
The current sound mode changes to “USER” automatically.
] Turn on the power.
All tracks will be played repeatedly until you change the source or eject the disc.
1 | 2 | 3 Repeat step 2 if necessary. |
| [Hold] | • To return to the previous menu, press BACK. |
|
| • To exit from the menu, press DISP or MENU. |
Stopping playback and ejecting the disc
“NO DISC” appears.
Press ![]() /SOURCE to listen to another playback source.
/SOURCE to listen to another playback source.
Prohibiting disc ejection
 [Hold]
To cancel the prohibition, repeat the same procedure.
Selecting a track/folder | Category Menu item |
| Selectable setting, [Initial: Underlined] | |||
| 1 |
|
|
|
|
|
DEMO | DEMO | • DEMO ON | : Display demonstration will be activated automatically if no | |||
|
|
|
| • DEMO OFF | operation is done for about 20 seconds. | |
|
|
|
|
| ||
|
|
|
|
| : Cancels. | |
2 |
|
|
| |||
| CLOCK | CLOCK SET | [ 1:00 ] | : Adjust the hour, then the minute. | ||
|
|
|
|
|
| |
|
|
|
|
|
|
|
For MP3/WMA discs, select the desired folder, then |
|
|
|
| ||
EQ | BASS | — | : For settings, see “Storing your own sound mode.” | |||
the desired track by repeating step 2. |
|
|
| |||
MIDDLE |
|
| ||||
PRO |
|
| ||||
• To return to the previous menu, press BACK. |
|
| ||||
TREBLE |
|
| ||||
|
|
|
|
|
| |
Using the remote controller |
| DIMMER | • DIMMER ON | : Dims the display and button illumination. | ||
|
| • DIMMER OFF | : Cancels. | |||
|
|
|
|
| ||
[Hold]
Selects folder of the MP3/
WMA
Selects track
5 U/D ∞ : Selects folder of the MP3/ | DISPLAY | SCROLL *1 | • SCROLL ONCE : Scrolls the displayed information once. | ||
2 R/F 3 | : |
| Pressing DISP for more than one second can scroll the display regardless of the | ||
| WMA |
|
| • SCROLL AUTO | : Repeats scrolling (at |
2 R/F 3 | : Selects track |
|
| • SCROLL OFF | : Cancels. |
[Hold] | track |
|
| setting. |
|
TAG | • TAG ON | : Shows the Tag information while playing MP3/WMA tracks. |
DISPLAY | • TAG OFF | : Cancels. |
*1 Some characters or symbols will not be shown correctly (or will be blanked) on the display.
2