For Customer Use
GR-DVA1
For clock operation and remote control unit
Dear Customer
It is recommended that you
Grounding or Polarization
Power Sources
Power Cord Protection
Power Lines
Replacement Parts
Accessories
Cleaning
Damage Requiring Service
About Batteries
AA-V15U
BN-V11U
Audio
Video
Contents
Power
Charging the Battery Pack
Using the Battery Pack
Using AC Power
Using a CAR Battery
Charge Marker
RE-INSERT Holder
Insert Battery in Holder
10 EN
Getting Started
Access DATE/TIME Menu
Date/Time Settings
Select Operation Mode
Access Recording Menu
INSERT/REMOVE Tape
12 EN
Loading/Unloading a Cassette
Open Cassette Cover
Set depending on your preference
Recording Mode Setting
SET Recording Mode
First move the highlight bar to REC Mode by
Grip Adjustment
Viewfinder Adjustment
14 EN
Attach Strap
Adjust Length
Shoulder Strap Attachment
Tripod Mounting
Load a Cassette
Power Switch Position
16 EN
Recording Basic Recording
Viewfinder Indications
Stop Recording
Press Display Button
Zoom
Feature Picture Stabilizer
18 EN
Basic Recording
Feature Video Light
To brighten the scene when natural lighting is too dim
Battery power
Basic Features
When blank portion is recorded on a tape
Proper recording
SET Function Parameters
Recording Advanced Features EN21
Displaying The Date And Time During Recording
Select Function
Snapshot
Advanced Features
22 EN
Recording
EN23
Motor Drive Mode
Recording Advanced Features
Using Menu For Detailed Adjustment
24 EN
Recording Menu Explanations
System Menu Explanations
Date/Time Menu Explanations
B K , , B W
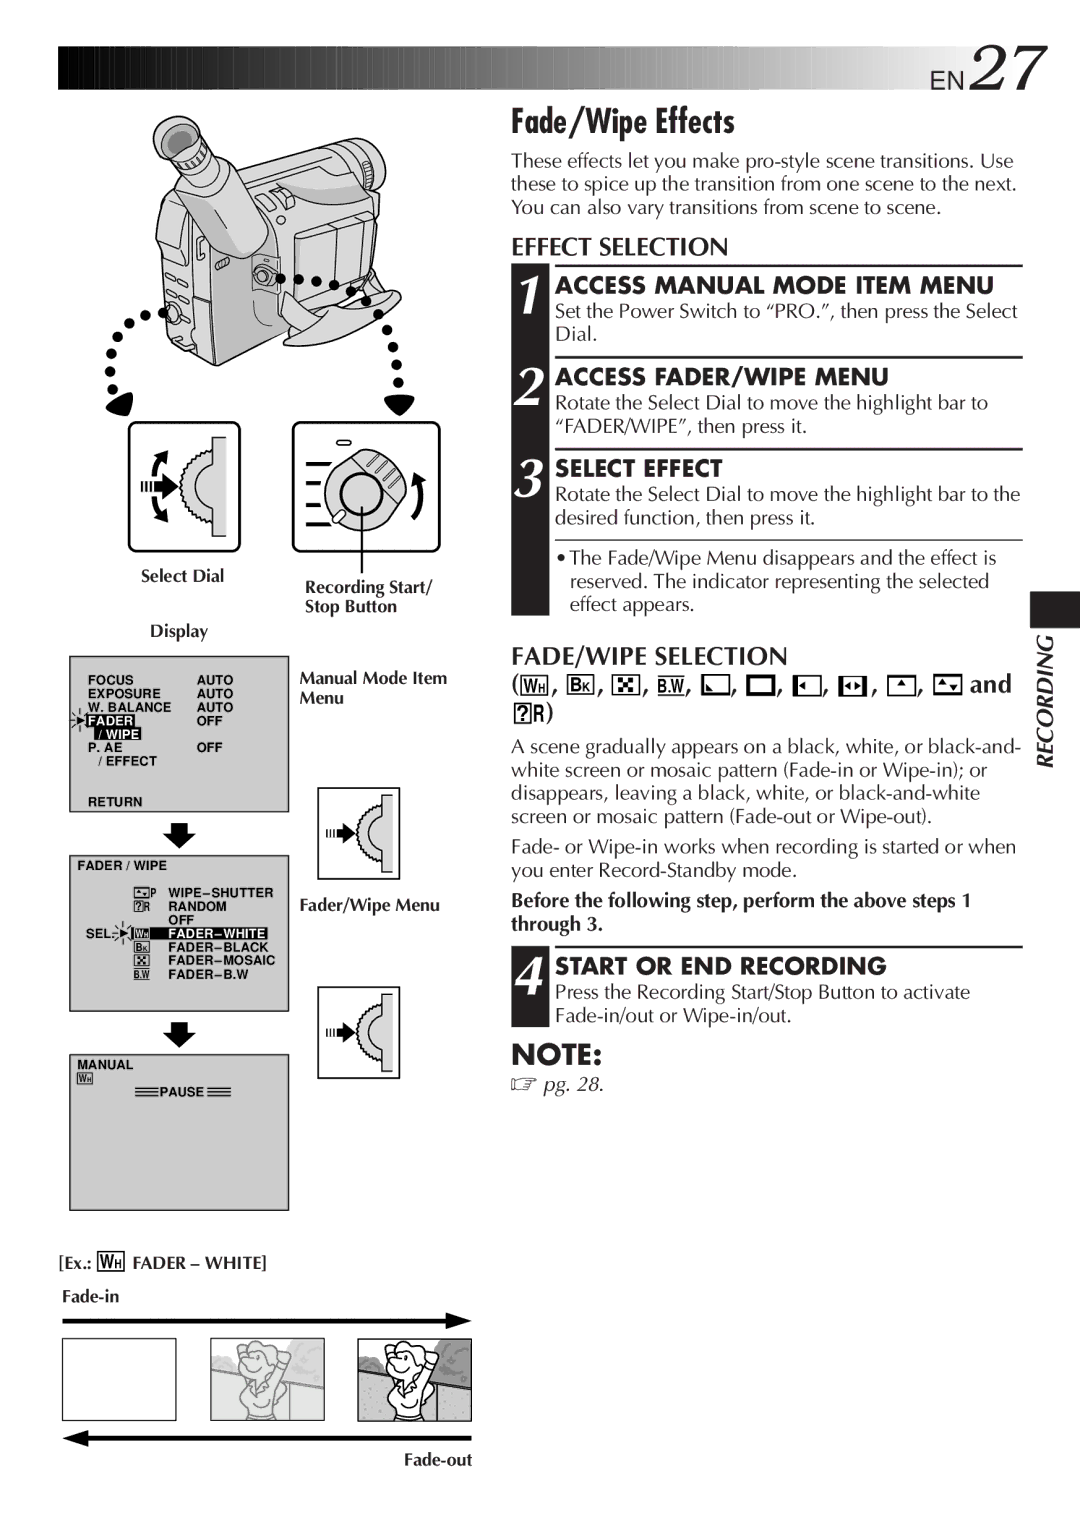
Fade/Wipe Effects
Effect Selection
FADE/WIPE Selection
Before the following steps, perform steps 1 through 3 on pg
28 EN
Picture Wipe or Dissolve Selection P, P, P, P , P, P and P
Start Recording
Fader And Wipe Menu
Program AE With Special Effects
Select Mode
Disable Mode
30 EN
Monotone
Shutter
Twilight
Sepia
Patterns that are regularly repeated
Focusing
32 EN
Auto Focus
END Adjustment of Focus
Access Manual Mode Item Menu
Access Manual Focus
Adjust Focus
To darken the image
Access Exposure Control
34 EN
Exposure Control
To Return To Automatic Iris Control
Iris Lock
Center SUBJECT, Lock Iris
Iris
36 EN
White Balance Adjustment
Accessment White Balance Adjust
Select Auto in . Or set the Power Switch to
SET Manual White Balance
Enter Setting
Exit Manual White Balance Adjustment
Manual White Balance Operation
Play Back
38 EN
Playback Basic Playback
Rewind or Fast-forward the tape
Feature Playback Zoom
Feature Still Playback
Feature Shuttle Search
Feature Slow-Motion Playback
Playback Menu
Playback Advanced Features
Access Playback Menu
40 EN
Playback Sound
Displaying The Time Code During Playback
Recording sound Display Output sound
Connections
Connectors
42 EN
Playback
Turn on the camcorder, the VCR and the TV
Connectvcr Camcorder to TV or
Tape Dubbing
44 EN
Remote control uses one lithium battery CR2025
Using the Remote Control Unit EN45
Installing The Battery
Pull OUT Battery Holder
RM-V712U only
EN Using the Remote Control Unit
Functions
Buttons
Feature Slow-Motion Playback RM-V712U only
To allow slow-speed search in either direction
To stop Slow-Motion Playback in progess, press Play
Activate Zoom
Using the Remote Control Unit
48 EN
Playback Zoom
Select Playback Effect
Accessmenu Playback Effect Select
Playback Special Effects
Start Playback
Operate VCR
50 EN
9 `
SET REMOTE/VCR Code
Select Scenes
Make Connections
USE Program AE with Special Effects if Necessary
52 EN
Select Scenes
USE FADE/WIPE on Scene Transition if Necessary
Automatic Editing to VCR
Prepare Source Tape
Stop Editing
54 EN
For More Accurate Editing
Diagnosing VCR’S Against Camcorder Timing
Input Correction Data
Adjustment of VCR’S Against Camcorder Timing
Possible Causes Corrective Action
56 EN
Completed pg Being used in a scene
Video mode Video playback
Set the Power Switch to Effects and Fade/Wipe
Selected the mode For editing was registered
Troubleshooting
58 EN
Recording Menu Use the Picture Wipe Function pg
AE with special effects
Indicators On Screen is set to Set on Screen to on
OFF in the Date/Time Date/Time Menu Screen
Ex. fingerprints Cause damage
Possible Causes
60 EN
After Use
Cleaning The Camcorder
# $ t %
62EN
Select Dial +, -, Push @ MENU/DISPLAY Button
Video Light Switch
$ Power Switch Battery Release Switch
Clock Battery Slot Tripod Mounting Socket
Viewfinder Indications During Recording
64 EN
Index
Indications
SOUND1 Tape END
Error Refer Manual
Volume
Viewfinder Indications During Playback
66 EN
Information
Using Household AC Plug Adapter
To protect the unit, do not
For safety, do not
Avoid using the unit
Do not leave the unit
Camcorder
Specifications
AC Power Adapter/Charger AA-V15U
Connectors
Memo
Memo
GR-DVA1

![]()
![]()
![]()
![]()
![]()
![]()
![]()
![]()
![]()
![]()
![]()
![]()
![]()
![]()
![]()
![]()
![]()
![]()
![]() EN27
EN27![]()
![]() PAUSE
PAUSE ![]()
