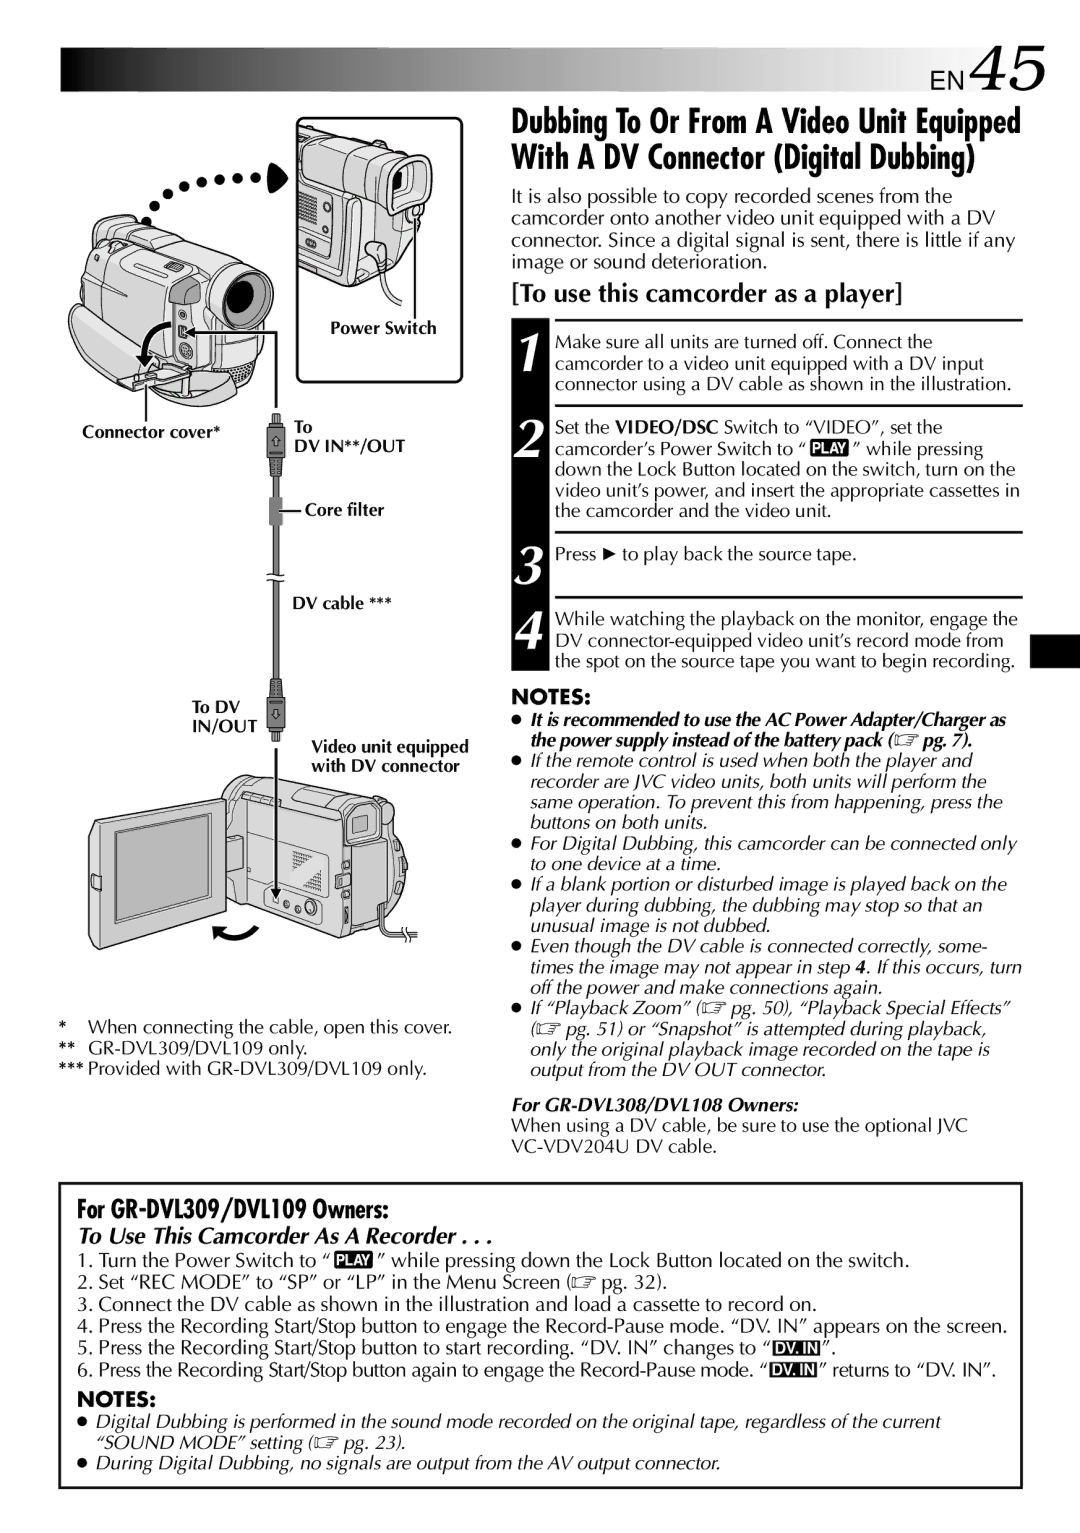
Power Switch

Connector cover*

To


DV IN**/OUT


Core filter


DV cable ***

To DV

IN/OUT

Video unit equipped with DV connector

*When connecting the cable, open this cover.

**GR-DVL309/DVL109 only.

***Provided with GR-DVL309/DVL109 only.

EN45

Dubbing To Or From A Video Unit Equipped With A DV Connector (Digital Dubbing)

It is also possible to copy recorded scenes from the camcorder onto another video unit equipped with a DV connector. Since a digital signal is sent, there is little if any image or sound deterioration.

[To use this camcorder as a player]

1 Make sure all units are turned off. Connect the camcorder to a video unit equipped with a DV input connector using a DV cable as shown in the illustration.

2 Set the VIDEO/DSC Switch to “VIDEO”, set the

camcorder’s Power Switch to “ ” while pressing down the Lock Button located on the switch, turn on the video unit’s power, and insert the appropriate cassettes in the camcorder and the video unit.

3 Press 4to play back the source tape.

4 While watching the playback on the monitor, engage the DV connector-equipped video unit’s record mode from the spot on the source tape you want to begin recording.

NOTES:

It is recommended to use the AC Power Adapter/Charger as the power supply instead of the battery pack ( pg. 7).

If the remote control is used when both the player and recorder are JVC video units, both units will perform the same operation. To prevent this from happening, press the buttons on both units.

For Digital Dubbing, this camcorder can be connected only to one device at a time.

If a blank portion or disturbed image is played back on the player during dubbing, the dubbing may stop so that an unusual image is not dubbed.

Even though the DV cable is connected correctly, some- times the image may not appear in step 4. If this occurs, turn off the power and make connections again.

If “Playback Zoom” (  pg. 50), “Playback Special Effects” (  pg. 51) or “Snapshot” is attempted during playback, only the original playback image recorded on the tape is output from the DV OUT connector.

For GR-DVL308/DVL108 Owners:

When using a DV cable, be sure to use the optional JVC VC-VDV204U DV cable.

For GR-DVL309/DVL109 Owners:

To Use This Camcorder As A Recorder . . .

1.Turn the Power Switch to “ ” while pressing down the Lock Button located on the switch.

2.Set “REC MODE” to “SP” or “LP” in the Menu Screen ( pg. 32).

3.Connect the DV cable as shown in the illustration and load a cassette to record on.

4.Press the Recording Start/Stop button to engage the Record-Pause mode. “DV. IN” appears on the screen.

5.Press the Recording Start/Stop button to start recording. “DV. IN” changes to “ DV. IN ”.

6.Press the Recording Start/Stop button again to engage the Record-Pause mode. “ DV. IN ” returns to “DV. IN”.

NOTES:

Digital Dubbing is performed in the sound mode recorded on the original tape, regardless of the current “SOUND MODE” setting (  pg. 23).

During Digital Dubbing, no signals are output from the AV output connector.

Page 45
Image 45
JVC GR-DVL109, GR-DVL108, GR-DVL308 specifications EN45, To use this camcorder as a player, For GR-DVL309/DVL109 Owners

GR-DVL109, GR-DVL309, GR-DVL308, GR-DVL108 specifications

The JVC GR-DVL series, including the GR-DVL308, GR-DVL309, GR-DVL108, and GR-DVL109, are notable products in the realm of compact digital camcorders, designed to cater to both amateur filmmakers and seasoned videographers. These models were released with a range of features that prioritize ease of use, excellent video quality, and robust functionality.

At the heart of the GR-DVL series is JVC's advanced digital imaging technology. Each model features a 1/6-inch CCD sensor that delivers impressive video quality with accurate color reproduction and clarity. The GR-DVL308 and GR-DVL309 come equipped with a 20x optical zoom, allowing users to capture distant subjects with remarkable detail. Meanwhile, the GR-DVL108 and GR-DVL109 offer a slightly lower zoom capability but still provide sufficient range for typical shooting scenarios.

One standout characteristic of these models is their ability to record in multiple formats, including VHS-C compatibility, which adds versatility to media management. Users can easily transition from digital to analog formats and vice versa, ensuring their recordings are easily accessible. The GR-DVL309 further enhances usability with a built-in digital still camera function, allowing for the capture of high-resolution still images alongside video recordings.

In terms of design, the JVC GR-DVL series is compact and lightweight, making it ideal for on-the-go shooting. The camcorders are user-friendly, featuring an intuitive interface and a rotating LCD screen that allows for flexible viewing angles. This ensures that users can comfortably compose their shots from various perspectives.

The series also incorporates JVC's image stabilization technology, which significantly minimizes shaking and enhances overall image smoothness during movement. This is particularly beneficial for handheld shooting, allowing for more professional-looking videos without the need for additional stabilization equipment.

Connectivity options are robust, with the inclusion of USB and FireWire (IEEE 1394) ports for easy data transfer to PCs and editing software. This compatibility streamlines the editing process, allowing for quick uploads to various platforms.

In conclusion, the JVC GR-DVL308, GR-DVL309, GR-DVL108, and GR-DVL109 are well-rounded camcorders that deliver impressive performance for their class. Combining advanced imaging technology, versatile recording options, and user-friendly features, these models are suitable for a wide range of users looking to create high-quality video content. Whether filming family events, travel adventures, or creative projects, the GR-DVL series has the capabilities to meet diverse videography needs.