70EN

TROUBLESHOOTING

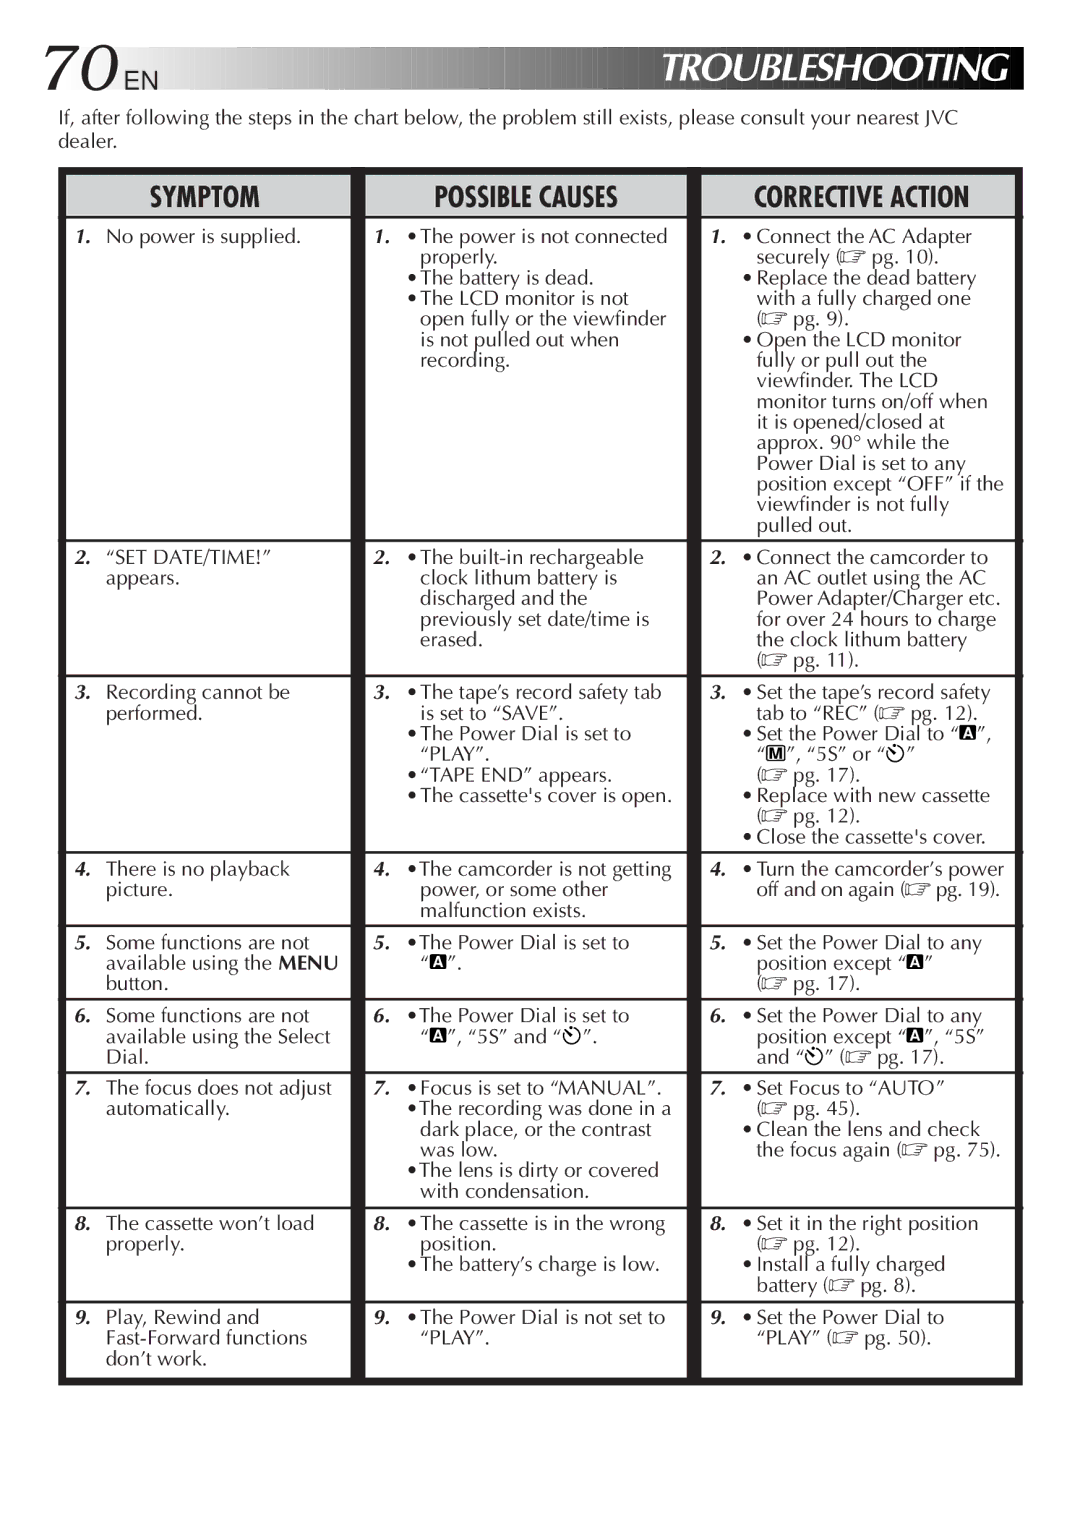
If, after following the steps in the chart below, the problem still exists, please consult your nearest JVC dealer.

SYMPTOM

POSSIBLE CAUSES

1.No power is supplied. 1. •The power is not connected properly.

•The battery is dead. •The LCD monitor is not

open fully or the viewfinder is not pulled out when recording.

2.“SET DATE/TIME!” 2. •The built-in rechargeable

appears.

clock lithum battery is


discharged and the


previously set date/time is


erased.

3. Recording cannot be

3. •The tape’s record safety tab

performed.

is set to “SAVE”.


•The Power Dial is set to


“PLAY”.


•“TAPE END” appears.


•The cassette's cover is open.

4. There is no playback

4. •The camcorder is not getting

picture.

power, or some other


malfunction exists.

5. Some functions are not

5. •The Power Dial is set to

available using the MENU

A

”.


button.


6. Some functions are not

6. •The Power Dial is set to

available using the Select

A

”, “5S” and “ ”.


Dial.

7.The focus does not adjust 7. •Focus is set to “MANUAL”.

automatically.•The recording was done in a dark place, or the contrast was low.

•The lens is dirty or covered with condensation.

8.The cassette won’t load 8. •The cassette is in the wrong

properly.

position.


•The battery’s charge is low.

9. Play, Rewind and

9. •The Power Dial is not set to

Fast-Forward functions

“PLAY”.

don’t work.


CORRECTIVE ACTION

1.• Connect the AC Adapter securely (pg. 10).

Replace the dead battery with a fully charged one (pg. 9).

Open the LCD monitor fully or pull out the viewfinder. The LCD monitor turns on/off when it is opened/closed at approx. 90° while the Power Dial is set to any position except “OFF” if the viewfinder is not fully pulled out.

2.• Connect the camcorder to an AC outlet using the AC Power Adapter/Charger etc. for over 24 hours to charge the clock lithum battery (pg. 11).

3.• Set the tape’s record safety tab to “REC” (pg. 12).

Set the Power Dial to “ A ”, “ M ”, “5S” or “

(pg. 17).

Replace with new cassette (pg. 12).

Close the cassette's cover.

4.• Turn the camcorder’s power off and on again (pg. 19).

5.• Set the Power Dial to any position except “ A ” (pg. 17).

6.• Set the Power Dial to any position except “ A ”, “5S” and “” (pg. 17).

7.• Set Focus to “AUTO”

(pg. 45).

Clean the lens and check the focus again (pg. 75).

8.• Set it in the right position

(pg. 12).

Install a fully charged battery (pg. 8).

9.• Set the Power Dial to “PLAY” (pg. 50).

Page 70
Image 70
JVC GR-DVL9000 manual Tape END appears, Don’t work

GR-DVL9000 specifications

The JVC GR-DVL9000 is a standout product in the realm of digital camcorders, showcasing a blend of advanced technology and user-friendly features. Released as part of JVC's line of DV camcorders, it quickly gained popularity among consumers seeking high-quality video recording without compromising on style and functionality.

At the heart of the GR-DVL9000 is its impressive 1/4-inch CCD sensor, which delivers a resolution of 800,000 pixels. This sensor ensures that the camcorder captures vibrant colors and sharp details, allowing users to record their precious moments in stunning clarity. Its capability to offer a 16:9 aspect ratio enhances the cinematic experience, making it particularly appealing for filmmakers and enthusiasts looking to achieve a more professional look in their videos.

The GR-DVL9000 employs JVC's advanced DV format, which offers superior video quality compared to traditional analog formats. This digital advantage is further amplified with the incorporation of 3D Digital Noise Reduction technology, ensuring clean and smooth playback, even in low-light conditions. The camcorder also supports a range of recording modes, allowing flexibility for various shooting environments, whether indoors or outdoors.

One of the key characteristics of the GR-DVL9000 is its user-centric design. The camcorder features an easy-to-navigate menu system and an ergonomic grip that enhances comfort during prolonged use. The large 3.5-inch LCD screen provides real-time feedback, making it easy to frame shots accurately and review recordings without straining the eyes.

Additionally, the GR-DVL9000 includes a 20x optical zoom lens, enabling users to get close to the action without sacrificing image quality. This is particularly useful for nature documentaries, sports events, or any scenario where capturing distant subjects is vital.

Connectivity options are also a highlight of this device. The camcorder includes both FireWire (IEEE 1394) and USB ports, allowing for seamless transfer of videos to computers for editing and archiving. This ease of connectivity underscores the GR-DVL9000’s suitability for both casual users and those who take their videography seriously.

In conclusion, the JVC GR-DVL9000 stands out with its combination of a strong CCD sensor, advanced digital recording capabilities, user-friendly design, and robust connectivity options. Whether for personal use or professional projects, it remains a compelling choice among digital camcorders, epitomizing JVC's commitment to quality and innovation in videography.