22 EN RECORDING Advanced Features For Video And D.S.C. (cont.)
|
| Power Switch | |||
MENU/BRIGHT Wheel |
|
|
| ||
|
|
| Lock Button | ||
|
|
| F |
|
|
|
|
| F |
|
|
|
|
| O |
|
|
|
|
| Y |
|
|
|
|
| A |
| |
|
|
|
| LP |
|
|
| Display |
|
|
|
| FADER / W I PE | Menu Screen | |||
|
| W I | |||
|
|
|
|
| |
|
| W I |
|
|
|
|
| RANDOM |
|
|
|
| 4 | OF F |
|
|
|
|
|
|
|
| |
|
|
|
|
| |
|
|
|
|
| |
DSC MENU | CAMERA MENU | ||||
1RETURN |
| 1RETURN |
|
| |
QUAL I TY | STANDARD | REC MODE |
| SP | |
REC SELECT | F I NE | SOUND MODE | LP | ||
|
| ZOOM |
|
|
|
|
| GA I N | UP |
|
|
|
| TAL LY |
|
|
|
|
| I D NUMBER |
| ||
|
| DEMO . MODE |
| ||
|
| S I DE | LED |
|
|
Using Menus For Detailed Adjustment
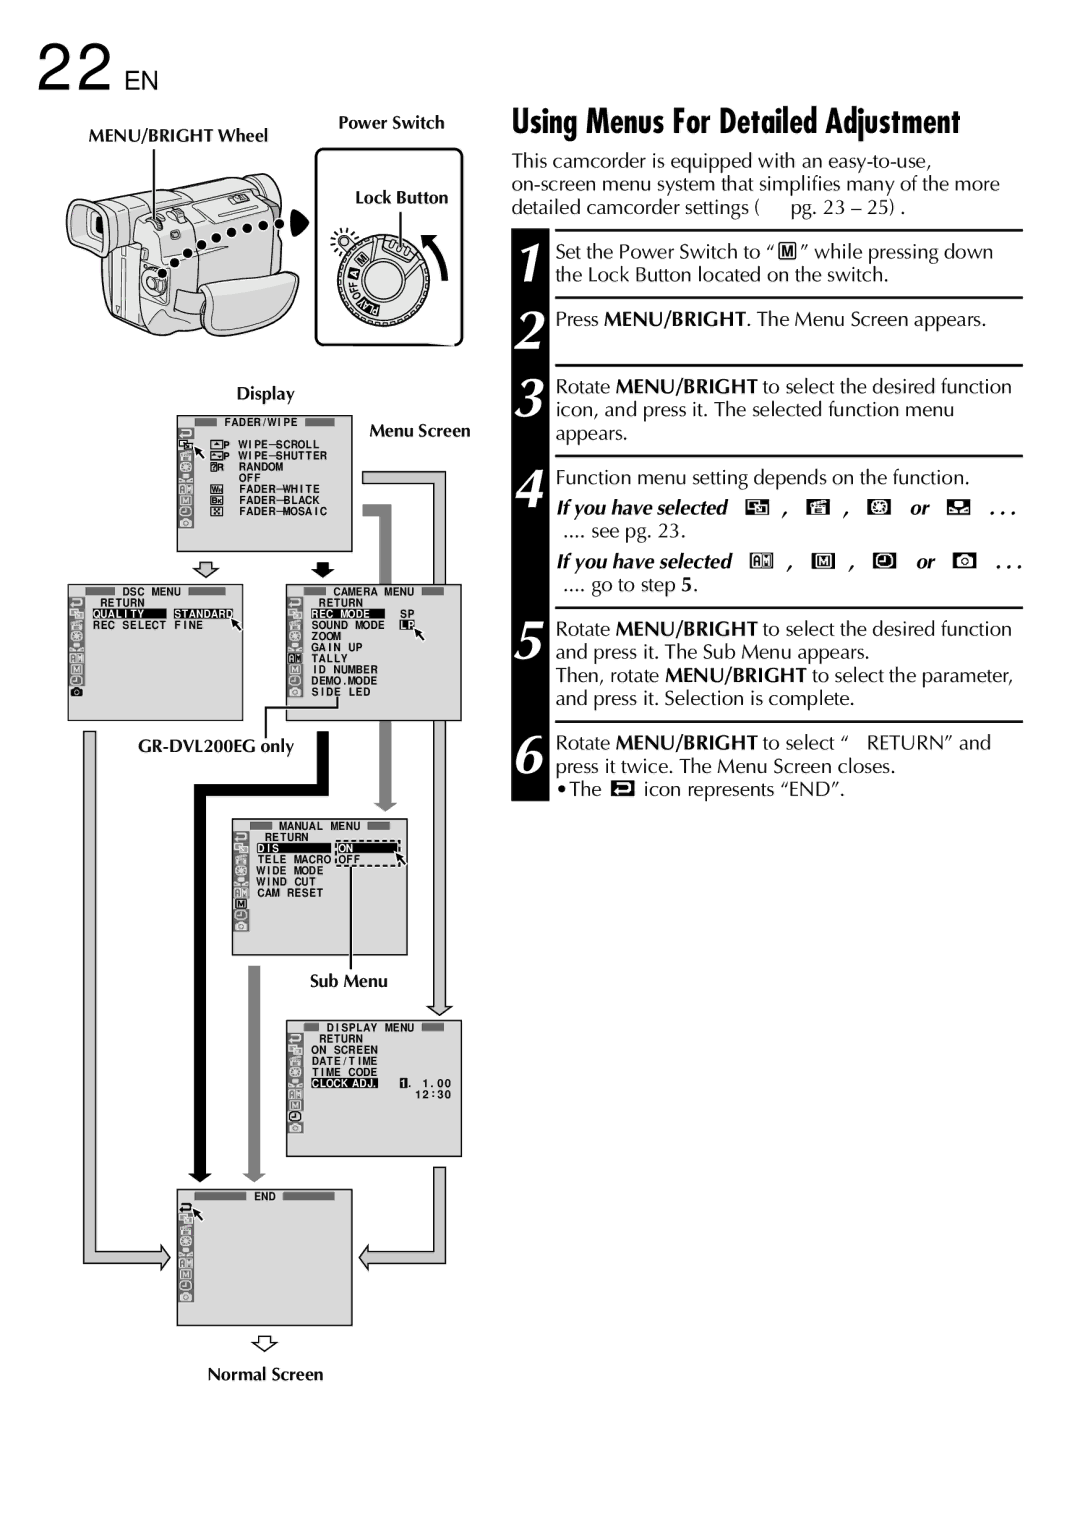
This camcorder is equipped with an
1
2 Press MENU/BRIGHT. The Menu Screen appears.
| Rotate MENU/BRIGHT to select the desired function | |||||||||||||
3 icon, and press it. The selected function menu |
| |||||||||||||
| appears. |
|
|
|
|
|
|
|
|
|
|
| ||
|
|
|
|
|
|
|
|
|
|
|
|
|
|
|
| Function menu setting depends on the function. |
| ||||||||||||
4 If you have selected “ |
|
| ”, “ |
|
|
| ”, “ |
|
| ” or “ |
|
| ” . . . | |
| .... see pg. 23. |
|
|
|
|
|
|
|
|
|
|
| ||
| If you have selected “ |
| ”, “ |
| ”, “ |
| ” or “ |
| ” . . . | |||||
|
|
|
|
|
| |||||||||
| .... go to step 5. |
|
|
|
|
|
|
|
|
|
|
| ||
5 Rotate MENU/BRIGHT to select the desired function and press it. The Sub Menu appears.
Then, rotate MENU/BRIGHT to select the parameter, and press it. Selection is complete.
6 Rotate MENU/BRIGHT to select “1RETURN” and press it twice. The Menu Screen closes.
•The ![]() icon represents “END”.
icon represents “END”.
MANUAL MENU | |
1RETURN |
|
D I S | ON |
TELE MACRO OF F | |
W I DE MODE |
|
W I ND CUT |
|
CAM RESET |
|
Sub Menu
D I SPLAY MENU
1RETURN
ON SCREEN
DATE / T I ME
T I ME CODE
CLOCK ADJ. 1 . 1 . 0 0 1 2 : 3 0
END
Normal Screen
