ENTER SHOWVIEW

4

NUMBER


Press OK, and a cursor

GUIDE PROG SET

appears above “GUIDE

1 2 3 4 5


EN11

When Using A Satellite

Tuner

Satellite Antenna

Aerial or Cable


PROG”. Then, using the


NUMBER keys, input the

GUIDE PROG

TV PROG


SHOWVIEW number (found

1

1


in most TV listings) of a


program scheduled to be


broadcast on each station


[0-9] =


on the list from step 1,

[MENU] : EXIT


starting at the top. If you

When entering a SHOWVIEW


enter the wrong number,


number for ZDF


press CANCEL to backspace


and input the correct number.


CONFIRM CHANNEL


POSITION NUMBER


4


Press OK and the display

GUIDE PROG SET


5


Ex. 1

Satellite

Tuner

AV2 IN/

DECODER

Ex. 2

Satellite

Tuner and

Decoder

under “TV PROG” begins


blinking.


If the blinking number

GUIDE PROG

TV PROG

under “TV PROG” agrees


2

2


with the channel


position . . .


. . . press OK.

[] =


If the numbers do not

[MENU] : EXIT


agree . . .


. . . input the channel position using PUSH JOGor

the NUMBER keys, then press OK.


If you input the SHOWVIEW number of a program that has already aired, “ERROR” appears on screen for a few seconds. Input the correct SHOWVIEW number.

Repeat steps 4 and 5 as necessary.

CLOSE MENU

6 Press MENU and selection is complete.

If you already know the Guide Program number for a station . . .

1– After step 3, press PUSH JOG %.

The GUIDE PROG number begins blinking.

2– Enter the Guide Program number using the NUMBER keys or PUSH JOG, then press PUSH JOG %.

The TV PROG number begins blinking.

3– Enter the channel position using the NUMBER keys or PUSH JOG, then press PUSH JOG% .

Repeat 2 and 3 as necessary. 4– Press MENU.

Rear view

TV Receiver

Preparation

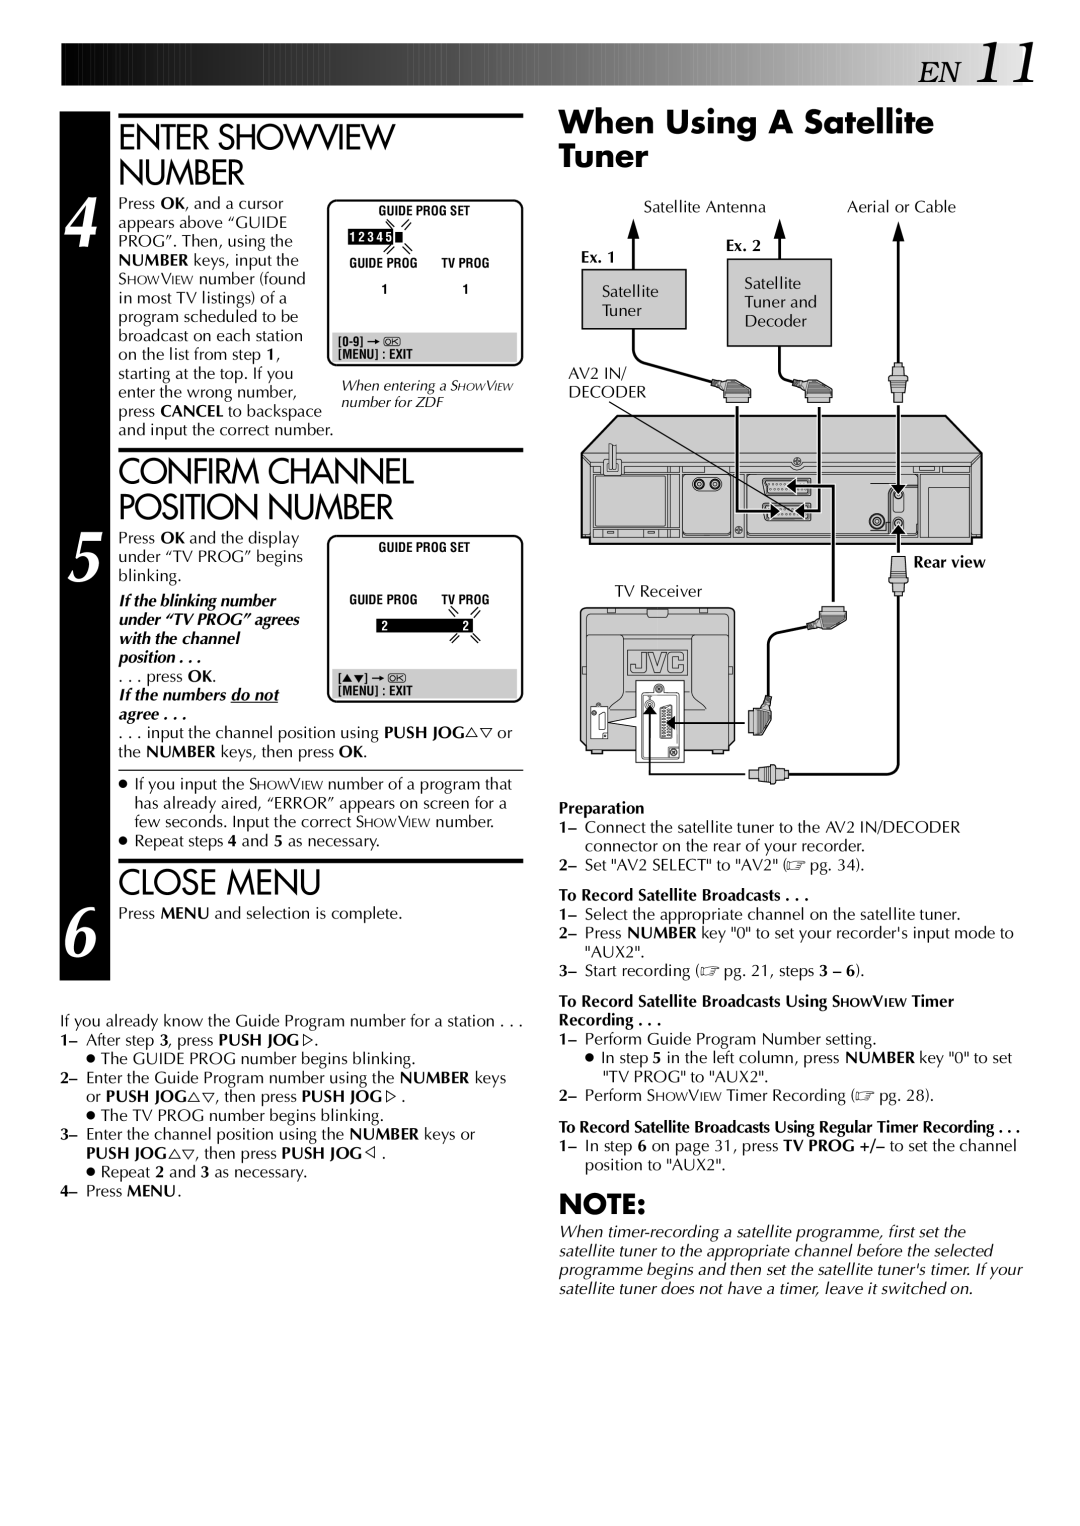
1– Connect the satellite tuner to the AV2 IN/DECODER connector on the rear of your recorder.

2– Set "AV2 SELECT" to "AV2" (pg. 34).

To Record Satellite Broadcasts . . .

1– Select the appropriate channel on the satellite tuner.

2– Press NUMBER key "0" to set your recorder's input mode to "AUX2".

3– Start recording (pg. 21, steps 3 – 6).

To Record Satellite Broadcasts Using SHOWVIEW Timer Recording . . .

1– Perform Guide Program Number setting.

In step 5 in the left column, press NUMBER key "0" to set "TV PROG" to "AUX2".

2– Perform SHOWVIEW Timer Recording (pg. 28).

To Record Satellite Broadcasts Using Regular Timer Recording . . .

1– In step 6 on page 31, press TV PROG +/– to set the channel position to "AUX2".

NOTE:

When timer-recording a satellite programme, first set the satellite tuner to the appropriate channel before the selected programme begins and then set the satellite tuner's timer. If your satellite tuner does not have a timer, leave it switched on.

Page 11
Image 11
JVC HR-DD848E specifications Enter Showview, Confirm Channel Position Number, Close Menu, When Using a Satellite Tuner

HR-DD848E specifications

The JVC HR-DD848E is a notable video cassette recorder (VCR) that emerged as a significant device in the late 1990s. It is particularly known for its advanced features and technological advancements that set it apart from conventional VCRs of its time. As part of JVC's esteemed line of video equipment, the HR-DD848E stands out for its ability to deliver high-quality playback and recording, marking it a favorite among enthusiasts and casual users alike.

One of the main features of the HR-DD848E is its Dual Play capability, allowing users to play back different formats without the need for additional equipment. The device supports both standard VHS tapes as well as the more advanced S-VHS format. S-VHS, known for its superior resolution and video quality compared to standard VHS, is complemented by the VCR’s built-in digital noise reduction and picture enhancement technology. This ensures that the playback experience is crisp and clear, regardless of tape quality.

Another distinguishing characteristic of the JVC HR-DD848E is its user-friendly interface. The device features straightforward controls and an intuitive on-screen menu, making it easy for individuals of all ages to operate. The included remote control also contributes to the user's convenience, providing access to various functionalities such as fast-forward, rewind, and pause.

The HR-DD848E is equipped with several advanced recording features. The Time Base Corrector (TBC) and the LP (Long Play) mode enhance the recording quality, allowing for longer playtime with satisfactory image clarity. The device also supports programming capabilities, enabling users to set timers for recordings, ensuring that they never miss their favorite shows, even during busy times.

Moreover, it features an AV input/output, enabling connectivity with other devices, such as cameras or additional video sources, making it versatile for various multimedia applications.

In summary, the JVC HR-DD848E is a remarkable VCR that encapsulates the technological innovations of its era. With features that enhance playback and recording quality, user-friendly operation, and the ability to connect with other devices, it represents a significant leap forward in home video technology. Whether for casual viewing or archiving cherished memories, the HR-DD848E remains a memorable part of video recording history.