22![]()
![]()
![]()
![]()
![]()
![]()
![]()
![]()
![]()
![]()
![]()
![]()
![]()
![]()
![]()
![]()
![]()
![]()
![]()
![]()
![]()
![]()
![]()
![]()
![]()
![]()
![]()
![]()
![]()
![]()
![]()
![]()
![]()
![]()
![]()
![]()
![]()
On-Screen Displays
6
q
OPERATE |
| OPERATE |
|
| |
|
| MODE |
| 2 |
|
1 | 2 | 3 |
4 | 5 | 6 |
7 8 9
0
3
1
PUSH JOG
1 |
| Press OPERATE. |
|
|
|
| ACCESS MODE SELECT | ||
2 |
| SCREEN |
|
|
| Press MODE. The On- |
|
| |
| Screen/B.E.S.T. screen | ON SCREEN | : ON | |
| appears. | |||
| B.E.S.T. | : ON | ||
|
|
| [5°]: SELECT |
|
|
|
| [5]: ON/OFF |
|
|
|
| [MODE] : EXIT |
|
|
|
|
|
|
3 |
| SELECT MODE |
|
|
| The pointer should already be next to “ON SCREEN”. If | |||
| not, press PUSH JOG%Þ to place it there. |
| ||
|
| ENABLE/DISABLE |
| |
4 |
|
|
| |
| The default setting is “ON”, so if you want | |||
| displays, leave the setting as is and go to step 5. If you | |||
| don’t want the displays to appear, press PUSH JOG% | |||
|
| to set “ON SCREEN” to “OFF”. |
| |
|
|
|
| |
|
| CLOSE MODE SELECT |
| |
5 |
| SCREEN |
|
|
| Press MODE. |
|
| |
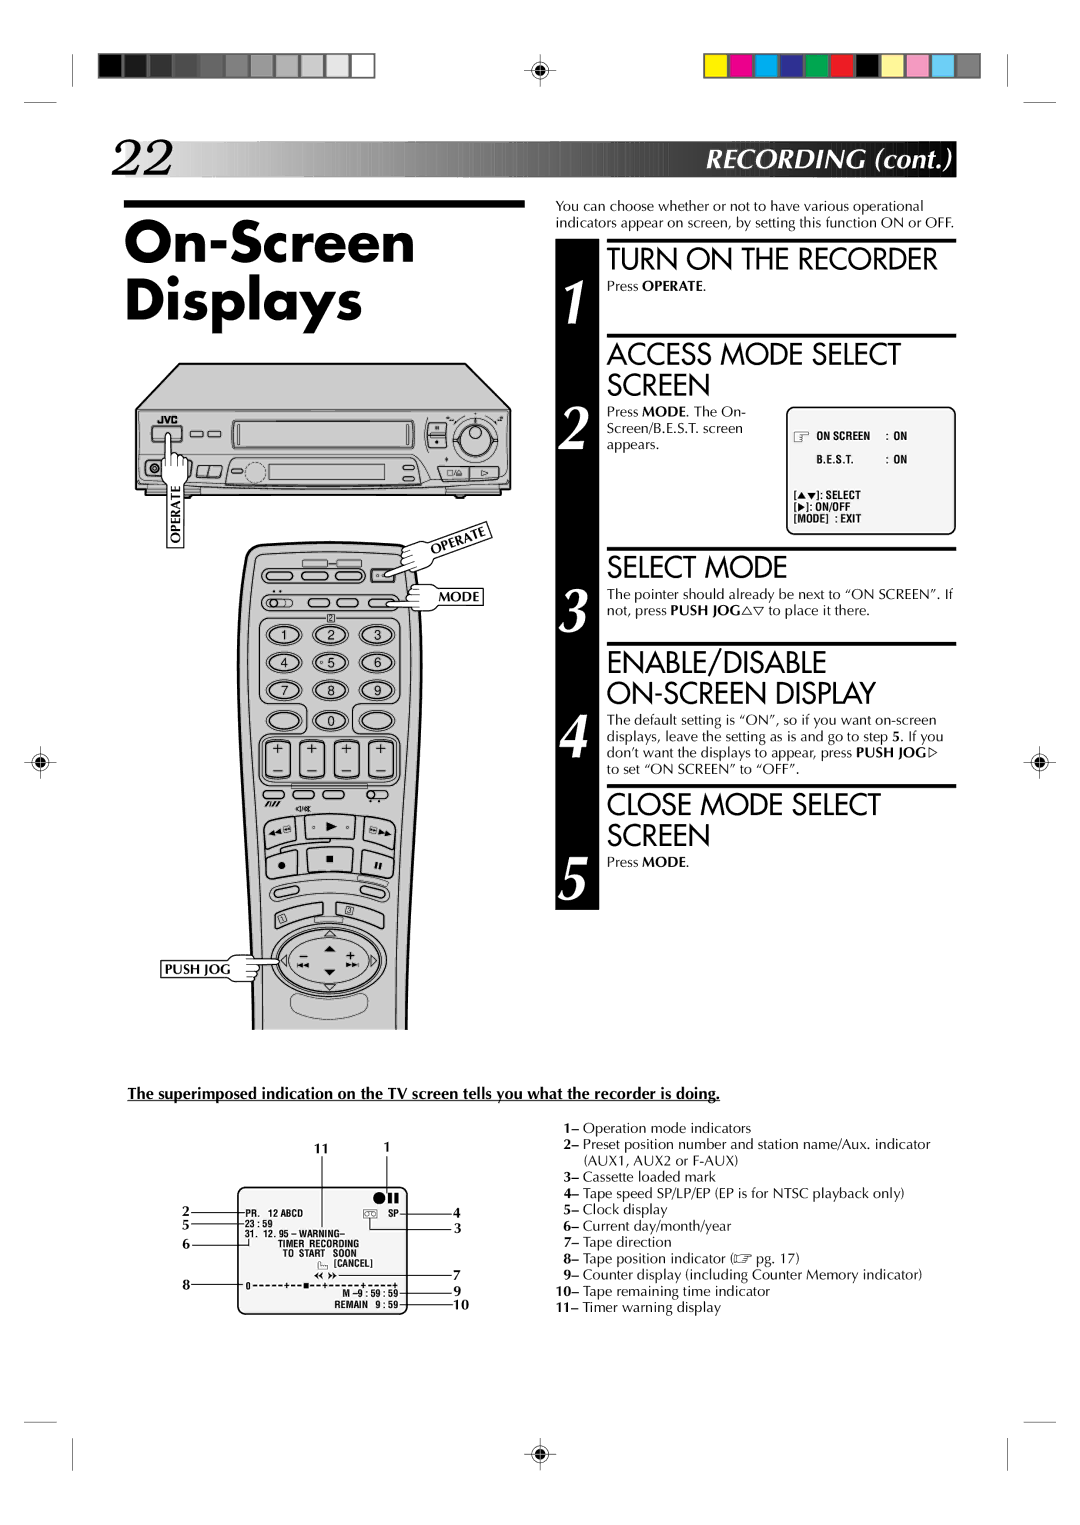
The superimposed indication on the TV screen tells you what the recorder is doing.
|
|
|
|
|
| 11 |
|
| 1 |
|
|
|
|
| ||
|
|
|
|
|
|
|
|
|
|
|
|
|
|
|
|
|
2 |
|
|
|
|
|
|
|
|
| q6 |
|
| 4 | |||
|
|
| PR. | 12 ABCD |
|
|
| ] SP |
|
| ||||||
|
|
|
|
|
|
| ||||||||||
5 |
|
| 23 : 59 |
|
|
|
|
|
|
|
| 3 | ||||
|
|
|
|
|
|
|
|
|
| |||||||
|
| 31. 12. 95 – WARNING– |
|
|
|
| ||||||||||
|
|
|
| |||||||||||||
6 |
|
|
|
| TIMER RECORDING |
|
|
|
|
|
|
| ||||
|
|
|
|
|
|
|
|
|
|
| ||||||
|
|
|
|
| TO START | SOON |
|
|
|
|
|
|
| |||
|
|
|
|
|
|
|
| [CANCEL] |
|
| 7 | |||||
8 |
|
|
|
|
|
|
|
|
|
|
|
|
| |||
| 0 | + | + | + | + |
|
| |||||||||
|
|
|
| 9 | ||||||||||||
|
|
|
|
|
|
|
|
| M |
|
| |||||
|
|
|
|
|
|
|
|
|
|
| ||||||
|
|
|
|
|
|
|
| REMAIN | 9 : 59 |
|
| 10 | ||||
|
|
|
|
|
|
|
|
|
| |||||||
1– Operation mode indicators
2– Preset position number and station name/Aux. indicator (AUX1, AUX2 or
3– Cassette loaded mark
4– Tape speed SP/LP/EP (EP is for NTSC playback only) 5– Clock display
6– Current day/month/year 7– Tape direction
8– Tape position indicator (☞ pg. 17)
9– Counter display (including Counter Memory indicator) 10– Tape remaining time indicator
11– Timer warning display
