46![]()
![]()
![]() EN
EN![]()
![]()
![]()
![]()
![]()
![]()
![]()
![]()
![]()
![]()
![]()
![]()
![]()
![]()
![]()
![]()
![]()
![]()
![]()
![]()
![]()
![]()
![]()
![]()
![]()
![]()
![]()
![]()
![]()
![]()
![]()
![]()
![]()
![]()
![]()
![]()
![]()
![]()
![]()
![]()
![]()
![]()
![]()
![]()
![]()
![]()
![]()
![]()
![]()
![]()
![]()


 EDITING
 (cont.)


Edit From A Camcorder
Recorder | Your VCR |
To rear panel PAUSE/AV
COMPULINK connector
| AUDIO | |
VIDEO IN | IN | (JVC camcorder only) |
|
|
Audio/Video cable (not supplied)
|
| VIDEO OUT |
Camcorder |
| AUDIO OUT |
|
| EDIT |
Player |
|
|
MENU |
|
|
| CH | |
OK |
|
|
NUMBER "0" | 0 | 4 |
|
| |
1
3 | OK |
MENU |
|
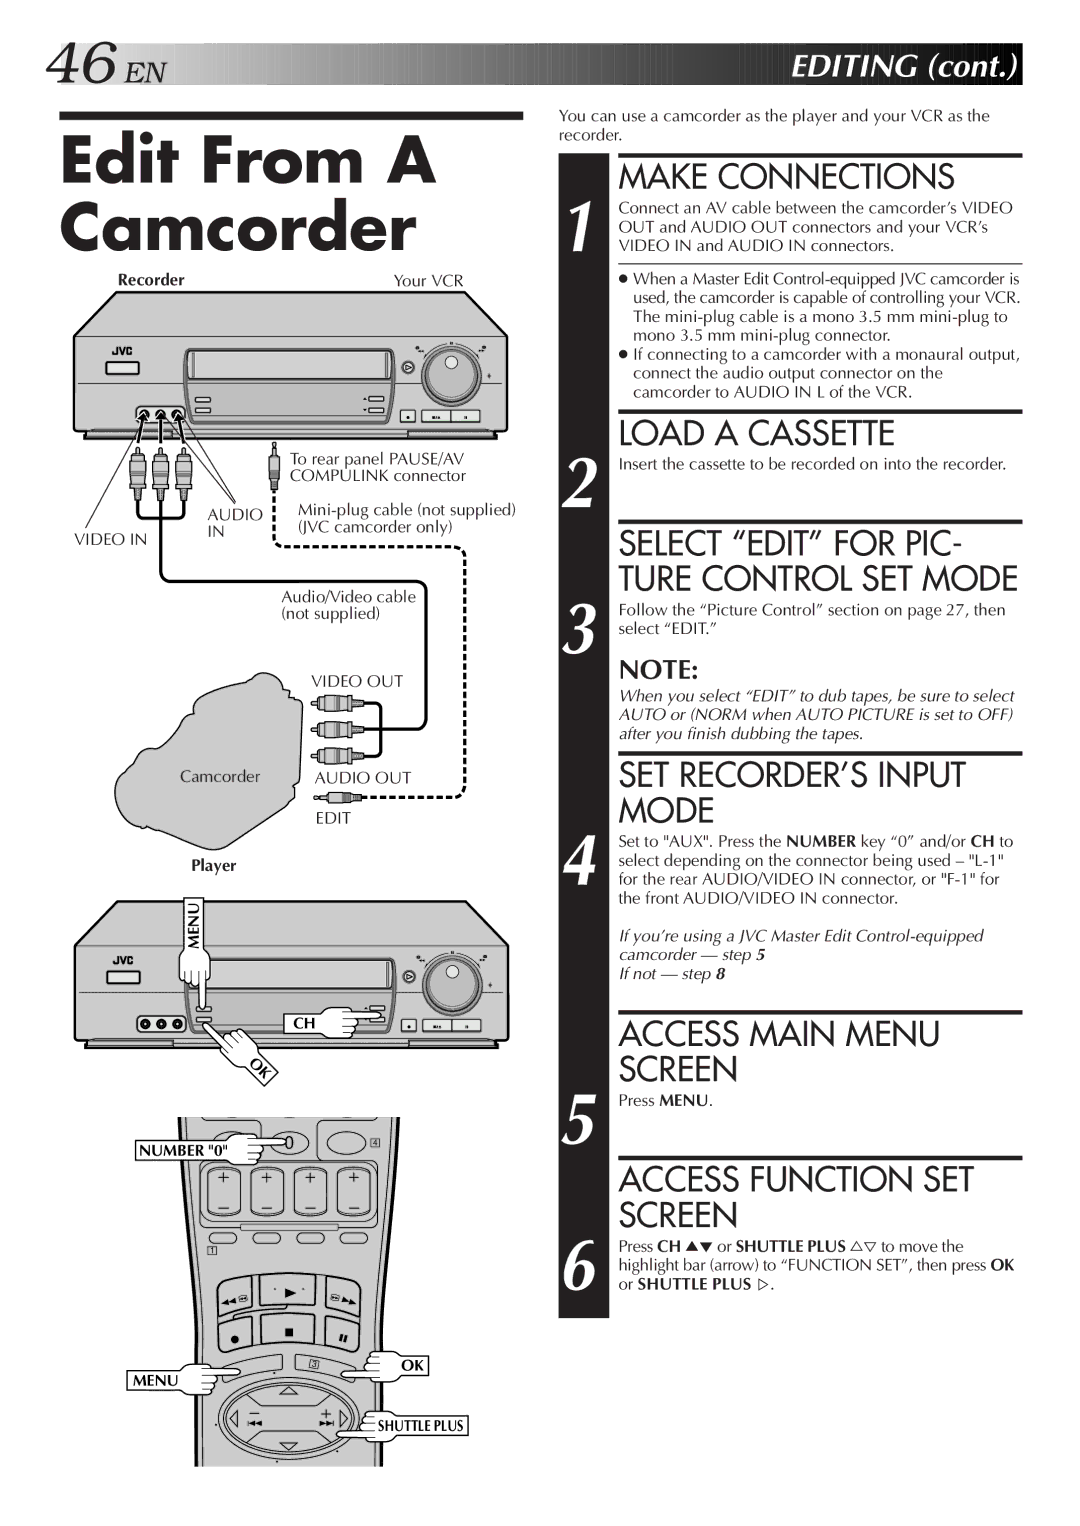
You can use a camcorder as the player and your VCR as the recorder.
MAKE CONNECTIONS
1 Connect an AV cable between the camcorder’s VIDEO OUT and AUDIO OUT connectors and your VCR’s VIDEO IN and AUDIO IN connectors.
● When a Master Edit
● If connecting to a camcorder with a monaural output, connect the audio output connector on the camcorder to AUDIO IN L of the VCR.
LOAD A CASSETTE
2 Insert the cassette to be recorded on into the recorder.
SELECT “EDIT” FOR PIC- TURE CONTROL SET MODE
3 Follow the “Picture Control” section on page 27, then select “EDIT.”
NOTE:
When you select “EDIT” to dub tapes, be sure to select AUTO or (NORM when AUTO PICTURE is set to OFF) after you finish dubbing the tapes.
SET RECORDER’S INPUT MODE
4 Set to "AUX". Press the NUMBER key “0” and/or CH to select depending on the connector being used –
If you’re using a JVC Master Edit
If not — step 8
ACCESS MAIN MENU
SCREEN
5 Press MENU.
ACCESS FUNCTION SET SCREEN
6 Press CH 5°or SHUTTLE PLUS %Þto move the highlight bar (arrow) to “FUNCTION SET”, then press OK or SHUTTLE PLUS %.
![]() SHUTTLE PLUS
SHUTTLE PLUS
