18 EN

INITIAL SETTINGS (cont.)

DBS Receiver Control Setting

Suggested location

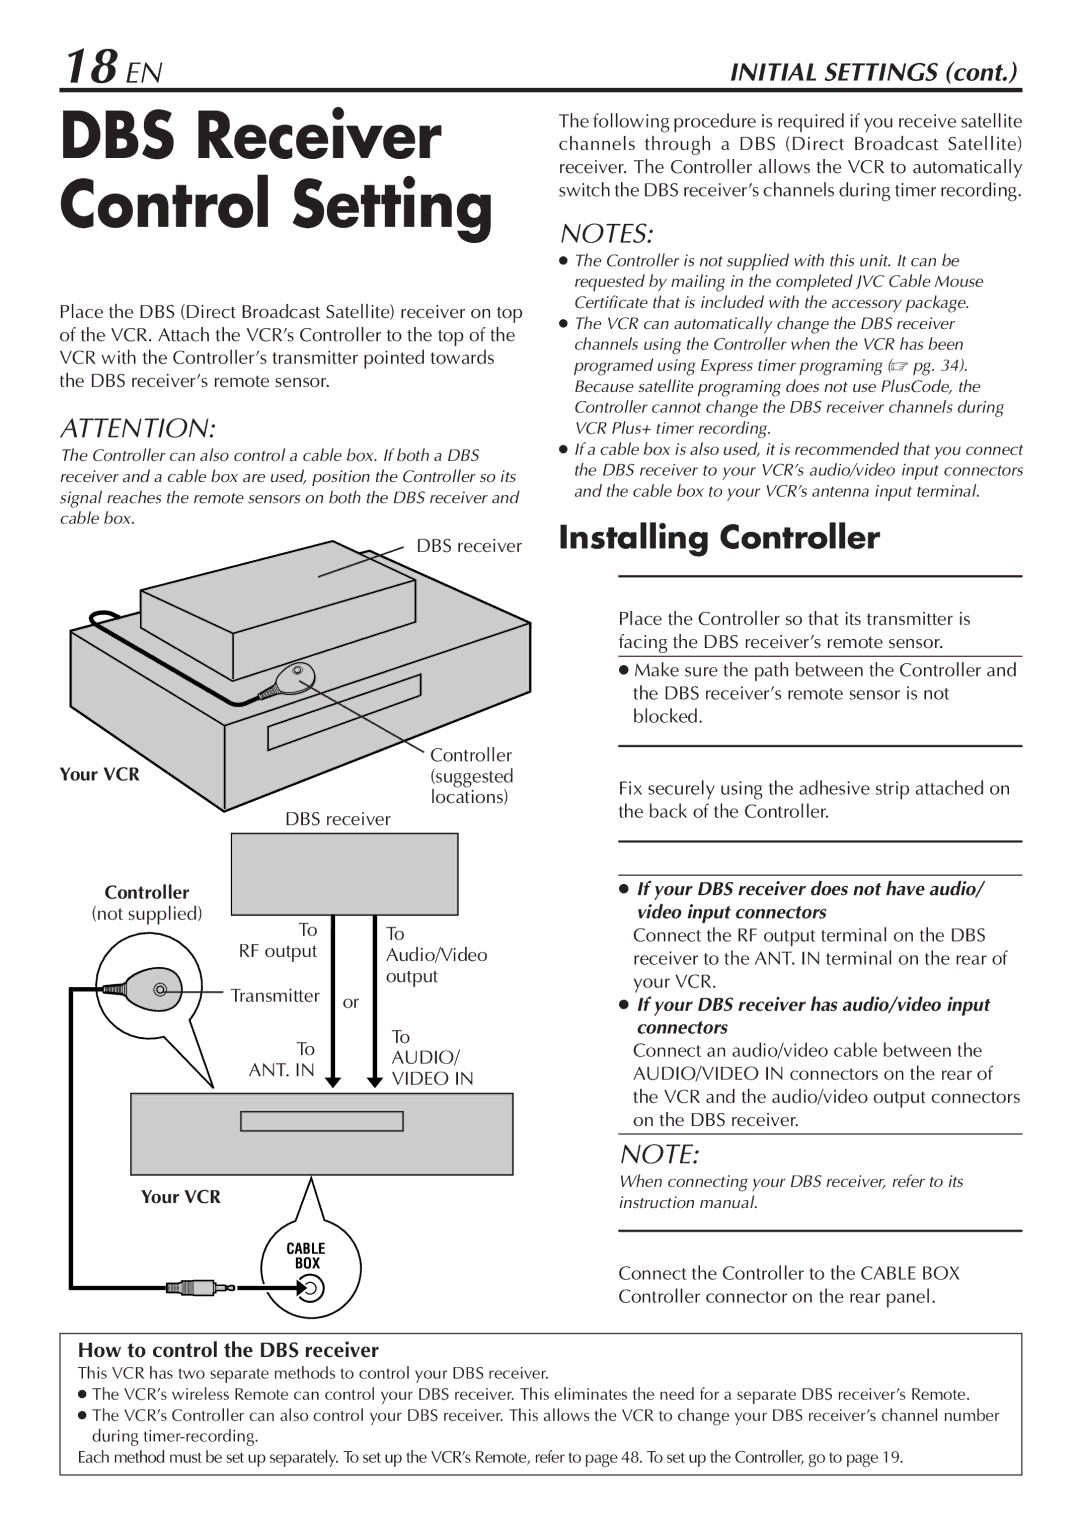
Place the DBS (Direct Broadcast Satellite) receiver on top of the VCR. Attach the VCR’s Controller to the top of the VCR with the Controller’s transmitter pointed towards the DBS receiver’s remote sensor.

ATTENTION:

The Controller can also control a cable box. If both a DBS receiver and a cable box are used, position the Controller so its signal reaches the remote sensors on both the DBS receiver and cable box.

DBS receiver

Controller

Your VCR(suggested

locations)

DBS receiver

Controller


(not supplied)


To

To

RF output

Audio/Video

Transmitter

output

or


To

To

AUDIO/

ANT. IN

VIDEO IN


Your VCR

CABLE

BOX

The following procedure is required if you receive satellite channels through a DBS (Direct Broadcast Satellite) receiver. The Controller allows the VCR to automatically switch the DBS receiver’s channels during timer recording.

NOTES:

The Controller is not supplied with this unit. It can be requested by mailing in the completed JVC Cable Mouse Certificate that is included with the accessory package. The VCR can automatically change the DBS receiver channels using the Controller when the VCR has been programed using Express timer programing ( pg. 34). Because satellite programing does not use PlusCode, the Controller cannot change the DBS receiver channels during VCR Plus+ timer recording.

If a cable box is also used, it is recommended that you connect the DBS receiver to your VCR’s audio/video input connectors and the cable box to your VCR’s antenna input terminal.

Installing Controller

1 Situate Controller

Place the Controller so that its transmitter is facing the DBS receiver’s remote sensor.

Make sure the path between the Controller and the DBS receiver’s remote sensor is not blocked.

2 Attach Controller

Fix securely using the adhesive strip attached on the back of the Controller.

3 Connect DBS receiver to VCR

If your DBS receiver does not have audio/ video input connectors

Connect the RF output terminal on the DBS receiver to the ANT. IN terminal on the rear of your VCR.

If your DBS receiver has audio/video input connectors

Connect an audio/video cable between the AUDIO/VIDEO IN connectors on the rear of the VCR and the audio/video output connectors on the DBS receiver.

NOTE:

When connecting your DBS receiver, refer to its instruction manual.

4 Connect Controller to VCR Connect the Controller to the CABLE BOX Controller connector on the rear panel.

How to control the DBS receiver

This VCR has two separate methods to control your DBS receiver.

The VCR’s wireless Remote can control your DBS receiver. This eliminates the need for a separate DBS receiver’s Remote. The VCR’s Controller can also control your DBS receiver. This allows the VCR to change your DBS receiver’s channel number during timer-recording.

Each method must be set up separately. To set up the VCR’s Remote, refer to page 48. To set up the Controller, go to page 19.

Page 18
Image 18
JVC HR-VP783U manual 18 EN, Connect DBS receiver to VCR, How to control the DBS receiver, Controller

HR-VP783U specifications

The JVC HR-VP783U is a remarkable VCR that encapsulates the best of video recording technology from its era. Known for its reliability and advanced features, this model was a favorite for both casual viewers and avid videophiles. Designed for versatility, the HR-VP783U supports multiple formats, allowing users to play both VHS and S-VHS tapes. This capability is essential for those who wish to enjoy a vast library of content or transfer old home videos.

One of the standout features of the HR-VP783U is its Super VHS (S-VHS) compatibility. S-VHS provides increased resolution and improved image quality compared to standard VHS, making it an excellent choice for recording and playing back high-quality video. Additionally, the VCR supports S-VHS ET, which allows users to play standard VHS tapes while still benefiting from enhanced quality in S-VHS format.

The HR-VP783U is equipped with JVC's advanced picture enhancement technologies. One notable feature is the Time Base Corrector (TBC), which helps eliminate signal irregularities, resulting in smoother and clearer picture playback. This is especially beneficial for old tapes with signs of wear and tear.

In terms of convenience, the VCR boasts a programmable timer that allows users to schedule recordings effortlessly. The easy programmable timer makes it simple to record your favorite shows while you're out, ensuring you never miss an episode. The unit also features a comprehensive remote control that provides straightforward navigation of its various functions and settings.

Connectivity is another strong point of the JVC HR-VP783U. It offers multiple input and output options, including composite video, S-Video, and audio jacks, ensuring compatibility with a range of devices. This enhanced connectivity allows users to connect to televisions, cameras, and even editing equipment with ease.

Furthermore, the HR-VP783U is designed with user-friendliness in mind, featuring an intuitive on-screen display and straightforward controls that appeal to users of all ages. With its robust build and reliable performance, the JVC HR-VP783U has earned a reputation for durability, making it a dependable choice for anyone seeking a comprehensive VCR solution. Whether for home use or professional applications, the JVC HR-VP783U remains a noteworthy model in the world of video recording.