English
Using the Cassette Deck
(Listening to a Tape)
CLOCK | TIMER | ON SCREEN |
| |
1 |
| 2 | 3 |
|
– SELECT + | V.INTRO | SLEEP | ||
4 |
| 5 | 6 |
|
ECHO |
| SET | HIGHLIGHT |
|
7 |
| 8 | 9 |
|
| +10 | PLAY MODE | ||
10 |
|
| ||
CD1 |
| CD2 | CD3 | STILL |
|
|
| CD |
|
PREV |
| NEXT | RETURN | SELECT |
|
|
| TAPE | |
REC PAUSE | A – TAPE - B |
| ||
SHIFT |
| FM MODE | FM/AM | AUX |
|
| i | |
SOUND | VOLUME | KEY | |
MODE | CONTROL | ||
| |||
|
| I |
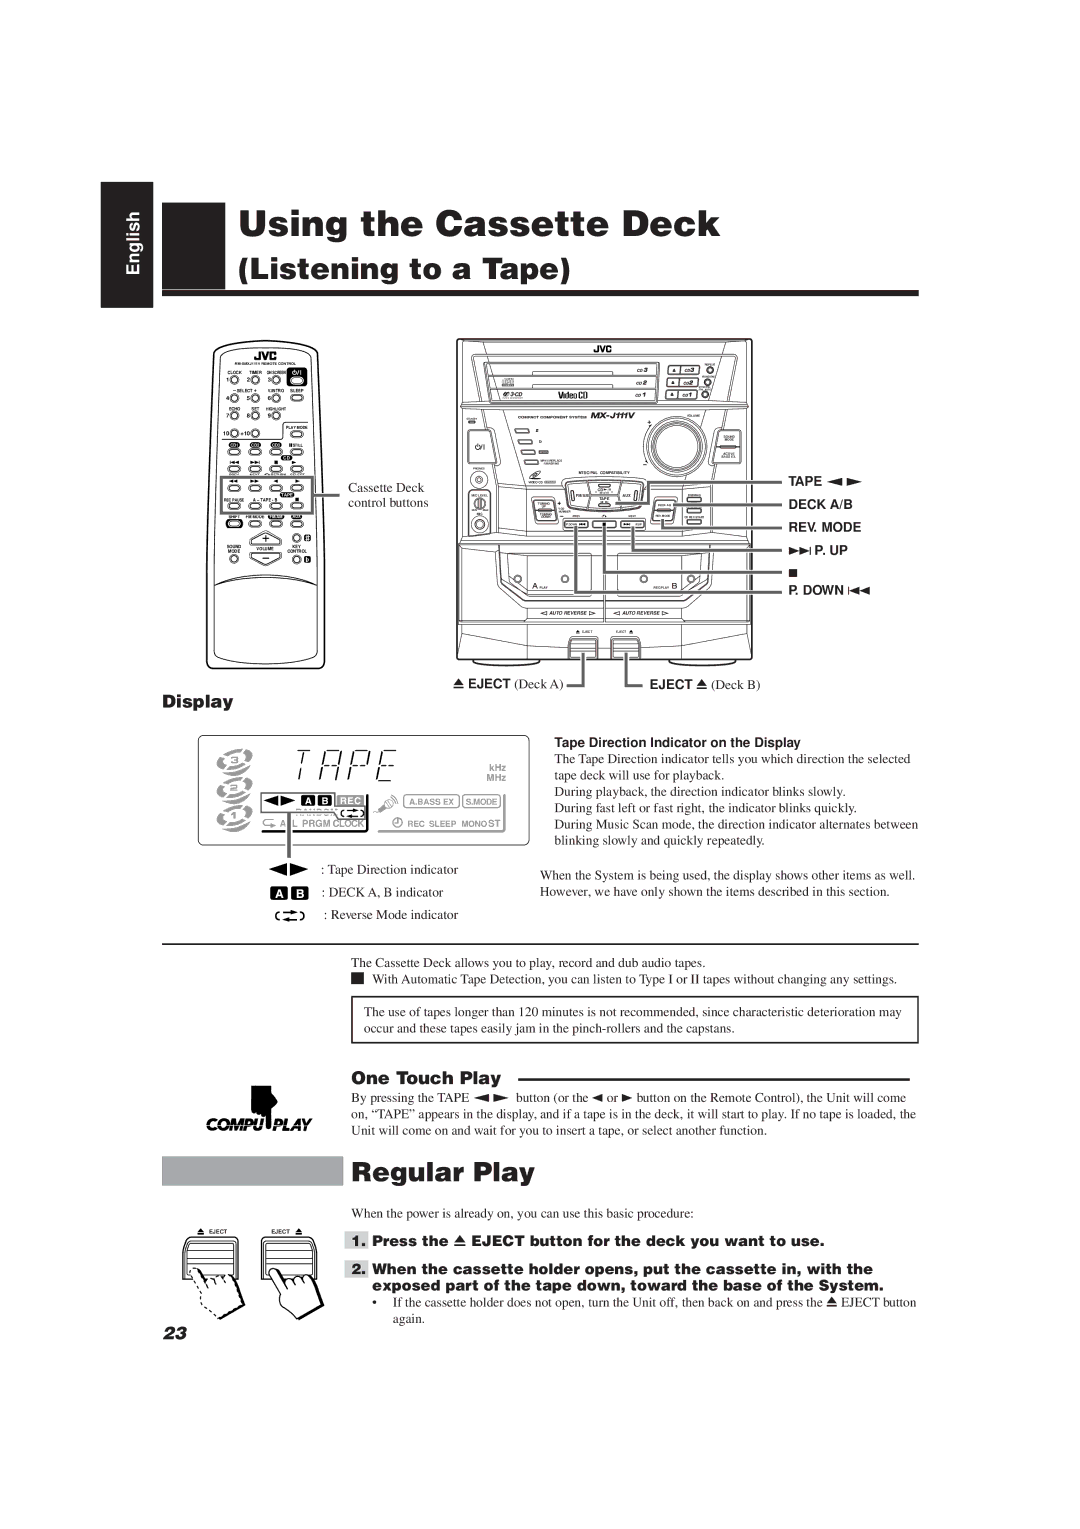
Cassette Deck control buttons
|
|
|
| REPEAT |
| COMPACT |
|
| RANDOM |
| DIGITAL VIDEO |
|
| NTSC/PAL |
|
|
|
| |
|
|
|
| /PAL AUTO |
| PLAY & EXCHANGER |
|
|
|
|
|
|
| VOLUME |
STANDBY |
|
|
|
|
|
|
|
| SOUND |
|
|
|
| MODE |
| ECHO |
|
| ACTIVE |
|
|
|
| BASS EX. |
| MPX/V.REPLACE |
|
|
|
| /V.MASKING |
|
|
|
PHONES |
|
|
|
|
| NTSC/PAL COMPATIBILITY |
|
| |
| VIDEO CD |
|
|
|
|
| CD |
|
|
| FM/AM | SELECT |
|
|
MIC LEVEL | AUX |
| DUBBING | |
|
| TAPE |
|
|
| TUNING |
| DECK A/B | REC |
| UP |
|
| START//STOP |
MIN MAX |
| VCD |
|
|
|
| NUMBER |
|
|
| |
MIC | TUNING | PREV | NEXT | REV. MODE |
|
| DOWN | CD REC START |
P.DOWN | P.UP |
PLAY | REC/PLAY |
TAPE “£
DECK A/B REV. MODE
¢P. UP
7
P. DOWN 4
AUTO REVERSE | AUTO REVERSE |
EJECT | EJECT |
0EJECT (Deck A)
EJECT 0 (Deck B)
Display
| kHz |
| MHz |
| A.BASS EX S.MODE |
ALL PRGM CLOCK | REC SLEEP MONO ST |
: Tape Direction indicator
: DECK A, B indicator
: Reverse Mode indicator
Tape Direction Indicator on the Display
The Tape Direction indicator tells you which direction the selected tape deck will use for playback.
During playback, the direction indicator blinks slowly. During fast left or fast right, the indicator blinks quickly.
During Music Scan mode, the direction indicator alternates between blinking slowly and quickly repeatedly.
When the System is being used, the display shows other items as well. However, we have only shown the items described in this section.
The Cassette Deck allows you to play, record and dub audio tapes.
o With Automatic Tape Detection, you can listen to Type I or II tapes without changing any settings.
The use of tapes longer than 120 minutes is not recommended, since characteristic deterioration may occur and these tapes easily jam in the
One Touch Play ——————————————————————
By pressing the TAPE “£ button (or the 2 or 3 button on the Remote Control), the Unit will come on, “TAPE” appears in the display, and if a tape is in the deck, it will start to play. If no tape is loaded, the Unit will come on and wait for you to insert a tape, or select another function.
Regular Play
When the power is already on, you can use this basic procedure:
EJECTEJECT
1.Press the 0 EJECT button for the deck you want to use.
2.When the cassette holder opens, put the cassette in, with the exposed part of the tape down, toward the base of the System.
•If the cassette holder does not open, turn the Unit off, then back on and press the 0 EJECT button again.
23
