RX-888VBK
For U.S.A
Basic Settings
Parts Identification Using the DSP Modes Getting Started
Using the DVD Multi Playback Mode
Using the On-Screen Menus
Front Panel Remote Control
Before Installation
Checking the Supplied Accessories
Connecting the FM and AM Antennas
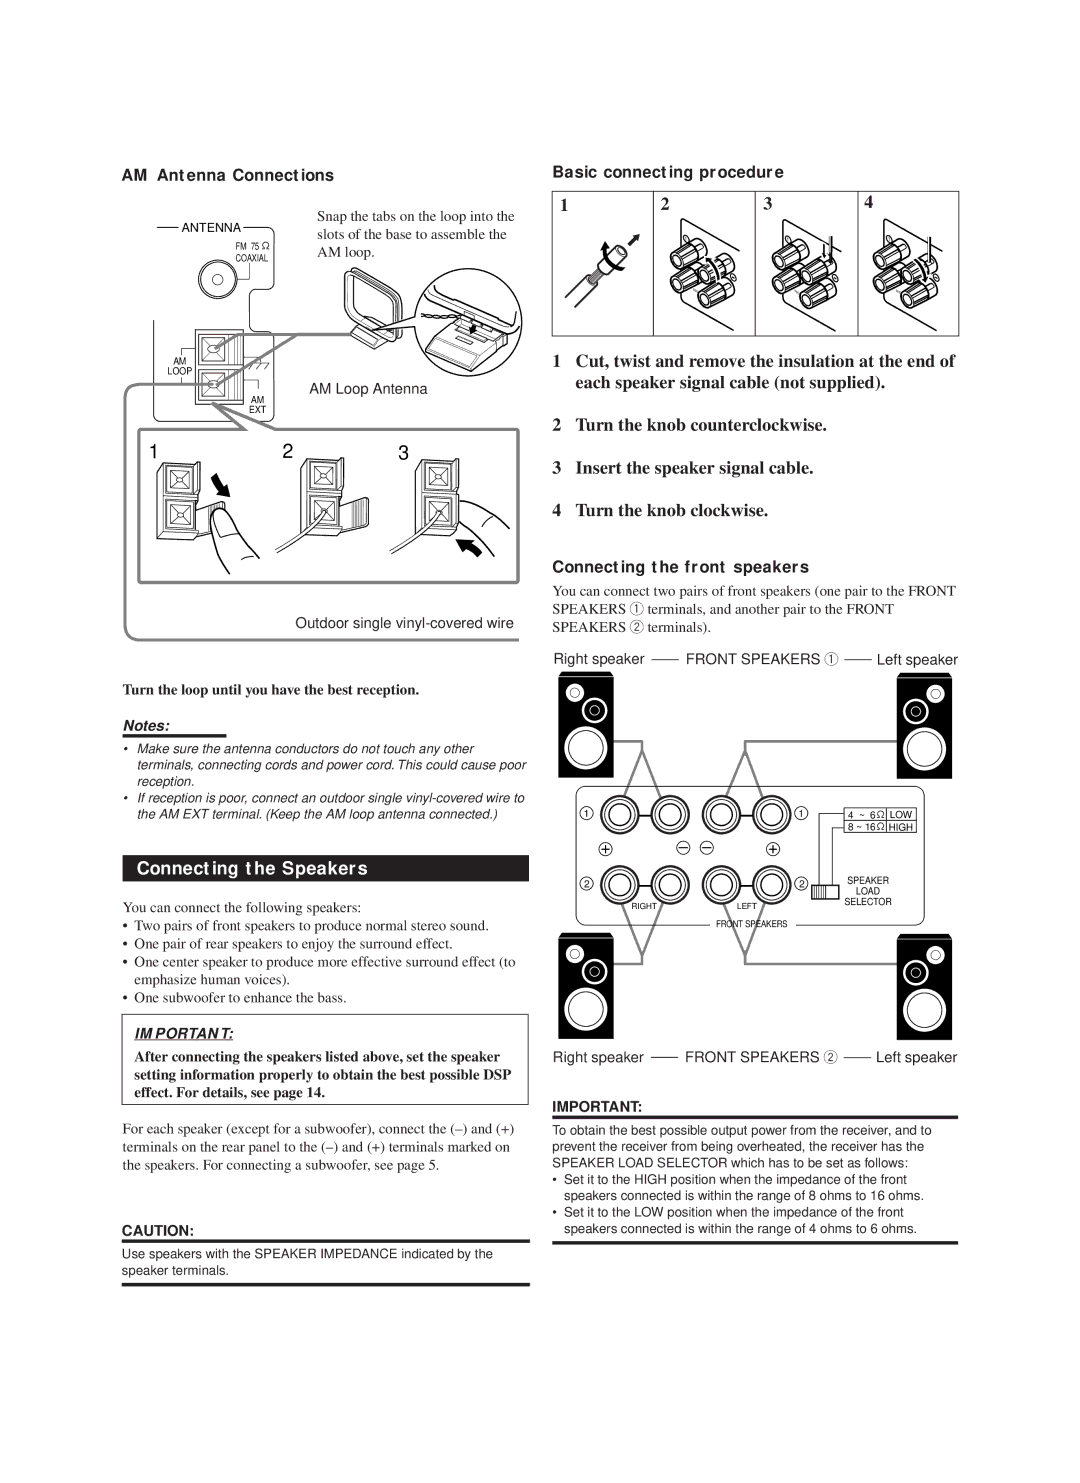
Connecting the front speakers
Connecting the Speakers
Basic connecting procedure
AM Antenna Connections
Connecting the subwoofer speaker
Connecting Audio/Video Components
Connecting the rear and center speakers
Analog connections
Video component connections
If your audio components have a Compu LINK-3 or Text
Compu Link terminal
VHS VCR
To composite
DVD player
To S-video output
‚ To composite video output
On the back of the remote control, remove the battery cover
Connecting the Power Cord
Putting Batteries in the Remote Control
+ to + Replace the cover
Selecting the Source to Play
Turning the Power On and Off Standby
From the remote control
On the front panel
Etc
Adjusting the Volume
Selecting the Front Speakers
Turn Source Selector to
Adjusting the Subwoofer Output Level
Attenuating the Input Signal
Listening at Low Volume Loudness
Muting the Sound
Changing the Source Name
Adjusting the Front Speaker Output Balance
Setting the Subwoofer Information
Recording a Source
Digital Input Digital in Terminal Setting
Selecting the Analog or Digital Input Mode
Showing the Text Information on Display
Front, Center, and Rear Speaker Setting
Setting the Speakers for the DSP Modes
Center Delay Time Setting
Rear Delay Time Setting
Dynamic Range Compression Setting
Crossover Frequency Setting
Low Frequency Effect Attenuator Setting
Frequency appears on the display
Using the Sleep Timer
Storing the Basic Settings Adjustments One Touch Operation
Adjust the sound using the functions listed above
Press ONE Touch OPERATION. Onetouchoperation
Using Preset Tuning
Tuning in Stations Manually
Assigning Names to Preset Stations
Selecting the FM Reception Mode
Selecting Your Favorite SEA Mode
Creating Your Own SEA Mode
3D-PHONIC modes
DAP modes
With 3D Theater selected
Dolby Surround Dolby Digital and Dolby Pro Logic
DVD Multi Playback Mode
Surround modes
DTS Digital Surround
Available DSP Modes According to the Speaker Arrangement
Front
Adjusting the 3D-PHONIC Modes
Adjusting the DAP Modes
Adjusting the Surround Modes
Press DOLBY/DTS Surround
ON/OFF to activate an Appropriate Surround mode
Adjust the center tone
Or DTS Surround
DIG Theater appears on Display
JVC Theater Surround adjustments
Repeatedly until Theater or
Center tone level you want Press Sound
Activating the DSP Modes
To cancel the DSP mode
Mode you want appears on Display
Repeatedly until the DSP mode you
Want appears on the display
Cntr be applied to the center speaker only
Activating the DVD Multi Playback Mode
DVD Multi appears on Display
Refer to the manual supplied with the DVD player
Multi appears on the display
10 keys are activated for adjusting the sound
Press DVD Multi so that DVD
Center tone level you want
DSP mode you want to
When you finish, press Exit
To Mode
Press Menu
Press %/ Þto move to Sound
Press @/ #to adjust the subwoofer output level
Input Attenuator mode
To Input ATT
Selecting Your Favorite SEA Mode
To SEA Mode
Activating the DVD Multi Playback Mode
Creating Your Own SEA Mode
Press %/ Þto move to SETTING, then Press @/ #
Press %/ Þ/ @/ #to adjust the SEA mode as you want
Press SET to store the setting into the SEA Usermode
Setting the Basic Setting Items Also see
Enter up to four
To Preset
Selected character
Press %/ Þ / @/ #to
CD player Cassette deck MD recorder
Remote Control through the Remote Sensor on the Receiver
Same time
Automatic Source Selection
Disc Search Only for CD Player
Then turn on this receiver
Displaying the Disc Information on the TV screen
Disc Title Input
To exit from the Disc information screen
Press Text Display while CD or MD is selected as the source
Showing the Disc Information on the TV Screen
Disc Information screen appears on the TV
Press %/ Þto move To Performer Then press SET
Press Text Display while CD is selected as the source
Press %/ Þto move To SEARCH, then Press SET
Press SET again
Press %/ Þto move To Title INPUT, then press SET
Press %/ Þto move to Search Then press SET
Press %/ Þto move To GENRE, then Press SET
Entering the Disc Information
Enter the disc title Referring to steps 3
Press Text Display while MD is selected as the source
Press %/ Þto move To Title Input Then press SET
Press %/ Þto move to the genre you want, then press SET
If the AV Compu Link terminal on the TV is AV Compu Link EX
If the AV Compu Link terminal
On the TV is RECEIVER/AMP
CASE1 If the components are equipped with the S-video
One-Touch Video Play
Automatic Selection of TV’s Input Mode
Automatic Power On/Off
One-Touch DVD Play
CD player-changer
Sound control section Amplifier
CD player
Tuner
MD recorder
Turntable
Cassette deck
VCR 1 VCR connected to the VCR 1 jacks
If there are more than one code listed for your brand of TV
Release TV/CATV/DBS Power
TV/CATV/DBS Power
Try to operate your TV by pressing TV/CATV
Release VCR 1 Power
Try to operate your VCR by pressing VCR 1 Power
If there are more than one code listed for your brand
JBL
AOC
CXC
JCB
PhaStar 772 Chostar 775 Xpressvu Tachi 819
Errold 627 775 Anasonic 701 Rimestar 566 Ony 639
ABC
CCE
HI-Q
KLH
STS
TMK
Problem Possible Cause Solution
Amplifier
Audio
Video
AM tuner
Tuning Range Usable Sensitivity Signal-to-Noise Ratio
FM tuner IHF
General
781 954 650
Valley Road Wayne, NJ
1098
Limited Warranty AUDIO-2
0299HIMMDWJEM

