USB Connection
This receiver is equipped with a USB terminal on the front panel and a USB WIRELESS ANTENNA terminal on the rear. You can enjoy sound reproduced through your PC with either of the following methods:
1connecting a USB wireless antenna (supplied) to the USB WIRELESS ANTENNA terminal and a USB wireless
transmitter (supplied) to your PC. (USB WIRELESS)
2connecting your PC to the USB terminal with a USB cable (not supplied). (USB TERMINAL)
When you connect your PC for the first time, follow the procedure below.
•Remember you cannot send any signal or data to your PC from this receiver.
•Use USB extension cable (supplied) if it is difficult to connect the transmitter directly to the USB connector or the transmitter becomes obstacle to other USB connectors.
IMPORTANT:
•Check if your PC equipped with the
•Check your PC’s BIOS
Preparation
1(For USB WIRELESS)
Be sure to make this procedure after purchasing the receiver.
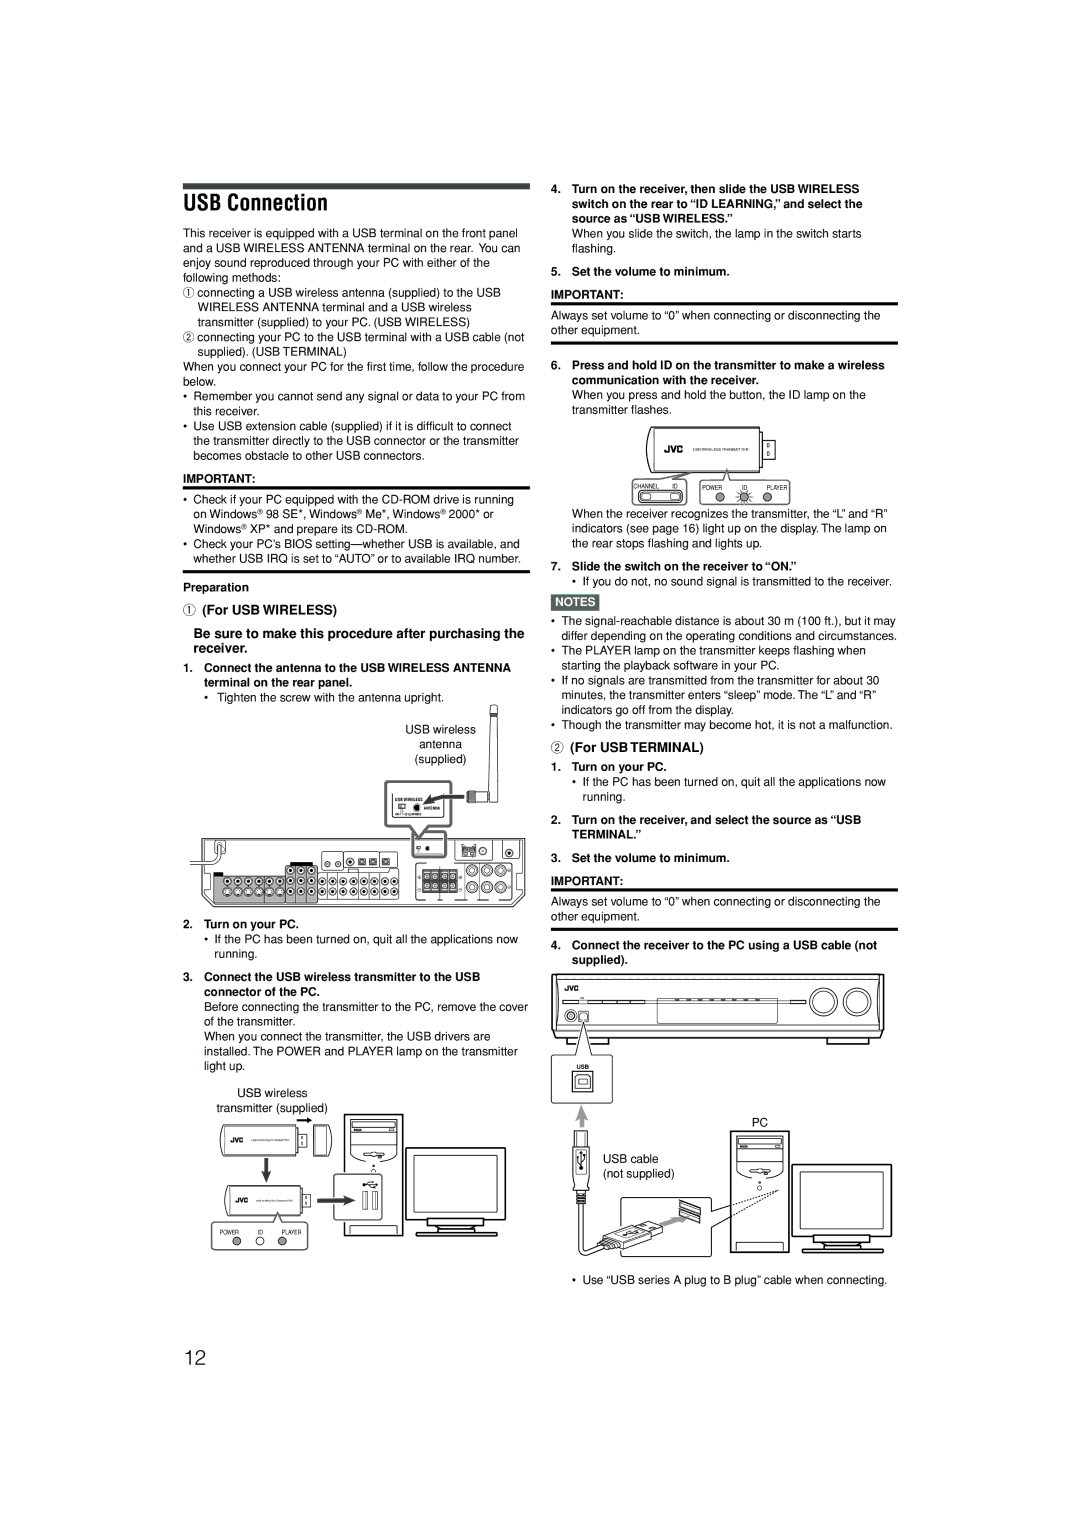
1.Connect the antenna to the USB WIRELESS ANTENNA terminal on the rear panel.
• Tighten the screw with the antenna upright.
USB wireless
antenna (supplied)
USB WIRELESS
ANTENNA
ON | ID LEARNING |
2.Turn on your PC.
•If the PC has been turned on, quit all the applications now running.
3.Connect the USB wireless transmitter to the USB connector of the PC.
Before connecting the transmitter to the PC, remove the cover of the transmitter.
When you connect the transmitter, the USB drivers are installed. The POWER and PLAYER lamp on the transmitter light up.
USB wireless
transmitter (supplied)
4.Turn on the receiver, then slide the USB WIRELESS switch on the rear to “ID LEARNING,” and select the source as “USB WIRELESS.”
When you slide the switch, the lamp in the switch starts flashing.
5.Set the volume to minimum.
IMPORTANT:
Always set volume to “0” when connecting or disconnecting the other equipment.
6.Press and hold ID on the transmitter to make a wireless communication with the receiver.
When you press and hold the button, the ID lamp on the transmitter flashes.
USB WIRELESS TRANSMITTER
CHANNEL | ID | POWER | ID | PLAYER |
When the receiver recognizes the transmitter, the “L” and “R” indicators (see page 16) light up on the display. The lamp on the rear stops flashing and lights up.
7.Slide the switch on the receiver to “ON.”
• If you do not, no sound signal is transmitted to the receiver.
NOTES
•The
•The PLAYER lamp on the transmitter keeps flashing when starting the playback software in your PC.
•If no signals are transmitted from the transmitter for about 30 minutes, the transmitter enters “sleep” mode. The “L” and “R” indicators go off from the display.
•Though the transmitter may become hot, it is not a malfunction.
2(For USB TERMINAL)
1.Turn on your PC.
•If the PC has been turned on, quit all the applications now running.
2.Turn on the receiver, and select the source as “USB TERMINAL.”
3.Set the volume to minimum.
IMPORTANT:
Always set volume to “0” when connecting or disconnecting the other equipment.
4.Connect the receiver to the PC using a USB cable (not supplied).
USB
USB WIRELESS TRANSMITTER
USB WIRELESS TRANSMITTER
POWER ID PLAYER
USB cable (not supplied)
PC |
• Use “USB series A plug to B plug” cable when connecting.
12