50 EN EDITING


DV Dubbing (HDD & DVD Deck Only)

1

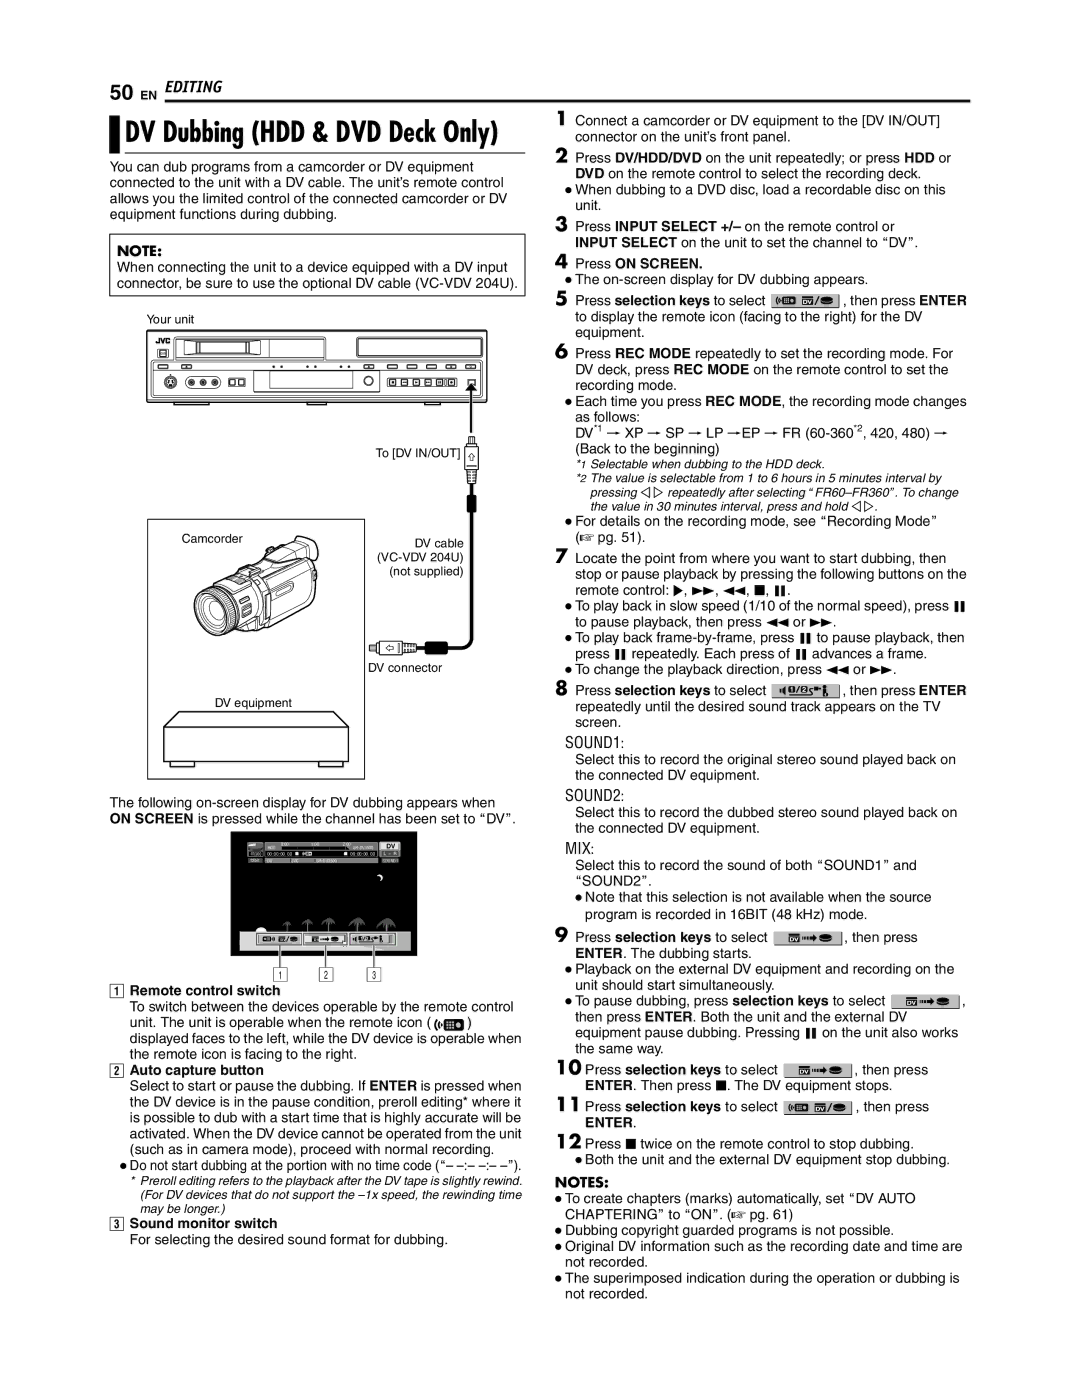
Connect a camcorder or DV equipment to the [DV IN/OUT]


2

connector on the unit’s front panel.


Press DV/HDD/DVD on the unit repeatedly; or press HDD or

You can dub programs from a camcorder or DV equipment


DVD on the remote control to select the recording deck.

connected to the unit with a DV cable. The unit’s remote control


When dubbing to a DVD disc, load a recordable disc on this

allows you the limited control of the connected camcorder or DV


unit.


equipment functions during dubbing.

3


Press INPUT SELECT +/– on the remote control or


NOTE:

4

INPUT SELECT on the unit to set the channel to ADVB.

Press ON SCREEN.


When connecting the unit to a device equipped with a DV input


connector, be sure to use the optional DV cable (VC-VDV 204U).

The on-screen display for DV dubbing appears.


5 Press selection keys to select


, then press ENTER


Your unit


to display the remote icon (facing to the right) for the DV


equipment.


To [DV IN/OUT]

6 Press REC MODE repeatedly to set the recording mode. For

DV deck, press REC MODE on the remote control to set the

recording mode.

Each time you press REC MODE, the recording mode changes

as follows:

DV*1 N XP N SP N LP NEP N FR (60-360*2, 420, 480) N

(Back to the beginning)

*1 Selectable when dubbing to the HDD deck.

*2 The value is selectable from 1 to 6 hours in 5 minutes interval by

pressing DE repeatedly after selecting AFR60–FR360B. To change

the value in 30 minutes interval, press and hold DE.

Camcorder

DV equipment

DV cable (VC-VDV 204U)

(not supplied)

DV connector

For details on the recording mode, see ARecording ModeB

(A pg. 51).

7Locate the point from where you want to start dubbing, then stop or pause playback by pressing the following buttons on the remote control: I, N, O, o, W.

To play back in slow speed (1/10 of the normal speed), press W to pause playback, then press O or N.

To play back frame-by-frame, press W to pause playback, then press W repeatedly. Each press of W advances a frame.

To change the playback direction, press O or N.

8Press selection keys to select , then press ENTER repeatedly until the desired sound track appears on the TV screen.

SOUND1:

Select this to record the original stereo sound played back on the connected DV equipment.

The following on-screen display for DV dubbing appears when ON SCREEN is pressed while the channel has been set to ADVB.


HDD

0:00


1:00

2:00

DV


GR-DV3500

FR360

00 : 00 : 00. 00


00 : 00 : 00. 00

L – R

12bit

DV

JVC


GR-DV3500


SOUND1

D V

D V

1

2

A B C

ARemote control switch

To switch between the devices operable by the remote control

unit. The unit is operable when the remote icon ( ) displayed faces to the left, while the DV device is operable when the remote icon is facing to the right.

BAuto capture button

Select to start or pause the dubbing. If ENTER is pressed when the DV device is in the pause condition, preroll editing* where it is possible to dub with a start time that is highly accurate will be activated. When the DV device cannot be operated from the unit (such as in camera mode), proceed with normal recording.

Do not start dubbing at the portion with no time code (A–:– –:– B).

* Preroll editing refers to the playback after the DV tape is slightly rewind. (For DV devices that do not support the –1x speed, the rewinding time may be longer.)

CSound monitor switch

For selecting the desired sound format for dubbing.

SOUND2:

Select this to record the dubbed stereo sound played back on the connected DV equipment.

MIX:

Select this to record the sound of both ASOUND1B and ASOUND2B.

Note that this selection is not available when the source program is recorded in 16BIT (48 kHz) mode.

9Press selection keys to select , then press ENTER. The dubbing starts.

Playback on the external DV equipment and recording on the unit should start simultaneously.

To pause dubbing, press selection keys to select , then press ENTER. Both the unit and the external DV equipment pause dubbing. Pressing W on the unit also works the same way.

10 Press selection keys to select , then press ENTER. Then press o. The DV equipment stops.

11 Press selection keys to select , then press

ENTER.

12 Press o twice on the remote control to stop dubbing.

Both the unit and the external DV equipment stop dubbing.

NOTES:

To create chapters (marks) automatically, set ADV AUTO CHAPTERINGB to AONB. (A pg. 61)

Dubbing copyright guarded programs is not possible.

Original DV information such as the recording date and time are not recorded.

The superimposed indication during the operation or dubbing is not recorded.

Page 50
Image 50
JVC SR-DVM700U manual Remote control switch, Auto capture button, Sound monitor switch

SR-DVM700U specifications

The JVC SR-DVM700U is a versatile and high-performance digital video recorder that caters to both professional and consumer needs. It is designed to handle a variety of video formats, making it a convenient and reliable choice for video production, archiving, and playback tasks.

One of the standout features of the SR-DVM700U is its ability to support both digital and analog formats. It can play and record from MiniDV, DVCAM, and DVCPRO tapes, while also offering the capability to handle various VHS formats. This dual functionality provides users with an excellent solution for converting older tapes to digital formats while maintaining high-quality output.

In terms of connectivity, the SR-DVM700U is equipped with a range of inputs and outputs. It features FireWire (IEEE 1394) connectivity, enabling fast and efficient transfer of digital video to and from computers and other devices. Additionally, it has multiple composite video and audio connections, making it easy to interface with various equipment in the production setup. The S-Video and component outputs enhance the video quality, ensuring professional-grade performance.

The device leverages advanced digital processing technologies to ensure high-quality audio and video recordings. It includes a built-in up-converter that improves the resolution and sharpness of analog signals when converting to digital formats, enhancing the overall viewing experience.

The JVC SR-DVM700U also incorporates features like playback time code and edit search functions, which are essential for video editing workflows. This technology allows users to efficiently navigate through their footage, making it easier to locate specific scenes or segments during the editing process.

Moreover, the unit is designed with a user-friendly interface, featuring a clear LCD screen and easy-to-use controls, which facilitate seamless operation. The compact and robust design ensures durability, making it suitable for both studio environments and on-location shoots.

In summary, the JVC SR-DVM700U digital video recorder is a powerful tool that combines multiple recording formats, advanced processing technologies, and versatile connectivity options. Its ability to bridge the gap between analog and digital media, coupled with its professional features, makes it an invaluable asset for videographers and multimedia professionals looking to preserve and transform their video content.