2 CONTROLS AND CONNECTORS |
|
|
| ||||
|
|
|
|
|
| ||
5 | 4 | 3 | 2 | 11 | 12 | 14 | 1 |
|
|
|
|
|
|
|
|
REC | STOP/EJECT REC |
|
|
|
| OPERATE | |
|
| CHECK | VIDEO CASSETTE RECORDER |
|
|
| |
| PAUSE/ |
| COUNT/ |
| SHIFT/TRACKING RESET | OPE. LOCK | |
REVERSE STILL | PLAY | MENU |
| ||||
|
|
| CLOCK |
| /CANCEL |
| |
REW |
| FF | TIME | TIMER | SET/V.LOCK | AL/PL |
|
|
|
| MODE | REC |
| RESET |
|
PAL
2 CONTROLS AND CONNECTORS
2-1 Front Panel
| 6 | 7 |
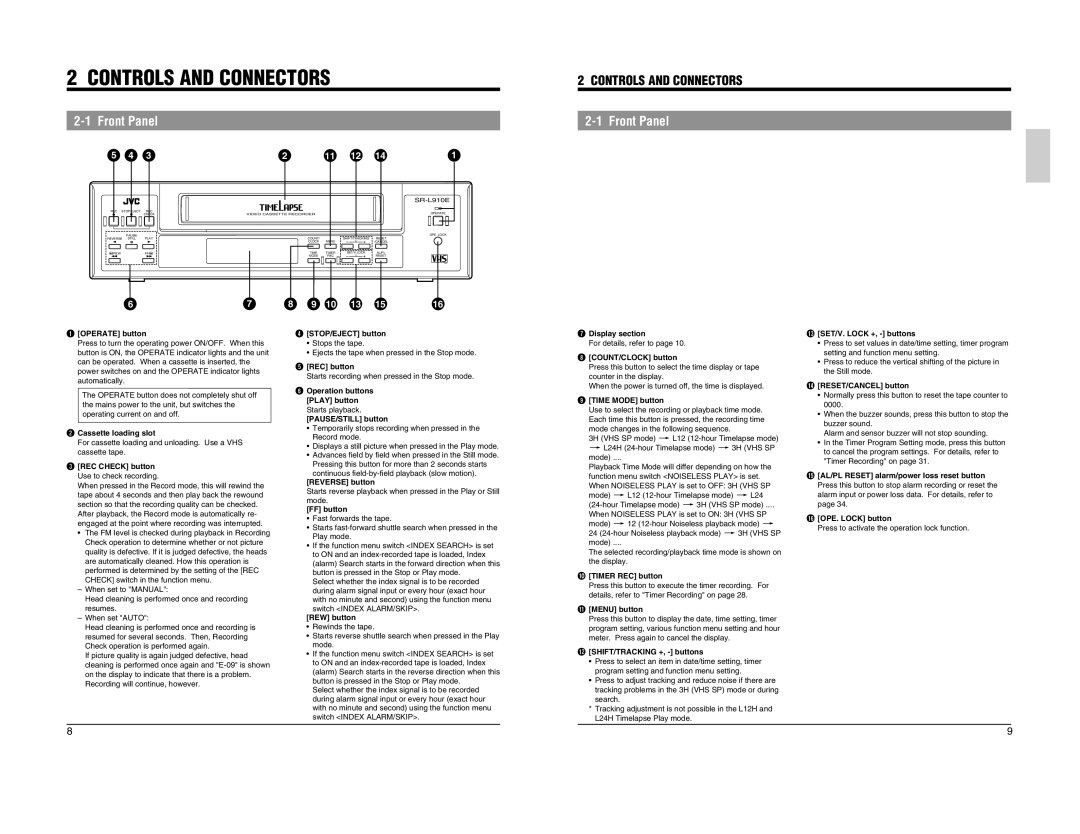
1 | [OPERATE] button |
|
| Press to turn the operating power ON/OFF. When this | |
| button is ON, the OPERATE indicator lights and the unit | |
| can be operated. When a cassette is inserted, the | |
| power switches on and the OPERATE indicator lights | |
| automatically. |
|
| The OPERATE button does not completely shut off | |
| the mains power to the unit, but switches the |
|
2 | operating current on and off. |
|
| Cassette loading slot |
|
| For cassette loading and unloading. Use a VHS |
|
3cassette tape. |
| |
| [REC CHECK] button |
|
| Use to check recording. |
|
| When pressed in the Record mode, this will rewind the | |
| tape about 4 seconds and then play back the rewound | |
| section so that the recording quality can be checked. | |
| After playback, the Record mode is automatically re- | |
| engaged at the point where recording was interrupted. | |
| • The FM level is checked during playback in Recording | |
| Check operation to determine whether or not picture | |
| quality is defective. If it is judged defective, the heads | |
| are automatically cleaned. How this operation is | |
| performed is determined by the setting of the [REC | |
| CHECK] switch in the function menu. |
|
| – When set to "MANUAL": |
|
| Head cleaning is performed once and recording | |
| resumes. |
|
| – When set "AUTO": |
|
| Head cleaning is performed once and recording is | |
| resumed for several seconds. Then, Recording | |
| Check operation is performed again. |
|
| If picture quality is again judged defective, head | |
| cleaning is performed once again and | |
| on the display to indicate that there is a problem. | |
| Recording will continue, however. |
|
8
4
5
6
9 | 10 | 13 | 15 | 16 |
[STOP/EJECT] button |
| |||
•Stops the tape.
•Ejects the tape when pressed in the Stop mode.
[REC] button Starts recording when pressed in the Stop mode.
Operation buttons [PLAY] button Starts playback. [PAUSE/STILL] button
•Temporarily stops recording when pressed in the Record mode.
•Displays a still picture when pressed in the Play mode.
•Advances field by field when pressed in the Still mode. Pressing this button for more than 2 seconds starts
continuous
•Fast forwards the tape.
•Starts
•If the function menu switch <INDEX SEARCH> is set to ON and an
Select whether the index signal is to be recorded during alarm signal input or every hour (exact hour with no minute and second) using the function menu
switch <INDEX ALARM/SKIP>. [REW] button
•Rewinds the tape.
•Starts reverse shuttle search when pressed in the Play mode.
•If the function menu switch <INDEX SEARCH> is set to ON and an
Select whether the index signal is to be recorded during alarm signal input or every hour (exact hour with no minute and second) using the function menu switch <INDEX ALARM/SKIP>.
7Display section
8For details, refer to page 10.
[COUNT/CLOCK] button Press this button to select the time display or tape counter in the display. 9When the power is turned off, the time is displayed.
[TIME MODE] button Use to select the recording or playback time mode. Each time this button is pressed, the recording time mode changes in the following sequence. 3H (VHS SP mode) [ L12
Playback Time Mode will differ depending on how the function menu switch <NOISELESS PLAY> is set. When NOISELESS PLAY is set to OFF: 3H (VHS SP mode) [ L12
When NOISELESS PLAY is set to ON: 3H (VHS SP mode) [ 12
The selected recording/playback time mode is shown on 0the display.
[TIMER REC] button Press this button to execute the timer recording. For !details, refer to "Timer Recording" on page 28.
[MENU] button Press this button to display the date, time setting, timer program setting, various function menu setting and hour @meter. Press again to cancel the display.
[SHIFT/TRACKING +, -] buttons
•Press to select an item in date/time setting, timer program setting and function menu setting.
•Press to adjust tracking and reduce noise if there are tracking problems in the 3H (VHS SP) mode or during search.
*Tracking adjustment is not possible in the L12H and L24H Timelapse Play mode.
#
$
%
^
[SET/V. LOCK +, -] buttons
•Press to set values in date/time setting, timer program setting and function menu setting.
•Press to reduce the vertical shifting of the picture in the Still mode.
[RESET/CANCEL] button
•Normally press this button to reset the tape counter to 0000.
•When the buzzer sounds, press this button to stop the buzzer sound.
Alarm and sensor buzzer will not stop sounding.
•In the Timer Program Setting mode, press this button to cancel the program settings. For details, refer to "Timer Recording" on page 31.
[AL/PL RESET] alarm/power loss reset button Press this button to stop alarm recording or reset the alarm input or power loss data. For details, refer to page 34.
[OPE. LOCK] button Press to activate the operation lock function.
8 | 9 |