GRUNDSÄTZLICHE BEDIENSCHRITTE

BASISFUNKTIONEN

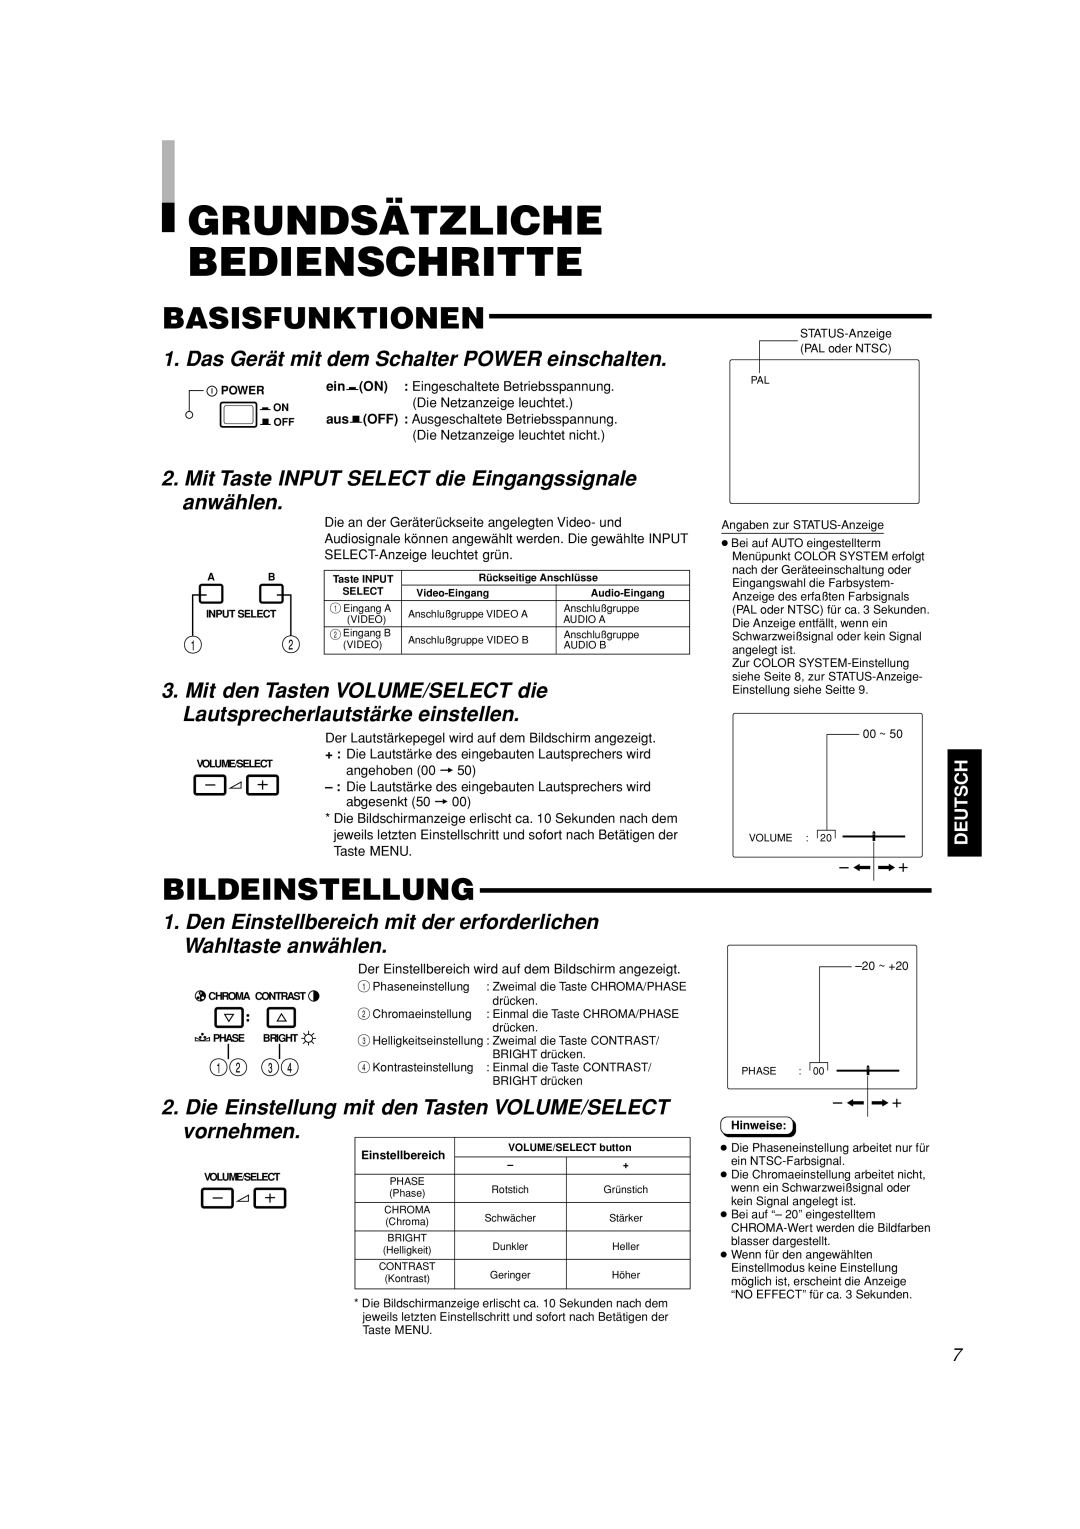
1. Das Gerät mit dem Schalter POWER einschalten.

STATUS-Anzeige (PAL oder NTSC)

POWER

eing(ON) : Eingeschaltete Betriebsspannung.

PAL


ON

(Die Netzanzeige leuchtet.)


ausG(OFF) : Ausgeschaltete Betriebsspannung.


OFF


(Die Netzanzeige leuchtet nicht.)


2.Mit Taste INPUT SELECT die Eingangssignale anwählen.

AB

INPUT SELECT

Die an der Geräterückseite angelegten Video- und Audiosignale können angewählt werden. Die gewählte INPUT SELECT-Anzeige leuchtet grün.

Taste INPUT

Rückseitige Anschlüsse

SELECT

Video-Eingang

Audio-Eingang

1 Eingang A

Anschlußgruppe VIDEO A

Anschlußgruppe

(VIDEO)

AUDIO A


2 Eingang B

Anschlußgruppe VIDEO B

Anschlußgruppe

(VIDEO)

AUDIO B


Angaben zur STATUS-Anzeige

Bei auf AUTO eingestellterm

Menüpunkt COLOR SYSTEM erfolgt

nach der Geräteeinschaltung oder

Eingangswahl die Farbsystem-

Anzeige des erfaßten Farbsignals

(PAL oder NTSC) für ca. 3 Sekunden.

Die Anzeige entfällt, wenn ein

Schwarzweißsignal oder kein Signal

angelegt ist.

Zur COLOR SYSTEM-Einstellung

siehe Seite 8, zur STATUS-Anzeige-

3. Mit den Tasten VOLUME/SELECT die Lautsprecherlautstärke einstellen.

Einstellung siehe Seitte 9.

Der Lautstärkepegel wird auf dem Bildschirm angezeigt.

+: Die Lautstärke des eingebauten Lautsprechers wird

VOLUME/SELECT

angehoben (00 = 50)

– :Die Lautstärke des eingebauten Lautsprechers wird abgesenkt (50 = 00)

*Die Bildschirmanzeige erlischt ca. 10 Sekunden nach dem jeweils letzten Einstellschritt und sofort nach Betätigen der Taste MENU.

BILDEINSTELLUNG

1.Den Einstellbereich mit der erforderlichen Wahltaste anwählen.

VOLUME : 20


00 ~ 50


DEUTSCH

+

CHROMA CONTRAST

PHASE BRIGHT

Der Einstellbereich wird auf dem Bildschirm angezeigt.

1 Phaseneinstellung

: Zweimal die Taste CHROMA/PHASE

2 Chromaeinstellung

drücken.

: Einmal die Taste CHROMA/PHASE


drücken.

3Helligkeitseinstellung : Zweimal die Taste CONTRAST/ BRIGHT drücken.

4 Kontrasteinstellung : Einmal die Taste CONTRAST/ BRIGHT drücken

–20 ~ +20

PHASE : 00

2.Die Einstellung mit den Tasten VOLUME/SELECT vornehmen.


Einstellbereich

VOLUME/SELECT button

VOLUME/SELECT


+


PHASE

Rotstich

Grünstich


(Phase)


CHROMA

Schwächer

Stärker


(Chroma)


BRIGHT

Dunkler

Heller


(Helligkeit)


CONTRAST

Geringer

Höher


(Kontrast)


*Die Bildschirmanzeige erlischt ca. 10 Sekunden nach dem jeweils letzten Einstellschritt und sofort nach Betätigen der Taste MENU.

Hinweise:

Die Phaseneinstellung arbeitet nur für ein NTSC-Farbsignal.

Die Chromaeinstellung arbeitet nicht, wenn ein Schwarzweißsignal oder kein Signal angelegt ist.

Bei auf “– 20” eingestelltem CHROMA-Wert werden die Bildfarben blasser dargestellt.

Wenn für den angewählten Einstellmodus keine Einstellung möglich ist, erscheint die Anzeige “NO EFFECT” für ca. 3 Sekunden.

7

Page 25
Image 25
JVC TM-A101G manual Grundsätzliche Bedienschritte, Basisfunktionen, Bildeinstellung

TM-A101G specifications

The JVC TM-A101G is a compact and versatile color monitor designed for various professional applications, particularly in the fields of broadcasting, video production, and educational environments. With a screen size of 10 inches, it offers a balance between portability and screen real estate, making it ideal for on-the-go setups and tight studio spaces.

One of the standout features of the TM-A101G is its high-resolution display capability. The monitor supports a maximum resolution of 1024 x 768 pixels, ensuring that users can achieve a crisp and clear output. This clarity is essential for professionals who need accurate color representation and detail in their work, whether they are editing video, monitoring live feeds, or conducting presentations.

The TM-A101G is equipped with advanced signal processing technologies that ensure high-quality image reproduction. Its wide viewing angles allow users to have a consistent image quality from multiple positions, making it practical for collaborative environments where group viewing is necessary. This feature enhances usability in settings such as control rooms or classrooms.

Connectivity is crucial in modern applications, and JVC has designed the TM-A101G with a range of inputs, including composite, S-Video, and component video, ensuring compatibility with various video sources. This versatility allows professionals to easily integrate the monitor into different setups, whether they are working with older equipment or the latest technology.

Another key characteristic of the TM-A101G is its lightweight design. Weighing only a fraction of larger monitors, it is easy to transport and install. This makes it a popular choice for fieldwork and mobile production teams who require reliable monitoring solutions without the burden of heavy equipment.

The monitor is built with durability in mind, featuring a sturdy chassis that can withstand the rigors of professional use. Additionally, the TM-A101G includes professional features such as underscan and overscan capabilities, providing users with control over the display output according to their specific needs.

In summary, the JVC TM-A101G is a well-rounded monitor that excels in image quality, connectivity, and portability, making it a valuable asset for video professionals and educators alike. Its mix of features and thoughtful design ensures that it meets the demands of today’s fast-paced media landscape, providing reliability and performance where it counts most.