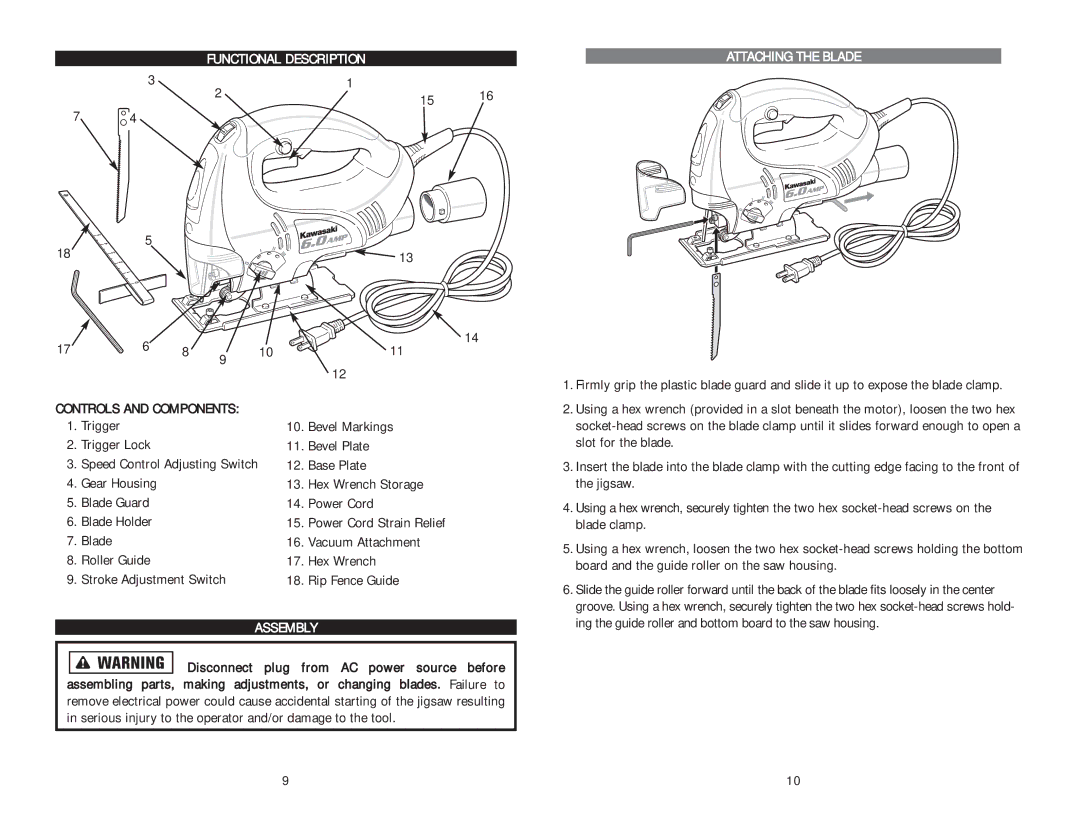
FUNCTIONAL DESCRIPTION
3 | 1 |
|
2 | 15 | 16 |
|
|
7 | 4 |
5
18 | 13 |
|
17 | 6 |
|
|
|
| 14 |
8 | 9 | 10 |
| 11 | ||
|
|
|
|
| 12 | |
|
|
|
|
|
| |
CONTROLS AND COMPONENTS: |
|
|
| |||
1. | Trigger |
|
|
| 10. | Bevel Markings |
2. | Trigger Lock |
|
|
| 11. | Bevel Plate |
3. | Speed Control Adjusting Switch |
| 12. | Base Plate | ||
4. | Gear Housing |
|
|
| 13. | Hex Wrench Storage |
5. | Blade Guard |
|
|
| 14. | Power Cord |
6. | Blade Holder |
|
|
| 15. | Power Cord Strain Relief |
7. | Blade |
|
|
| 16. | Vacuum Attachment |
8. | Roller Guide |
|
|
| 17. | Hex Wrench |
9. | Stroke Adjustment Switch |
| 18. | Rip Fence Guide | ||
ASSEMBLY
![]()
![]()
![]()
![]()
![]()
![]()
![]() Disconnect plug from AC power source before assembling parts, making adjustments, or changing blades. Failure to remove electrical power could cause accidental starting of the jigsaw resulting in serious injury to the operator and/or damage to the tool.
Disconnect plug from AC power source before assembling parts, making adjustments, or changing blades. Failure to remove electrical power could cause accidental starting of the jigsaw resulting in serious injury to the operator and/or damage to the tool.
ATTACHING THE BLADE
1.Firmly grip the plastic blade guard and slide it up to expose the blade clamp.
2.Using a hex wrench (provided in a slot beneath the motor), loosen the two hex
3.Insert the blade into the blade clamp with the cutting edge facing to the front of the jigsaw.
4.Using a hex wrench, securely tighten the two hex
5.Using a hex wrench, loosen the two hex
6.Slide the guide roller forward until the back of the blade fits loosely in the center groove. Using a hex wrench, securely tighten the two hex
9 | 10 |
