Sears Roebuck and Co., Hoffman Estates, IL 60179 U.S.A
2200128 Sears Canada, Inc., Toronto, Ontario, Canada M5B 2B8
Contents
Your safety and the safety of others is very important
Before you throw away your old refrigerator or freezer
Iiii
Removing packaging materials
Installing Your Refrigerator
Cleaning before use
Remove Screw 1 AS Shown in Diagram
Recommended Grounding Method
Please Read Before Installation
Remove Screw 2 AS Shown in Diagram
Read all directions carefully before you begin
Cold Water Supply
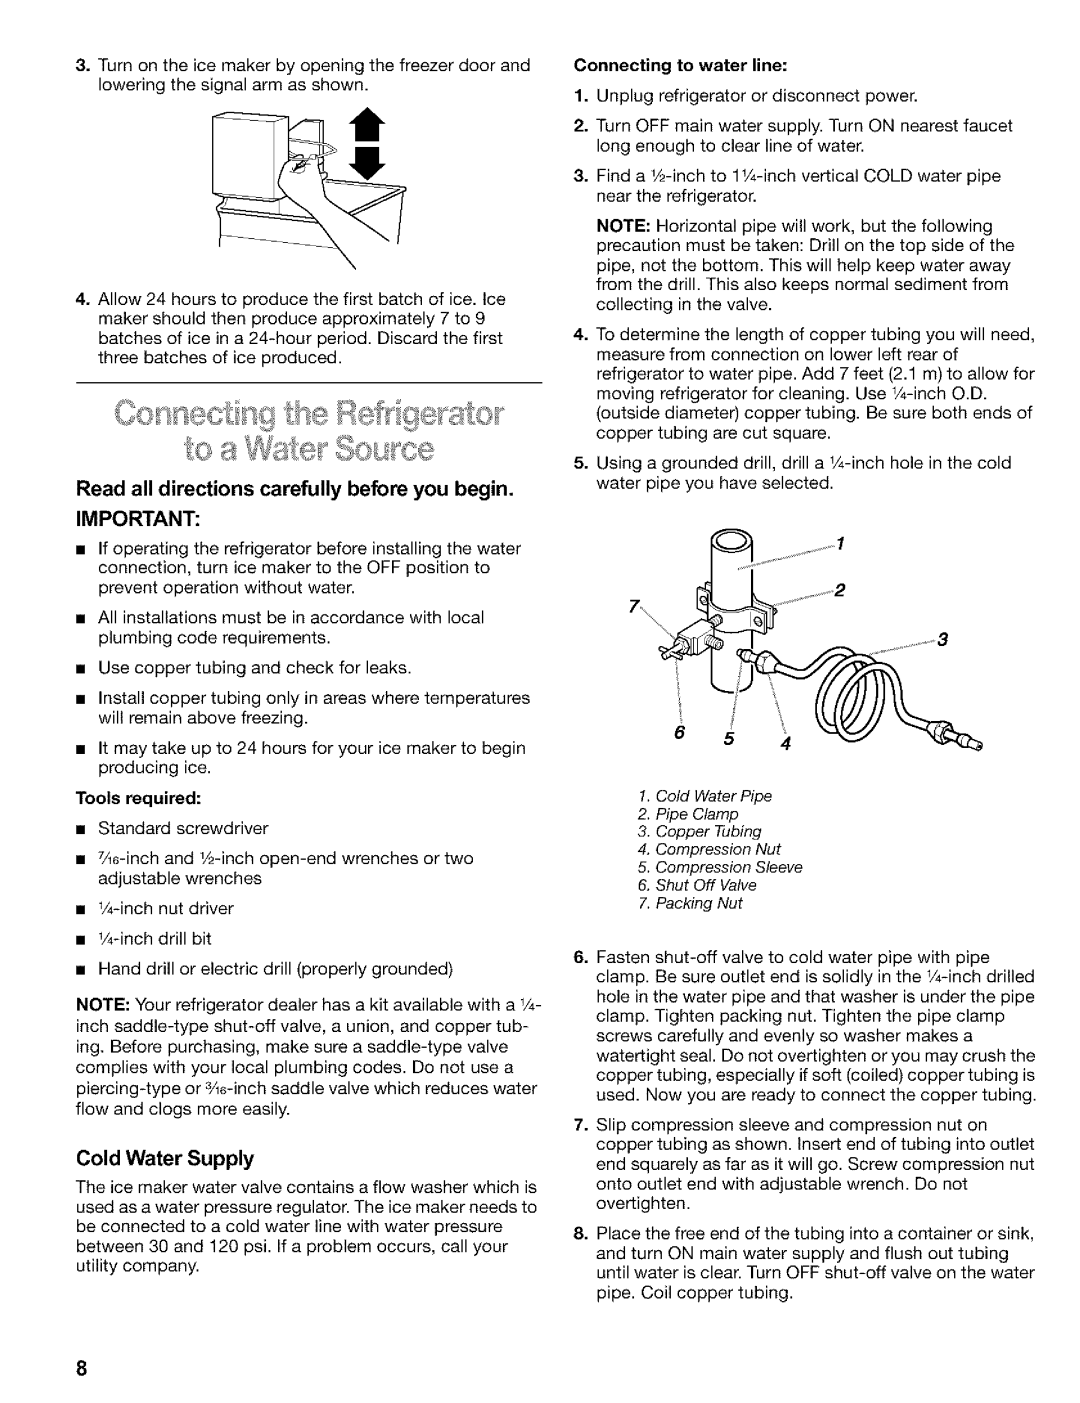
Connecting to refrigerator
Door Closing
Turn shut-off valve ON. Check For Leaks. Tighten any
To remove the base grille
Using Your Refrigerator
Checking airflow
Recommended Adjustment
Storing Fresh Food
CONDITION/REASON
Thermostat
Storing Frozen Food
Refrigerator Features
Ice dispenser
Water dispenser
Dispenser light
Dispenser lock on somemodels
To dispense water
Water filter status light
Changing a water filter cartridge
To replace a shelf/frame
Using the dispenser without the water filter
Ordering replacement filters
To slide the shelf from side to side
To remove the shelf
To replace the shelf
To remove the drawer
To replace the crisper cover
Adjusting the control
To remove the crisper
Snap-on Door Rails
Drop-in Door Rails
Caring for Your Refrigerator
To replace the basket
Explosion Hazard
Energy Saving Tip
Refrigerator light bulbs
Partcomments
If you choose to leave the refrigerator on while youre
Vacations
Moving
Troubleshooting
Lights do not work
There is water in the defrost drain pan
Motor seems to run too much
Refrigerator seems to make too much noise
Ice maker is not producing ice
Ice maker is producing too little ice
Off-taste,odor or grey color in the ice
Divider between the two compartments is warm
Water dispenser will not operate properly
Water or ice is leaking from the dispenser
Temperature is too warm
There is interior moisture build-up
Doors will not close completely
Doors are difficult to open
Sears Maintenance Agreement
Sears Maintenance Agreement
Water Filter Certifications
MCL
Gallons 946 Liters
Maximum Minimum %
Water Filtration System Model LC-400
Maximum
Reduction NSF Test Requirement
Performance tt
Influent
Ndicegaranta
Antes de tirar su refrigerador viejo o congelador
Seguridad DEL Refrigerador
Su seguridad y la seguridad de los demos es muy importante
Partes Y Caractersticas
Cbmo quitar los materiales de empaque
Cbmo limpiar su refrigerador antes de usarlo
Herramientas necesarias
SE Muestra EN EL DIAGRAMA, no Quite EL Tornillo
Metodo de conexibn a tierra recomendado
Muestra EN EL DIAGRAMA, no Quite EL Tornillo
8S B a
Leer las instrucciones con cuidado antes de comenzar
Suministro de agua fria
Importante
Herramientas requeridas
Cierre de la Puerta
Conexibn al refrigerador
Para retirar la rejUla de la base
Para volver a colocar la rejilla
Page
No bloquee ninguno de estos orificios de ventilaci6n
Como Usar SU Refrigerador
Cbmo comprobar el flujo de aire
Almacenamiento de alimentos frescos
Ajuste CONDICIN/MOTIVORECOMENDADO
CONDICIN/MOTIVO
Ajuste Recomendado
Conservacibn de alimentos congelados
El distribuidor de hielo
Para sacar el depbsito de hielo
Para distribuir hielo
Para sacar agua
La luz del distribuidor
El distribuidor de agua
El cierre del distribuidor en algunos modelos
Cbmo cambiar el cartucho de flltracibn de agua
La luz de estado del filtro de agua
Lock UNLOCK1
Estantes deslizables en algunos modelos
Uso del dispensador sin el filtro de agua
Para pedir filtros de repuesto
Estantes y marcos de estantes Para quitar un estante/marco
Para volver a colocar un estante/marco
C6mo deslizar el estante de lado a lado
Para quitar el estante
Cbmo ajustar el control
Para volver a colocar el estante
Para sacar el cajbn convertible
Para sacar la tapa
Jlg. I0... I I..+0 ... OS
Para sacar el compartimiento de verduras
Rieles del a puerta a presi6n
Rieles calzables de la puerta
Cbmo retirar el cajbn para carnes frias
Para volver a colocar los rieles
Cuidado DE SU Refrigerador
Comentarios
Focos del refrigerador
Parte
Luz superior del congelador en algunos modelos
Focos del congelador
La luz que estb debajo del depbsito de hielo
Vacaciones
Mudanza
Localizacion Y Reparacion DE Averas
Parece que el motor funciona excesivamente
Las luces no funcionan
El refrigerador parece Hacer mucho ruido
La fabrica de hielo no produce hielo
La fabrica de hielo produce muy poco hielo
El hielo tiene mal sabor, mal olor o un color grisceo
El despachador de hielo no funciona debidamente
El despachador de agua no funciona debidamente
Hay filtracibn de agua o hielo en el despachador
El agua del despachador no est Io suficientemente fria
El divisor entre los dos compartimientos est caliente
La temperatura est muy caliente
Hay acumulacibn de humedad en el interior
Las puertas no cierran completamente
Es dificil abrir las puertas
Contrato DE Mantenimiento Sears
Contrato de mantenimiento Sears
El contrato de mantenimiento Sears
Le damos servicio a Io que vendemos es nuestro
Certificacion DE Filtros DE Agua
Litros 250 galones
Sistema de Filtrado de Agua Modelo LC-400
Litros 400 galones
Litros 500 galones
Minimo %
Ximo Minimo %
Contaminatestt
Garantie
SI Curiti DU RI Frigi Rateur
Votre sdcuritd et celle des autres est tres importante
Avant de jeter votre vieux rdfrigdrateur ou
Congdlateur
PII=CES ET CARACTI!RISTIQUES
Nettoyage avant rutilisation
Installation DU RI Frigi Rateur
Enlevement des matdriaux demballage
PAS Enlever a LA VIS 1, TEL Quindiqu Dans LE Schima
Methode recommandde de mise a la terre
Outils requis
PAS Enlever LA VlS 2 TEL Quillustri Dans LE Schema
NE PAS Enlever LA VIS 3 TEL Quillustri Dans LE Schema
Arrivde deau froide
Raccordement b une canalisation deau
Raccordement au rfrigrateur
Pour replacer la grille
Fermeture des portes
Recommandd, ne refroidira pas les compartiments plus vite
Utilisation DU RI Frigi Rateur
Verification de la circulation dair
Ne pas obstruer lunede ces ouvertures daration
CONDITION/RAISON
Ajustement Recommandie
Conservation des aliments frais
Conservation des aliments congels
Pour retirer le bac de glaons
CARACTI!RISTIQUES DU RI Frigi Rateur
Le distributeur de glaqons
Le distributeur deau
Temoin lumineux du distributeur
Distribution de glaqons
Distribution deau
Remplacement de la cartouche de filtre a eau
Le temoin lumineux de Ietatdu filtre a eau
Pour retirer les tablettes de la position dexp6dition
Commande de flltres de rechange
Utilisation de la fontaine refrigqree sans filtre Eau
Pour r6installer un cadre de tablette
Tablettes sur roulettes sur certains modeles
Pour glisser la tablette dunc6t & lautre
Pour enlever la tablette
Pour reinstaller la tablette
Ajustement du rdglage
Pour retirer le couvercle
Pour replacer le couvercle
Pour retirer le bac b Igumes
Pour retirer le couvercle du bac b lgumes
Pour enlever Iextension du couvercle du bac b ldgumes
Pour remettre Iextension du couvercle du bac ldgumes
Tringles dposes dans la porte
Tringles enclenchables dans la porte
Pour r6installer le panier
Entretien DE Votre RI Frigi Rateur
Pour retirer le panier du congdlateur
Conseil pour 6conomie d6nergie
Ampoules ddclairage du rdfrigdrateur
Piecescommentaires
Ampoules dclairage du conglateur
Pour enlever le protecteur de Iampoule pour le nettoyage
Lumire au-dessous du bac & glagons
Heures
Vacances
Dmnagement
Les ampoules nclairent pas
Guide DE DI Pannage
Le moteur semble fonctionner excessivement
La machine b glacons ne produit pas de glaqons
La machine a glaqons produit trop peu de glaqons
Mauvais got ou odeur des glaqons
Le distributeur de glacr.Onsne fonctionne pas correctement
Le distributeur deau ne fonctionne pas correctement
Leauou la glace coule du distributeur
Leaudu distributeur nest pas assez froide
La cloison entre les deux sections est tiede
La tempdrature est trop tiede
II existe une accumulation dhumiditd b Iinterieur
Les portes ne se ferment pas completement
Les portes sont difficiles b ouvrir
Service Dentretiensears
Contrat dentretien Sears
Le contrat dentretien Sears
Nous faisons Ientretien des produits que nous
Certifications DE Filtre .&.EAU
946 Liters 250 Gallons
Liters 400 gallons
NSF
Liters 500 gallons
Rendement Affluent moyen
Gnral Moyen Minimal Rduction
Contaminanttt
MY-HOM E
2200128