WATER SUPPLY

1.Water for the humidifier must be taken from a nearby cold water line. Turn off the water supply. Drain by opening a faucet at a lower level of the line.

2.Position the saddle valve on the water line as close to the humidifier as possible. You have been supplied with 10 feet of 1/4" plastic tubing.

NOTE: When measuring the distance from the saddle valve location to the humidifier, keep in mind that the tubing must be supported; there- fore, it must run along the ceiling and walls.

Measure along the path that the tubing wiii follow.

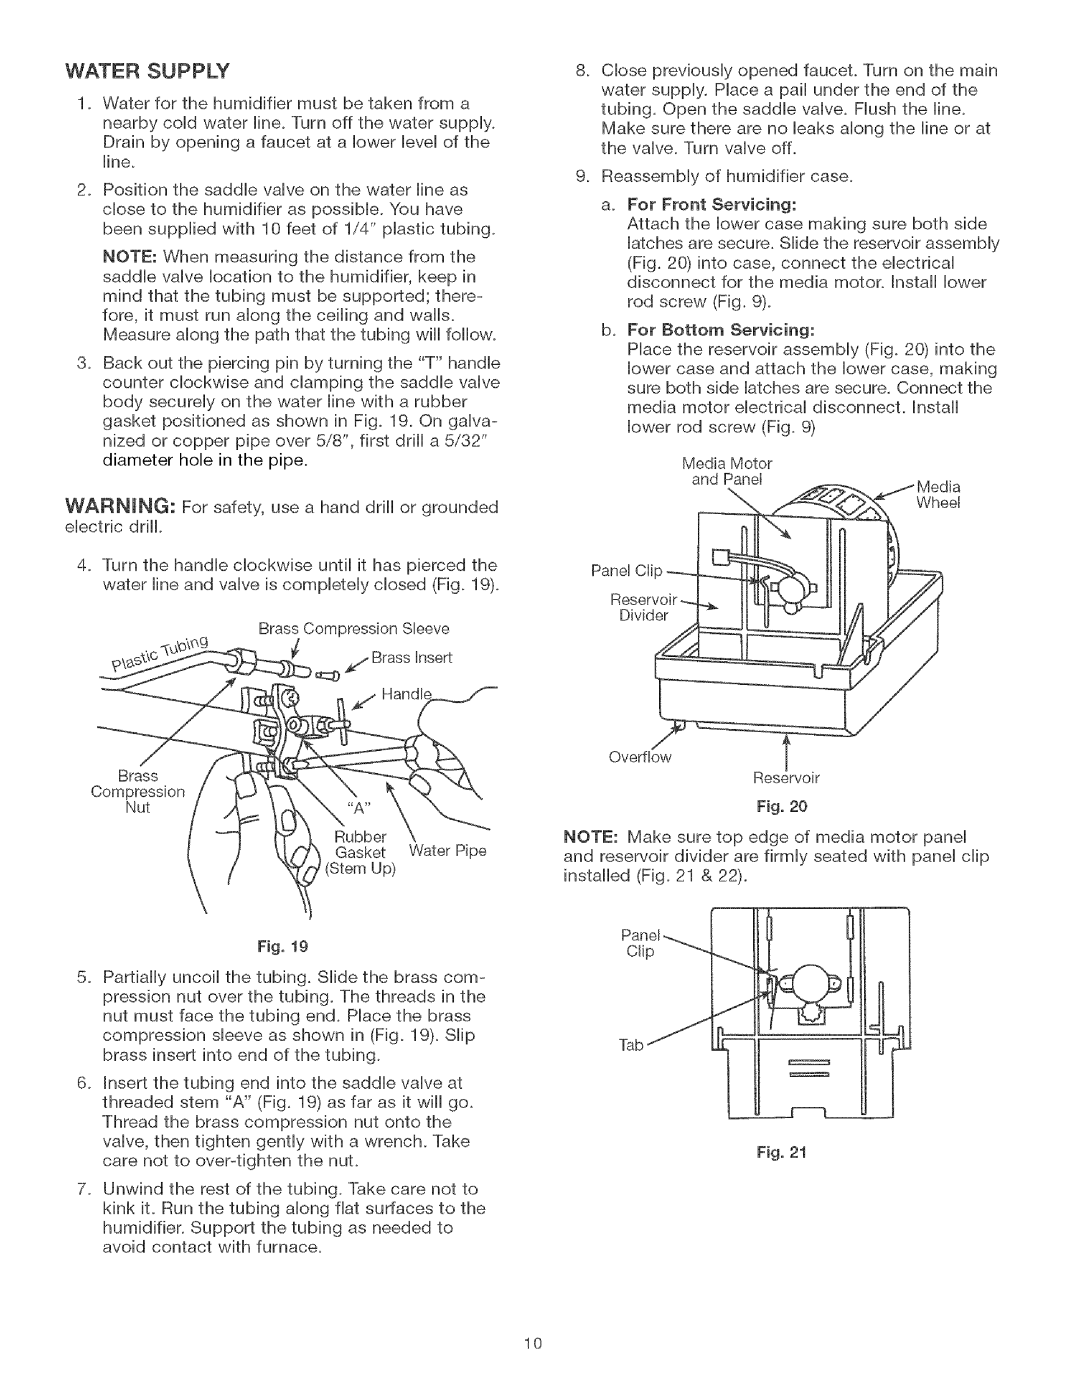
3.Back out the piercing pin by turning the "T" handle counter clockwise and clamping the saddle valve body securely on the water line with a rubber gasket positioned as shown in Fig. 19. On galva- nized or copper pipe over 5/8", first drill a 5/32" diameter hole in the pipe.

WARNING: For safety, use a hand drill or grounded electric drill.

4.Turn the handle clockwise until it has pierced the water line and valve is completely closed (Fig. 19).

Brass Compression Sleeve

_[ _ xf Brass insert

j Hand

Brass

Compression

Nut

Rubber

Gasket Water Pipe

(Stem Up)

Fig, 19

5.Partially uncoil the tubing. Slide the brass com- pression nut over the tubing. The threads in the nut must face the tubing end. Place the brass compression sleeve as shown in (Fig. 19). Slip brass insert into end of the tubing.

6.Insert the tubing end into the saddle valve at threaded stem "A" (Fig. 19) as far as it wiii go. Thread the brass compression nut onto the valve, then tighten gently with a wrench. Take care not to over-tighten the nuL

7.Unwind the rest of the tubing. Take care not to kink it. Run the tubing along fiat surfaces to the humidifier. Support the tubing as needed to avoid contact with furnace.

8.Close previously opened fauceL Turn on the main water supply, Place a pail under the end of the tubing, Open the saddle valve. Flush the line. Make sure there are no leaks along the line or at the valve, Turn valve off.

9.Reassembiy of humidifier case.

a. For Front Servicing:

Attach the lower case making sure both side latches are secure. Slide the reservoir assembly

(Fig. 20) into case, connect the electrical disconnect for the media motor. Install lower

rod screw (Fig. 9).

b.For Bottom Servicing:

Place the reservoir assembly (Fig. 20) into the lower case and attach the lower case, making sure both side latches are secure. Connect the media motor electrical disconnect. Install

lower rod screw (Fig. 9)

Media Motor

and Panel

Wheel

Panel Clip

Divider

Overflow

Reservoir

Fig, 20

NOTE: Make sure top edge of media motor panel and reservoir divider are firmly seated with panel clip installed (Fig. 21 & 22).

Fig, 21

10

Page 10
Image 10
Kenmore 303.9380612 manual Water Supply

303.9380612 specifications

The Kenmore 303.9380612 is a versatile and efficient appliance designed to meet the needs of modern households. It stands out in the crowded market of home appliances due to its user-friendly features, innovative technologies, and commitment to performance.

One of the primary characteristics of the Kenmore 303.9380612 is its energy efficiency. This model is equipped with advanced energy-saving technologies that not only reduce electricity consumption but also help lower utility bills. Its Energy Star certification is a testament to its environmentally friendly design, ensuring that users can enjoy a high-performing appliance without the guilt of excessive energy use.

The Kenmore 303.9380612 boasts a spacious interior, allowing for a significant amount of storage, making it an ideal choice for families and individuals alike. The adjustable shelves provide flexibility to accommodate various items, from large pots and pans to smaller groceries. This adaptability ensures that users can maximize their storage potential without compromising accessibility.

Another notable feature is the smart temperature management system. The appliance comes with precise temperature control and even cooling technologies, ensuring that food remains fresh for longer periods. This is crucial for preserving the quality of perishable items, thereby reducing food waste and promoting sustainability at home.

The Kenmore 303.9380612 also incorporates user-friendly controls that enhance the overall user experience. The intuitive interface makes it simple to navigate through various settings, whether you're adjusting temperatures or accessing special modes designed for specific food types. Additionally, the clear display allows for effortless monitoring of performance, ensuring that users are always informed.

In terms of design, the sleek and modern aesthetic of the Kenmore 303.9380612 complements any kitchen decor. Its durable exterior is not only visually appealing but also resistant to scratches and stains, ensuring that it will maintain its pristine appearance over time.

Safety is another hallmark feature of this appliance. It comes with built-in features designed to prevent accidents, such as automatic shut-off mechanisms and door alarms. These elements provide peace of mind, particularly in households with children.

In summary, the Kenmore 303.9380612 combines energy efficiency with advanced technology, spacious storage, and user-friendly features, making it a top choice for anyone looking to enhance their kitchen. Its thoughtful design and commitment to performance ensure that it meets the needs of modern living while providing reliable service for years to come.