4_ Peei off the paper from the back of the gasket and stick the gasket on the return air pbnum.

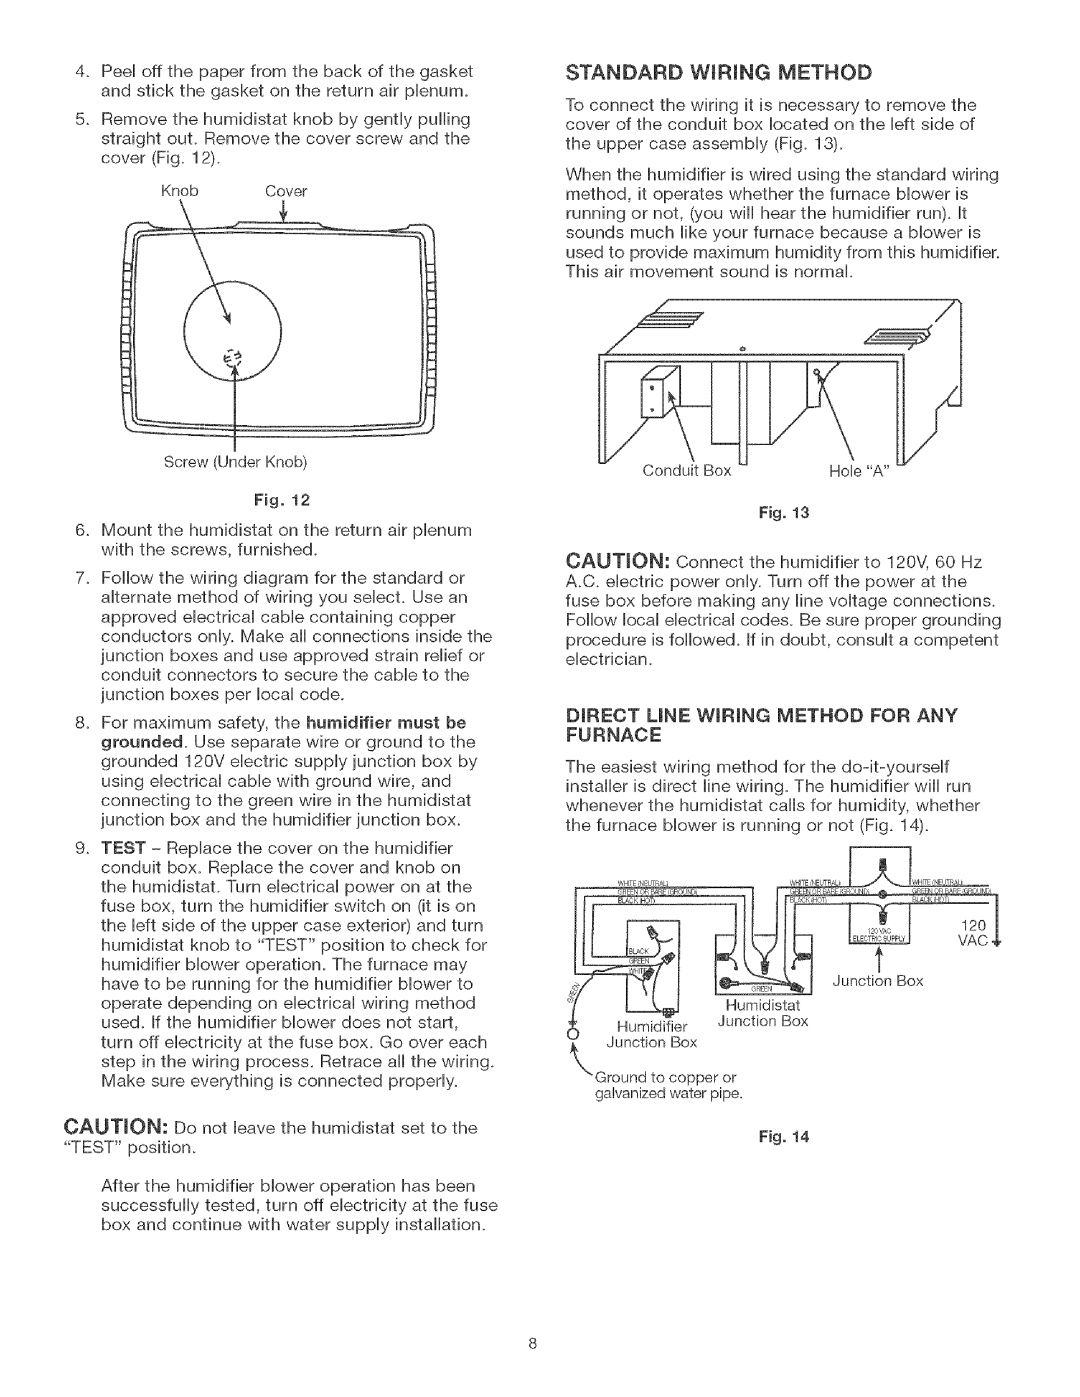
5.Remove the humidistat knob by gently pulling straight ouL Remove the cover screw and the cover (Fig. 12).

KnobCover

Screw (Under Knob)

Fig, 12

6_ Mount the humidistat on the return air plenum with the screws, furnished.

7.Follow the wiring diagram for the standard or alternate method of wiring you selecL Use an approved eUectrical cable containing copper

conductors only. Make all connections inside the junction boxes and use approved strain relief or conduit connectors to secure the cable to the junction boxes per local code,

8_ For maximum safety, the humidifier must be grounded. Use separate wire or ground to the grounded 120V electric supply junction box by using electrical cable with ground wire, and connecting to the green wire in the humidistat junction box and the humidifier junction box.

g_ TEST - Replace the cover on the humidifier conduit box. Replace the cover and knob on the humidistaL Turn electrical power on at the fuse box, turn the humidifier switch on (it is on the left side of the upper case exterior) and turn humidistat knob to "TEST" position to check for humidifier blower operation. The furnace may have to be running for the humidifier blower to operate depending on electrical wiring method used. If the humidifier blower does not start, turn off electricity at the fuse box. Go over each step in the wiring process. Retrace aii the wiring. Make sure everything is connected properly.

CAUTmON: Do not leave the humidistat set to the

"TEST" position.

After the humidifier blower operation has been successfully tested, turn off electricity at the fuse box and continue with water supply installation.

STANDARD WmRmNG METHOD

To connect the wiring it is necessary to remove the cover of the conduit box located on the left side of

the upper case assembly (Fig. 13).

When the humidifier is wired using the standard wiring method, it operates whether the furnace blower is running or not, (you wiii hear the humidifier run). It sounds much like your furnace because a blower is

used to provide maximum humidity from this humidifier. This air movement sound is normal.

Fig, 13

CAUTmON: Connect the humidifier to 120V, 60 Hz A.C. electric power only. Turn off the power at the fuse box before making any line voltage connections. Foiiow iocai eiectricai codes. Be sure proper grounding procedure is followed. If in doubt, consult a competent electrician.

DIRECT LiNE WiRiNG METHOD FOR ANY FURNACE

The easiest wiring method for the do-it-yourself installer is direct line wiring. The humidifier will run whenever the humidistat calls for humidity, whether the furnace blower is running or not (Fig. 14).

Junction Box

Ground to copper or galvanized water pipe.

Fig, 14

Page 8
Image 8
Kenmore 303.9380612 manual Standard WmRmNG Method

303.9380612 specifications

The Kenmore 303.9380612 is a versatile and efficient appliance designed to meet the needs of modern households. It stands out in the crowded market of home appliances due to its user-friendly features, innovative technologies, and commitment to performance.

One of the primary characteristics of the Kenmore 303.9380612 is its energy efficiency. This model is equipped with advanced energy-saving technologies that not only reduce electricity consumption but also help lower utility bills. Its Energy Star certification is a testament to its environmentally friendly design, ensuring that users can enjoy a high-performing appliance without the guilt of excessive energy use.

The Kenmore 303.9380612 boasts a spacious interior, allowing for a significant amount of storage, making it an ideal choice for families and individuals alike. The adjustable shelves provide flexibility to accommodate various items, from large pots and pans to smaller groceries. This adaptability ensures that users can maximize their storage potential without compromising accessibility.

Another notable feature is the smart temperature management system. The appliance comes with precise temperature control and even cooling technologies, ensuring that food remains fresh for longer periods. This is crucial for preserving the quality of perishable items, thereby reducing food waste and promoting sustainability at home.

The Kenmore 303.9380612 also incorporates user-friendly controls that enhance the overall user experience. The intuitive interface makes it simple to navigate through various settings, whether you're adjusting temperatures or accessing special modes designed for specific food types. Additionally, the clear display allows for effortless monitoring of performance, ensuring that users are always informed.

In terms of design, the sleek and modern aesthetic of the Kenmore 303.9380612 complements any kitchen decor. Its durable exterior is not only visually appealing but also resistant to scratches and stains, ensuring that it will maintain its pristine appearance over time.

Safety is another hallmark feature of this appliance. It comes with built-in features designed to prevent accidents, such as automatic shut-off mechanisms and door alarms. These elements provide peace of mind, particularly in households with children.

In summary, the Kenmore 303.9380612 combines energy efficiency with advanced technology, spacious storage, and user-friendly features, making it a top choice for anyone looking to enhance their kitchen. Its thoughtful design and commitment to performance ensure that it meets the needs of modern living while providing reliable service for years to come.