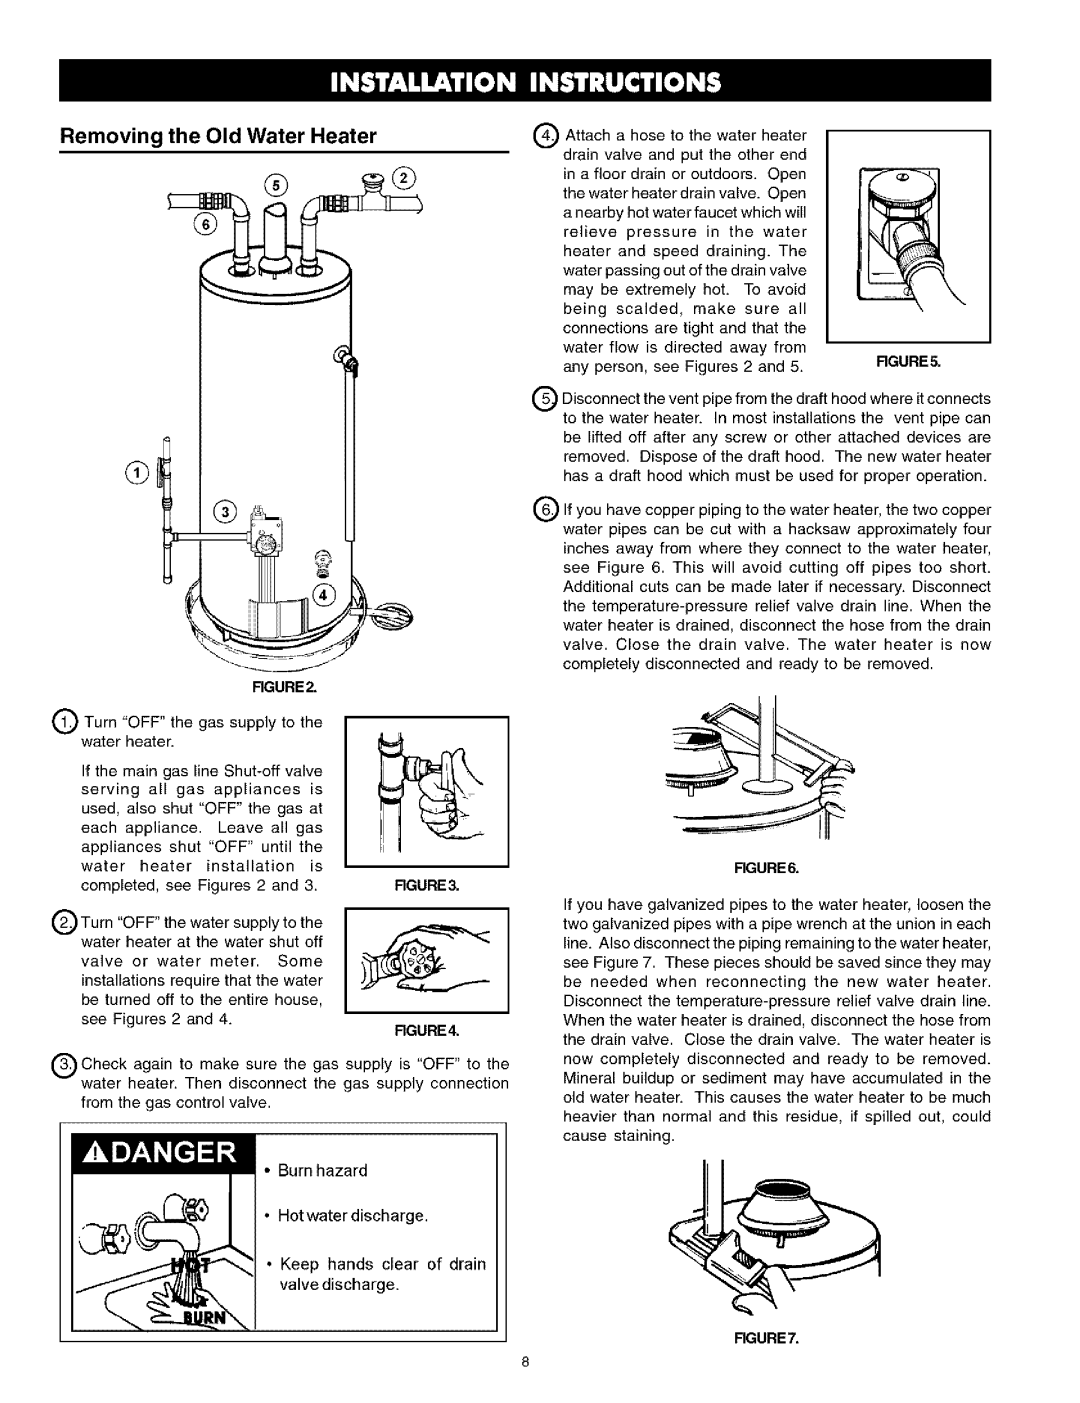
Removing the Old Water Heater

FIGURE2,

QTurn "OFF" the gas supply to the water heater.

If the main gas line Shut-off valve

serving all gas appliances is used, also shut "OFF" the gas at

each appliance. Leave all gas appliances shut "OFF" until the

water heater installation is

completed, see Figures 2 and 3.

RGURE3,

(_) Turn LLOFEll the water supply to the water heater at the water shut off

valve or water meter. Some installations require that the water be turned off to the entire house, see Figures 2 and 4.

RGURE4.

(_Check again to make sure the gas supply is "OFF" to the water heater. Then disconnect the gas supply connection

from the gas control valve.

Burn hazard

Hotwater discharge.

Keep hands clear of drain valve discharge.

(_ Attach a hose to the water heater drain valve and put the other end in a floor drain or outdoors. Open the water heater drain valve. Open a nearby hot water faucet which will relieve pressure in the water

heater and

speed draining. The


water passing out of the drain valve


may be extremely hot. To avoid


being scalded, make sure all


connections

are tight and that the


water flow is directed away from

RGURE5,

any person,

see Figures 2 and 5.


(_ Disconnect the vent pipefrom the draft hood where it connects to the water heater. In most installations the vent pipe can be lifted off after any screw or other attached devices are removed. Dispose of the draft hood. The new water heater has a draft hood which must be used for proper operation.

QIf you have copper piping to the water heater, the two copper water pipes can be cut with a hacksaw approximately four inches away from where they connect to the water heater, see Figure 6. This will avoid cutting off pipes too short. Additional cuts can be made later if necessary. Disconnect

the temperature-pressure relief valve drain line. When the water heater is drained, disconnect the hose from the drain valve. Close the drain valve. The water heater is now completely disconnected and ready to be removed.

FIGURE&

If you have galvanized pipes to the water heater, loosen the two galvanized pipes with a pipe wrench at the union in each line. Also disconnect the piping remaining to the water heater, see Figure 7. These pieces should be saved since they may be needed when reconnecting the new water heater. Disconnect the temperature-pressure relief valve drain line. When the water heater is drained, disconnect the hose from the drain valve. Close the drain valve. The water heater is now completely disconnected and ready to be removed.

Mineral buildup or sediment may have accumulated in the old water heater. This causes the water heater to be much heavier than normal and this residue, if spilled out, could cause staining.

FIGURE 7,

Page 8
Image 8
Kenmore 153.336861, 336801 HA, 336901 HA, 761, 153.336361, 153.336301 HA Removing the Old Water Heater, RGURE3, RGURE4, RGURE5

153.336501 HA, 336, 153.336161, 153.336301 HA, 336901 HA specifications

The Kenmore 153 is a standout model in the realm of home appliances, particularly noted for its exceptional performance and innovative features. This appliance is designed to meet the demands of modern households, combining efficiency, reliability, and user-friendly features into one compact unit.

One of the primary features of the Kenmore 153 is its robust design, which reflects its commitment to durability. Constructed with high-quality materials, it is engineered to withstand the rigors of daily use while maintaining a sleek and stylish appearance. This model comes with a powerful motor that guarantees efficient operation, enabling users to complete tasks quickly and effectively.

The Kenmore 153 incorporates advanced technology that enhances its functionality. For example, it features smart sensor technology, which automatically detects load size and adjusts water and energy usage accordingly. This not only conserves resources but also ensures optimal cleaning performance with every use. Additionally, the model offers multiple wash cycles and temperature settings, giving users the flexibility to customize their washing experience based on the fabric type and soil level.

Energy efficiency is a significant aspect of the Kenmore 153's design. It boasts an ENERGY STAR certification, indicating that it meets stringent energy efficiency guidelines set by the U.S. Environmental Protection Agency. This not only helps reduce utility bills but also minimizes the environmental impact, making it a wise choice for eco-conscious consumers.

The Kenmore 153 also prioritizes user convenience. Its intuitive control panel allows for easy navigation through various settings and options. A display screen provides clear information about the selected cycle and estimated time remaining, helping users manage their laundry tasks more effectively.

In terms of capacity, the Kenmore 153 is spacious enough to accommodate large loads, making it ideal for families and busy households. Its advanced cleaning system ensures thorough cleaning without damaging clothes, while the high spin speeds reduce drying time significantly.

Overall, the Kenmore 153 stands out for its combination of advanced technology, energy efficiency, and user-centric design. It is a reliable choice for those seeking a powerful and versatile appliance to enhance their laundry experience. Whether you are dealing with everyday clothing or specialized fabrics, the Kenmore 153 promises to deliver exceptional results with every use.