Manuals
/
Kenmore
/
Kitchen Appliance
/
Range
Kenmore
790-9663 Operating the Bridge Element some models, To Operate the Bridge Surface Element
Models:
790-9663
1
14
50
50
Download
50 pages
48.21 Kb
11
12
13
14
15
16
17
18
Setting Timer
Hot Surface Indicator Lights
Adjusting Oven Temperature
Before Setting Oven Controls
Self Cleaning Ovens
How to
Proper Meat Probe placement
Safety
Sears Installation Service
Possible Cause/Solution
Page 14
Image 14
Page 13
Page 15
Page 14
Image 14
Page 13
Page 15
Contents
Electric Range
ENGLISH ESPAÑOL
p/n 316417277
Estufa eléctrica
FIVE-YEAR LIMITED WARRANTY
Kenmore Elite Appliance Warranty
One Year Limited Warranty
Disclaimer of implied warranties limitation of remedies
Do not use the oven or warmer drawer if equipped for storage
Important Safety Instructions
ENGLISH
Never Use Your Appliance for Warming or Heating the Room
SELF CLEANING OVENS
IMPORTANT INSTRUCTIONS FOR USING YOUR COOKTOP
IMPORTANT INSTRUCTIONS FOR USING YOUR OVEN
IMPORTANT INSTRUCTIONS FOR CLEANING YOUR RANGE
Sears Installation Service
Master Protection Agreements
Acuerdos de protección
Master Protection Agreements
Range Features
Your Electric Range Features Include
Oven Vent Location
Before Setting Oven Controls
Your Electric Range Features Include cont’d
Removing & Replacing Oven Racks
Air Circulation in the Oven
Types of Oven Racks
Baking Layer Cakes with 1 or 2 Oven Racks
Flat Handle Oven Rack
To turn the Cooktop Lockout Feature ON
Before Setting Surface Controls
To Set the Cooktop Lockout Feature
To turn the Cooktop Lockout Feature OFF
Hot Surface Indicator Lights
Setting Surface Controls
The available ESEC Window Display Settings
Cooktop Sabbath Day Feature and Sb Message
Operating Single Radiant Surface Elements
Recommended Surface Cooking Settings
Setting
To Operate the Single Radiant Surface Elements
Do not place aluminum foil or plastic items such as salt
Operating the Double Element some models
To Operate the Double Surface Elements
Operating the Triple Element some models
To Operate the Triple Surface Element
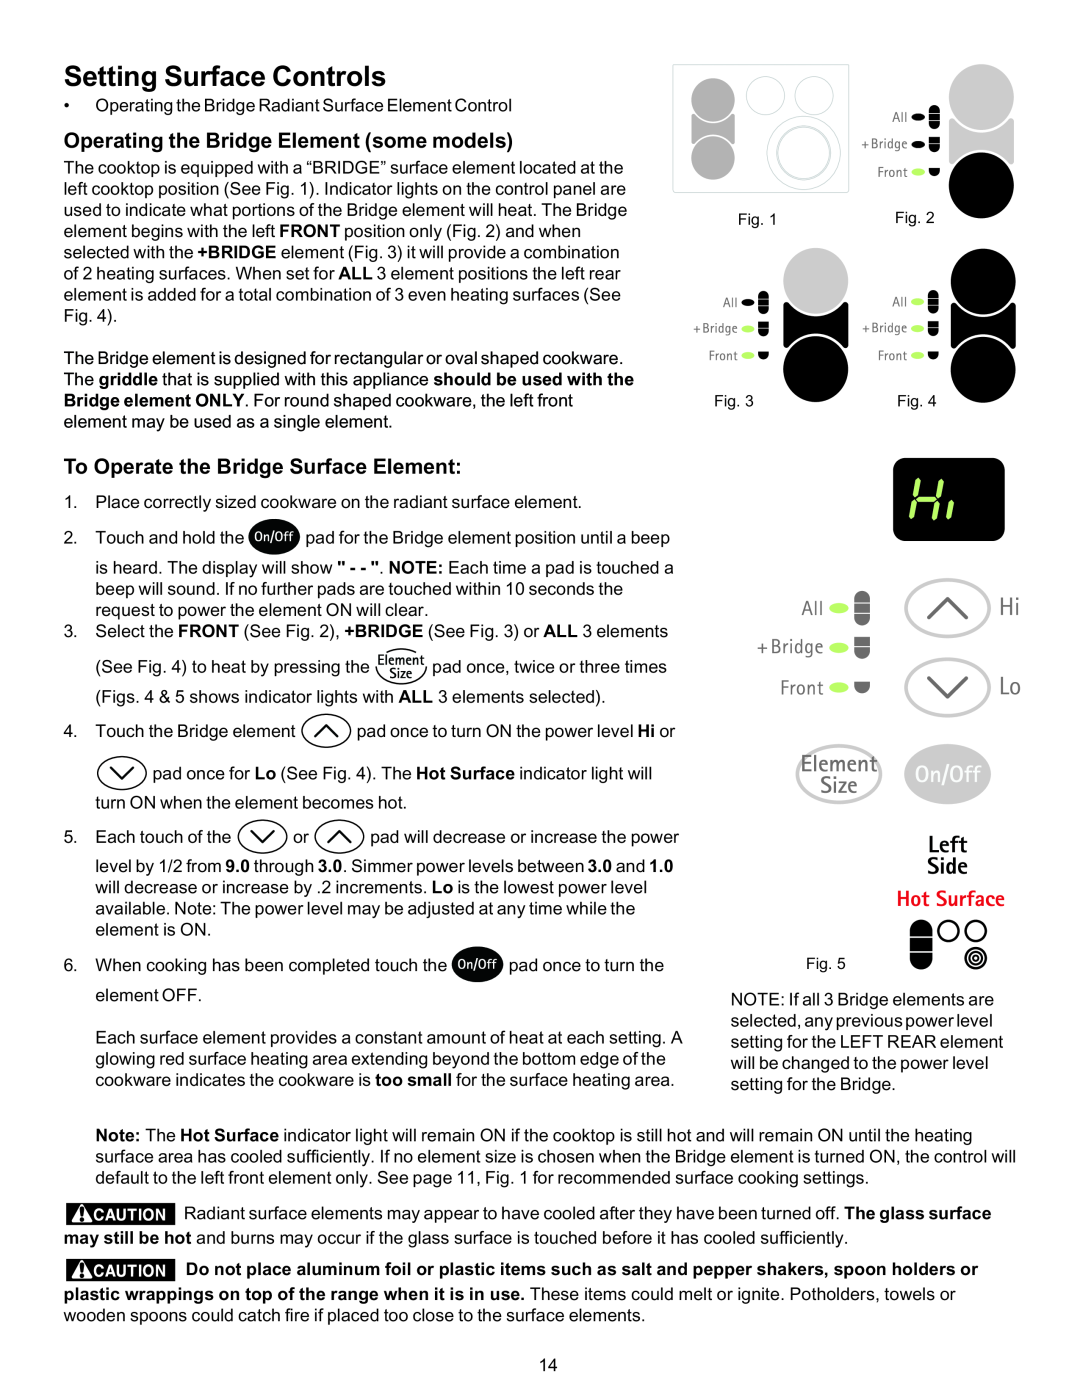
Operating the Bridge Element some models
To Operate the Bridge Surface Element
Warmer Zone Temperature Selection
Settings Table
Operating the Warmer Warm & Ready Zone
To Set the Warmer Zone Control
Surface Cooking
SensaCook some models
Cookware Material Types
Using proper cookware
Cleaning section
Arranging Warmer Warm & Ready Drawer Rack Positions
Note The Warmer Drawer will not operate during the Self-Clean cycle
Warmer Warm & Ready Drawer & Bread Proofing Indicator Lights
Warmer Drawer Humidity Controller Feature
Warmer Drawer Recommended Food Settings Table
To Set the Warmer Drawer & Bread Proofing Controls
Setting Warmer Drawer Controls
Warmer Drawer Food Temperature Settings
Preparing Bread Dough for the Warmer Drawer
FEATURE
Electronic Oven Control Pad Features
Minimum & Maximum Control Pad Settings
MIN. TEMP. /TIME
Setting Silent Control Operation
Setting Oven Controls
Setting the Clock
INSTRUCTIONS To set the clock example below for
To set the Timer example for 5 minutes
Setting Continuous Bake or 12 Hour Energy Saving
Setting Timer
To cancel the Timer before the set time has run out
Setting Temperature Display - Fahrenheit or Celsius
Setting Oven Lockout Feature
INSTRUCTIONS To activate the Oven Lockout feature
To reactivate normal oven operation
To store a typical cookie recipe example for baking at
To Set the Recipe Recall Feature
When the Cook Time finishes
375F for 9 minutes and to shut-off automatically INSTRUCTIONS
THE OVEN
Setting Preheat
To set the Preheat temperature for 350F
To set the Bake Temperature to 350F
Using the Air Guard feature some models
Setting Bake
To change the Bake Temperature example changing from 350 to 425F
To program the oven to begin baking immediately
Setting Cook Time
Cook Time feature When the Cook Time finishes
and to shut off automatically example below to
Setting Delay Start
Delay Start feature When the set bake time runs out
To set the oven to broil at the default setting 550F
Recommended Broiling Times and Searing Grill
Benefits of Convection Roast
Setting the Food Categories Features
Roasting Rack Instructions
Recommended
Important things to consider
Using and Setting Meat Probe
Proper Meat Probe placement
Using and Setting the Meat Probe cont’d
To use the Meat Probe
Tips for Convection Bake
Setting Convection Bake
to stop Convection Bake or cancel Convection Bake
To set the oven for Convection Bake and temperature to 350F
INSTRUCTIONSPRESSDISPLAY
To set the Convection Convert feature
To Set Add 1 Minute Feature
Setting the Slow Cook Feature
optional
To Set the Sabbath Feature for use on the Jewish Sabbath & Holidays
To set Warm & Hold to turn ON automatically
Setting the Warm & Hold Feature
To set Warm & Hold
To Remove Warmer Drawer
Warmer Drawer Removal
To Remove and Replace Warmer Warm Ready Drawer
To Replace Warmer Drawer
Adhere to the following cleaning precautions
Self-Cleaning
Self-Cleaning Oven
INSTRUCTIONS
Self- Cleaning
200 thru 400 usingFig. 1 number pads
PRESS
When the Self-Clean cycle is done
Stopping or Interrupting a Self-Cleaning cycle
Adjusting Oven Temperature
To adjust the oven temperature higher
To adjust the oven temperature lower
Surfaces
General Care & Cleaning
How to Clean
Glass control panel
Plastic or foods with a high sugar content
Cooktop Cleaning & Maintenance
Cleaning Recommendations for the Ceramic Glass Cooktop
For light to moderate soil
Special Caution for Aluminum Use on the Ceramic Cooktop
Removing & Replacing the Lift-Off Oven Door
Do not use the following on the ceramic glass cooktop
To Remove Oven Door
Replacing the upper oven interior light bulbs
Care & Cleaning of Stainless Steel some models
Changing Oven Lights
OCCURRENCE
POSSIBLE CAUSE/SOLUTION
Before You Call
Meat too close to the element. Reposition the rack to provide proper clearance between
Parmesan Green Beans and Potatoes
Recipes for Slow Cook
Slow Cook Turkey Breast
Orange Surprise Cake
Top
Page
Image
Contents