pmI[$U_{

R[e.ll_l I,_I_TO_I

¢ONVENIENCI_

WIRING


ADN_TMENY


TERMKNA_,_(31

T[ RMr

NAL3

(2)

tUNO_m

CAP $CA(

(OPTIONAL)

_T

L(T

_'R[SSUP £

PRF._SVR

E REGUL_,TOR


WIRING


ADJUSTMENT


TtRMIII/_..513)


(IJNDI[R +CAp SCR[W


I*IIF.SSI#RE

TA

T_

L(I" _SU

R[


YIIRMI_(21


INf.(7

11._ L_ERCAP SCRElW

_G_S

€O_TROS.

ADJUST PILOT BURNER

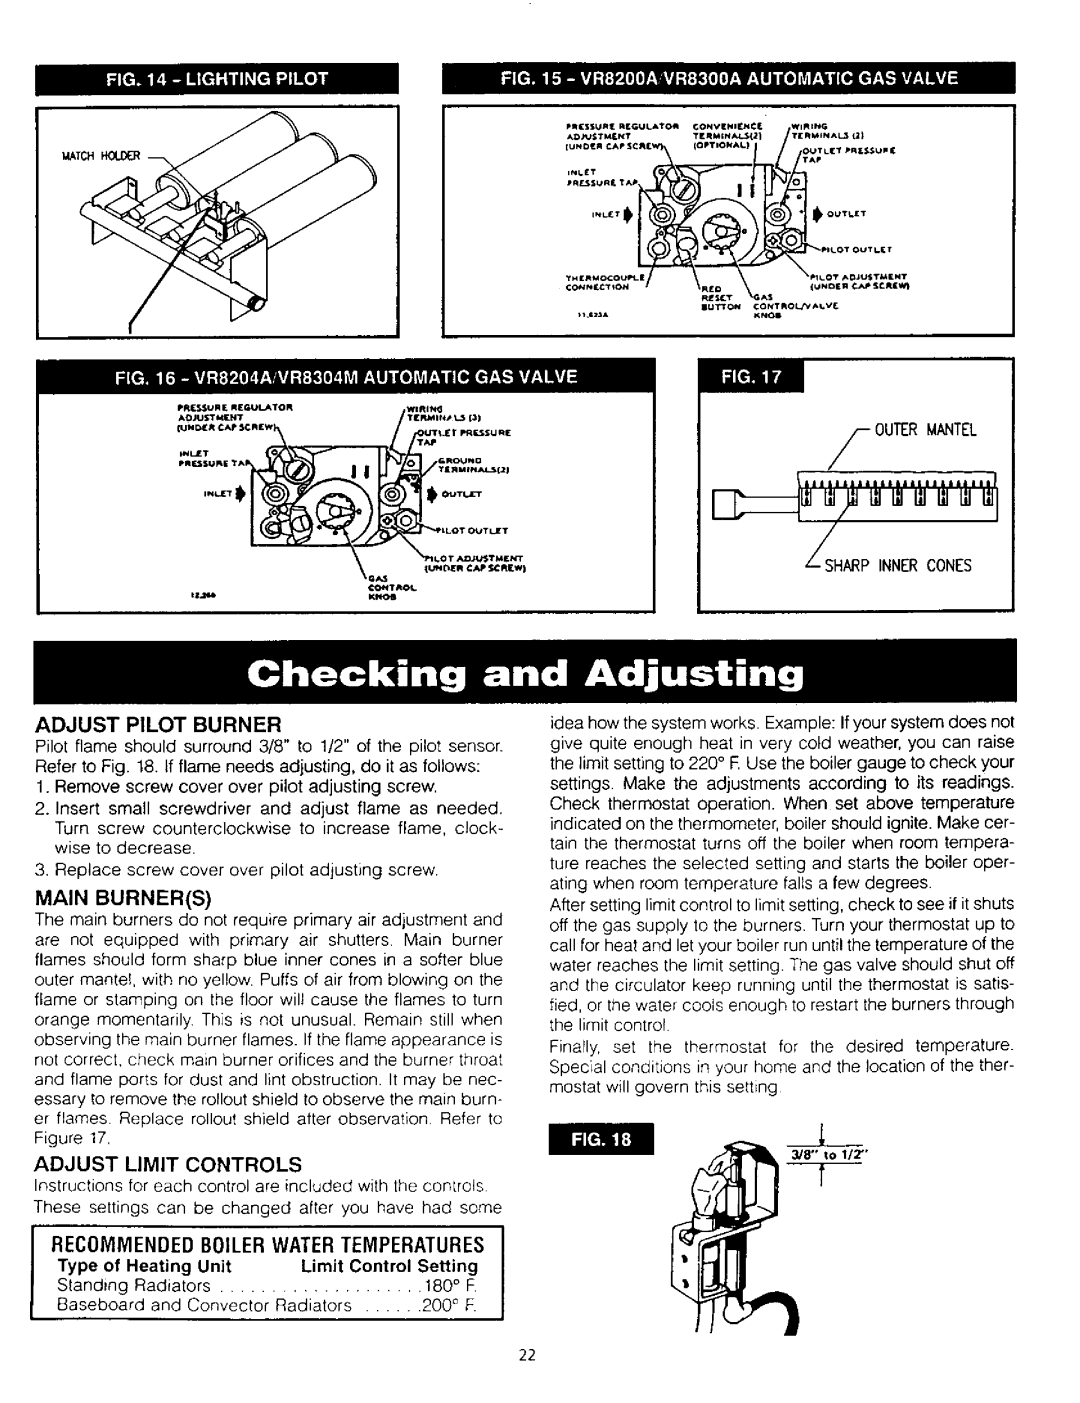
Pilot flame should surround 3/8" to 1/2" of the pilot sensor. Refer to Fig. 18. If flame needs adjusting, do it as follows:

1.Remove screw cover over pilot adjusting screw.

2.Insert small screwdriver and adjust flame as needed. Turn screw counterclockwise to increase flame, clock+ wise to decrease.

3.Replace screw cover over pilot adjusting screw.

MAIN BURNER(S)

The main burners do not require primary air adjustment and are not equipped with primary air shutters Main burner flames should form sharp blue inner cones in a softer blue outer mantef, with no yellow. Puffs of air from blowing on the flame or stamping on the floor wilt cause the flames to turn orange momentarily This is not unusual. Remain still when observing the main burner flames. If the flame appearance is not correct, check main burner orifices and the burner throat and flame ports for dust and lint obstruction. It may be nec- essary to remove the rollout shield to observe the main burn- er flames Replace rollout shield after observation Refer to Figure 17+

ADJUST LIMIT CONTROLS

Instructions for each control are included with the controls These settings can be changed after you have had some

RECOMMENDED BOILER WATER TEMPERATURES J

Type of Heating

Unit

Limit Control

Setting

I

Standing Radiators


180° F.

Baseboard and

Convector

Radiators

200 ° F.

o+

yH [,_MO¢OuPt-E

@1LOT AD$_ITM[NT

¢ONNI;C_' K)N

IUND[R

€.AP It AIW_

lUTTON

¢ONTRO_A_VI_


f OUTER MANTEL

,..:..:--.:...-:..:..:, I111;+ +':'+ ':'+1

_SHARP INNERCONES

idea how the system works. Example: If your system does not give quite enough heat in very cold weather, you can raise the limit setting to 220° R Use the boiler gauge to check your settings. Make the adjustments according to its readings. Check thermostat operation. When set above temperature

indicated on the thermometer, boiler should ignite. Make cer- tain the thermostat turns off the boiler when room tempera-

ture reaches the selected setting and starts the boiler oper- ating when room temperature falls a few degrees.

After setting limit control to limit setting, check to see if it shuts off the gas supply to the burners. Turn your thermostat up to call for heat and let your boiler run until the temperature of the water reaches the limit setting. The gas valve should shut off and the circulator keep running until the thermostat is satis- fied, or the water cools enough to restart the burners through the limit control

FinaPly, set the thermostat for the desired temperature. Special conditions in your home and the location of the ther- mostat will govern this setting

3/8" to 1/2"'

22

Page 22
Image 22
Kenmore KWX - 8V, KWX - 9V, KWX - 3V, KWX - 6V, KWX - 4V Adjust Pilot Burner, Adjust Limit Controls, Sharp Innercones

KWX - 7V, KWX - 4V, KWX - 9V, KWX - 3V, KWX - 5V specifications

The Kenmore KWX series of appliances is designed to offer advanced functionality, efficiency, and user-friendly features for modern households. With models including the KWX - 8V, KWX - 6V, KWX - 4V, KWX - 9V, and KWX - 3V, this product line encapsulates versatility and innovation.

The KWX - 8V stands out with its high-efficiency performance. Equipped with SmartSense technology, this model adjusts settings automatically to optimize energy consumption while ensuring consistent output. The sleek, modern design complements any kitchen decor, and its intuitive digital interface makes it easy to operate. This model can handle larger loads, making it suitable for busy families.

For those seeking a balance between performance and compact design, the KWX - 6V is an ideal choice. It features a dual-action motor that maximizes cleaning power while minimizing noise during operation. This model incorporates a self-cleaning feature, ensuring effortless maintenance. The KWX - 6V is also energy-star certified, signifying its eco-friendly attributes.

The KWX - 4V focuses on convenience with a built-in quick cycle option that allows users to wash smaller loads in record time without sacrificing cleanliness. Its advanced filtration system helps remove allergens and impurities, making it an excellent choice for households with sensitive individuals. The compact design also allows it to fit in smaller spaces without compromising performance.

The KWX - 9V is engineered for those who desire high-tech features. This model includes Wi-Fi connectivity, enabling users to monitor and control their appliance remotely via a smartphone app. Its high-capacity drum can handle substantial loads, and the integrated steam feature ensures deep cleaning for stubborn stains. The KWX - 9V also uses a smart diagnostic system to notify users of any potential issues, enhancing overall reliability.

Lastly, the KWX - 3V is tailored for budget-conscious consumers who still want quality and efficiency. With a straightforward interface and essential functions, this model provides reliable performance without extra frills. Its durable construction and efficient energy use make it a smart investment for any home.

Collectively, the Kenmore KWX series models encapsulate a range of features and technologies that cater to diverse needs, from high-capacity cleaning to energy efficiency, making them a great addition to any modern kitchen.