Throw Distance and Screen Size

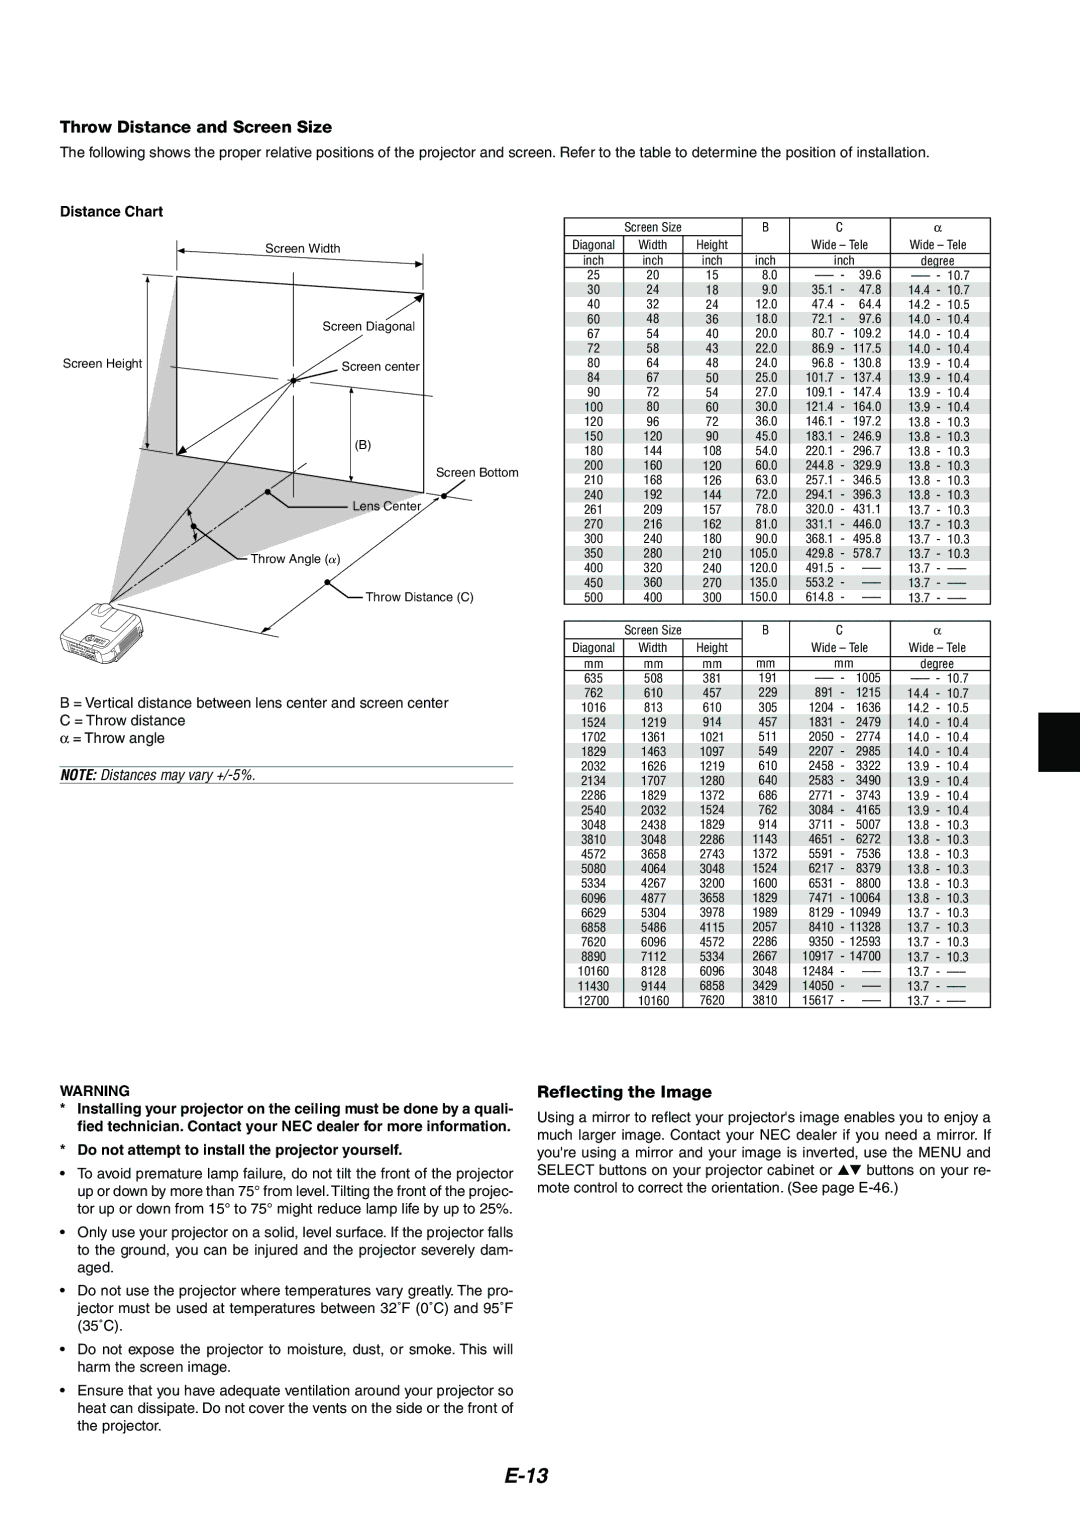
The following shows the proper relative positions of the projector and screen. Refer to the table to determine the position of installation.

Distance Chart

Screen Width

Screen Diagonal

Screen Height

Screen center

(B)

Screen Bottom

Lens Center

Throw Angle (￿)

Throw Distance (C)

B = Vertical distance between lens center and screen center C = Throw distance

α= Throw angle

NOTE: Distances may vary +/-5%.


Screen Size


B


C


α


Diagonal

Width

Height


Wide – Tele

Wide – Tele

inch

inch

inch

inch


inch

degree

25

20

15

8.0

–––

-

39.6

–––

-

10.7

30

24

18

9.0

35.1

-

47.8

14.4

-

10.7

40

32

24

12.0

47.4

-

64.4

14.2

-

10.5

60

48

36

18.0

72.1

-

97.6

14.0

-

10.4

67

54

40

20.0

80.7

-

109.2

14.0

-

10.4

72

58

43

22.0

86.9

-

117.5

14.0

-

10.4

80

64

48

24.0

96.8

-

130.8

13.9

-

10.4

84

67

50

25.0

101.7

-

137.4

13.9

-

10.4

90

72

54

27.0

109.1

-

147.4

13.9

-

10.4

100

80

60

30.0

121.4

-

164.0

13.9

-

10.4

120

96

72

36.0

146.1

-

197.2

13.8

-

10.3

150

120

90

45.0

183.1

-

246.9

13.8

-

10.3

180

144

108

54.0

220.1

-

296.7

13.8

-

10.3

200

160

120

60.0

244.8

-

329.9

13.8

-

10.3

210

168

126

63.0

257.1

-

346.5

13.8

-

10.3

240

192

144

72.0

294.1

-

396.3

13.8

-

10.3

261

209

157

78.0

320.0

-

431.1

13.7

-

10.3

270

216

162

81.0

331.1

-

446.0

13.7

-

10.3

300

240

180

90.0

368.1

-

495.8

13.7

-

10.3

350

280

210

105.0

429.8

-

578.7

13.7

-

10.3

400

320

240

120.0

491.5

-

–––

13.7

-

–––

450

360

270

135.0

553.2

-

–––

13.7

-

–––

500

400

300

150.0

614.8

-

–––

13.7

-

–––


Screen Size


B


C


α


Diagonal

Width

Height


Wide – Tele

Wide – Tele

mm

mm

mm

mm


mm

degree

635

508

381

191

–––

-

1005

–––

- 10.7

762

610

457

229

891

-

1215

14.4

-

10.7

1016

813

610

305

1204

-

1636

14.2

-

10.5

1524

1219

914

457

1831

-

2479

14.0

-

10.4

1702

1361

1021

511

2050

-

2774

14.0

-

10.4

1829

1463

1097

549

2207

-

2985

14.0

-

10.4

2032

1626

1219

610

2458

-

3322

13.9

-

10.4

2134

1707

1280

640

2583

-

3490

13.9

-

10.4

2286

1829

1372

686

2771

-

3743

13.9

-

10.4

2540

2032

1524

762

3084

-

4165

13.9

-

10.4

3048

2438

1829

914

3711

-

5007

13.8

-

10.3

3810

3048

2286

1143

4651

-

6272

13.8

-

10.3

4572

3658

2743

1372

5591

-

7536

13.8

-

10.3

5080

4064

3048

1524

6217

-

8379

13.8

-

10.3

5334

4267

3200

1600

6531

-

8800

13.8

-

10.3

6096

4877

3658

1829

7471

- 10064

13.8

-

10.3

6629

5304

3978

1989

8129

- 10949

13.7

-

10.3

6858

5486

4115

2057

8410

- 11328

13.7

-

10.3

7620

6096

4572

2286

9350

- 12593

13.7

-

10.3

8890

7112

5334

2667

10917

- 14700

13.7

-

10.3

10160

8128

6096

3048

12484

-

–––

13.7

- –––

11430

9144

6858

3429

14050

-

–––

13.7

- –––

12700

10160

7620

3810

15617

-

–––

13.7

- –––

WARNING

*Installing your projector on the ceiling must be done by a quali- fied technician. Contact your NEC dealer for more information.

*Do not attempt to install the projector yourself.

To avoid premature lamp failure, do not tilt the front of the projector up or down by more than 75° from level. Tilting the front of the projec- tor up or down from 15° to 75° might reduce lamp life by up to 25%.

Only use your projector on a solid, level surface. If the projector falls to the ground, you can be injured and the projector severely dam- aged.

Do not use the projector where temperatures vary greatly. The pro- jector must be used at temperatures between 32˚F (0˚C) and 95˚F (35˚C).

Do not expose the projector to moisture, dust, or smoke. This will harm the screen image.

Ensure that you have adequate ventilation around your projector so heat can dissipate. Do not cover the vents on the side or the front of the projector.

Reflecting the Image

Using a mirror to reflect your projector's image enables you to enjoy a much larger image. Contact your NEC dealer if you need a mirror. If you're using a mirror and your image is inverted, use the MENU and

SELECT buttons on your projector cabinet or buttons on your re- mote control to correct the orientation. (See page E-46.)

E-13

Page 13
Image 13
Kensington MT1065, MT1075 user manual Throw Distance and Screen Size, Reflecting the Image, Distance Chart

MT1065, MT1075 specifications

Kensington, a leader in innovative accessories for the digital workspace, has introduced two remarkable models: the MT1065 and MT1075. These devices are designed to enhance productivity and provide seamless connectivity in the modern office environment.

The Kensington MT1065 is specially engineered for professionals seeking a reliable and feature-rich solution for their connectivity needs. One of its main highlights is its versatility, as it supports multiple connections, including HDMI, USB-C, and VGA. This flexibility allows users to easily connect various devices, from laptops to projectors, and seamlessly transition between presentations or collaborative sessions.

With its compact and lightweight design, the MT1065 is ideal for on-the-go professionals. It fits easily into a backpack or laptop case, making it convenient for travel. Additionally, this model employs advanced video technology, supporting resolutions up to 4K, ensuring that presentations are crisp, clear, and visually engaging. The MT1065 also features Plug and Play capability, which means that users can set it up quickly without the need for additional software or drivers.

On the other hand, the Kensington MT1075 takes connectivity a step further by incorporating additional ports, including multiple USB-A and USB-C connections. This makes it a perfect choice for those who require extended connectivity options. It facilitates connection to numerous peripherals, such as external hard drives, keyboards, and mice, all while keeping the workspace organized and efficient.

The MT1075 also boasts advanced power delivery capabilities, enabling the user to charge their devices while maintaining high-performance data transfer simultaneously. This dual functionality helps in minimizing cable clutter, resulting in a cleaner and more organized workstation. Furthermore, it supports high-definition video output, making it suitable for video conferencing, online streaming, and graphic-intensive applications.

Both models feature a robust build quality, ensuring durability and longevity, vital in a bustling office environment. Kensington’s commitment to user-friendly design is evident in the easy-to-use interface and ergonomic layout, prompting users to maximize their productivity effectively.

In conclusion, whether opting for the Kensington MT1065 or the MT1075, users benefit from advanced connectivity options, enhanced power delivery, and a commitment to quality and performance. Both models encapsulate the essence of modern workspace needs, allowing professionals to work smarter and more efficiently in today’s digital age.