1.Plug Power Cord into an Independent, Grounded Outlet – If the electric circuit is overloaded with other appliances, your brewer may not function properly.
2.Initial Cleansing Brew – Before you make your first beverage, perform an initial cleansing brew without inserting a K-Cup®pack.
3.One Cup at a Time – Your new brewer makes one fresh beverage at a time. You will need to add fresh water each time you brew. Unlike other Keurig® brewers, the K10 MINI Plus does not store water in the reservoir.
4.The Right Water Makes a Difference – For the best-tasting gourmet coffee, tea or hot cocoa, Keurig recommends using bottled or filtered water. We do not recommend using distilled or reverse osmosis water. Note that water quality can vary from place to place. If you notice an undesirable taste in your beverage (such as chlorine or other mineral substance), we recommend trying bottled water or water from a filtration system. For best results, carefully follow manufacturer’s instructions when using any water filtration system.
5.Customize Your Size, Flavor & Brew – With over 200 K-Cup®pack varieties and multiple fill levels, your brewer provides endless customization options – so that you can create the size, flavor and strength of each beverage that is perfect for you. For a strong, intense flavor, select an Extra Bold K-Cup®pack (with
up to 30% more ground coffee than regular varieties) along with a brew size that’s right for you. The less water you use, the more intense the flavor in your cup. The more water you use, the less intense the flavor in your cup.
Use the Water Level Guide located inside the Cold Water Reservoir to customize your brew size.
6.Brewing Iced Beverages – Your iced tea and iced coffee taste best when fresh-brewed hot over ice. Try it by placing a tall cup filled with ice on the Drip Tray, choose your favorite K-Cup®pack and follow the brewing instructions on page 8. Also, look for the “Brew Over Ice” icon on K-Cup®packs specially crafted to brew over ice! IMPORTANT: Do not brew into a cup made of glass. Doing so may cause the glass to crack or break.
7.Remove K-Cup®Pack After Use – Please see page 8 for brewing instructions.
8.Brewing into a Tall Mug – To brew into a tall mug, simply remove the Drip Tray Assembly and place the tall mug on the Drip Tray Base. Without the Drip Tray Assembly, however, you do lose the benefit of the Drip Tray to contain any excess water.
9.The Drip Tray – Any liquid overflow (from your cup or from the Cold Water Reservoir) will be caught in the Drip Tray. Be sure to empty the Drip Tray when the red Drip Tray Overflow Indicator pops up.
6
10.Automatic Shut-Off – As a safety feature, your brewer will shut off automatically when it is idle for longer than 90 seconds. Simply press the Power Button to restart.
11.Clean Your Brewer Regularly – To keep your brewer looking and performing at its best, be sure to clean the external and internal components on a regular basis. See page 12 for more information.
12.De-Scaling – Depending on the mineral content of the water in your area, calcium deposits or scale may build up in your brewer. Scale is non-toxic, but left unattended, it can hinder brewer performance. De-scaling your brewer helps maintain the heating element and other internal parts of the brewer that come in contact with water. See page 14 for more information.
13.Storing – When storing your brewer, empty the Drip Tray. Follow the instructions on page 14 for emptying the Internal Hot Water Tank. Store your brewer upright in
a safe, dry, frost-free environment. See page 15 for more information.
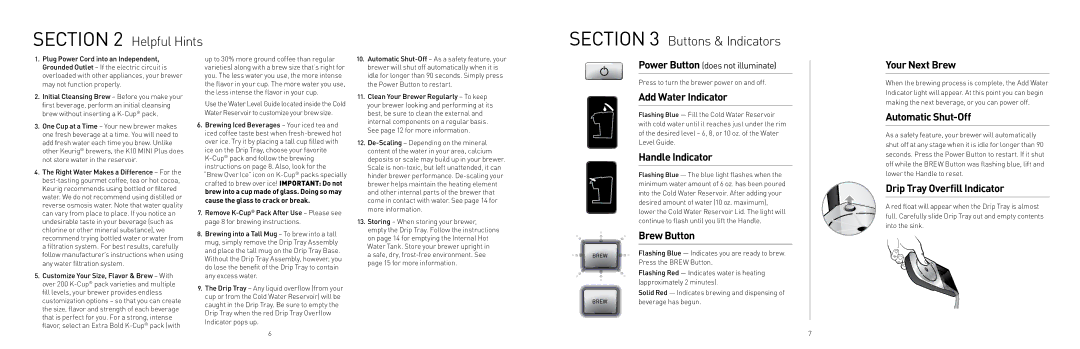
Power Button (does not illuminate)
Press to turn the brewer power on and off.
Add Water Indicator
Flashing Blue — Fill the Cold Water Reservoir with cold water until it reaches just under the rim of the desired level – 6, 8, or 10 oz. of the Water Level Guide.
Handle Indicator
Flashing Blue — The blue light flashes when the minimum water amount of 6 oz. has been poured into the Cold Water Reservoir. After adding your desired amount of water (10 oz. maximum), lower the Cold Water Reservoir Lid. The light will continue to flash until you lift the Handle.
Brew Button
Flashing Blue — Indicates you are ready to brew. Press the BREW Button.
Flashing Red — Indicates water is heating (approximately 2 minutes).
Solid Red — Indicates brewing and dispensing of beverage has begun.
7
Your Next Brew
When the brewing process is complete, the Add Water Indicator light will appear. At this point you can begin making the next beverage, or you can power off.
Automatic Shut-Off
As a safety feature, your brewer will automatically shut off at any stage when it is idle for longer than 90 seconds. Press the Power Button to restart. If it shut off while the BREW Button was flashing blue, lift and lower the Handle to reset.
Drip Tray Overfill Indicator
A red float will appear when the Drip Tray is almost full. Carefully slide Drip Tray out and empty contents into the sink.