
K10 specifications
The Keurig K10 is a compact single-serve coffee maker renowned for its convenience and efficiency. Designed to serve fresh coffee in just minutes, the K10 offers a user-friendly experience ideal for homes and small spaces.One of the standout features of the Keurig K10 is its keen ability to brew a variety of beverages. With the use of Keurig’s patented K-Cup pods, users can enjoy not only coffee but also tea, hot cocoa, and specialty drinks with ease. The K-Cups come in countless flavors, allowing coffee lovers to explore options from rich dark roasts to light, fruity blends.
The compact design of the K10 is tailored for countertop use, making it particularly suitable for apartments, dorms, or office spaces. Its small footprint ensures that even those with limited kitchen space can accommodate this appliance without sacrificing style or functionality.
The K10 operates with a simple one-touch button, enhancing its user-friendly experience. After filling the water reservoir, users need to insert their chosen K-Cup, select their desired cup size (6, 8, or 10 oz), and press the brew button. Within just a minute, a steaming cup of coffee is ready to enjoy.
Another key characteristic of the Keurig K10 is its heating technology. The machine uses an innovative heating element that heats water on demand, which means there is no need to wait for a full pot of coffee to brew. This on-demand feature not only saves time but also reduces energy consumption, as the machine can be turned off when not in use.
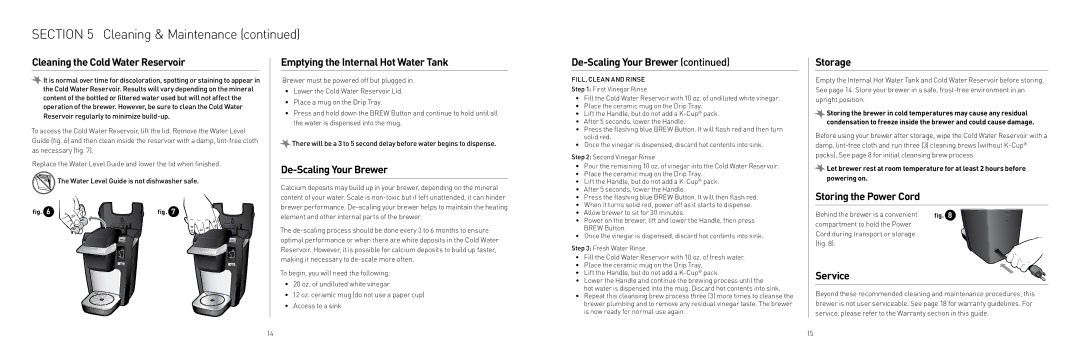
The K10 is designed to be easy to clean. The removable drip tray captures spills and overflow, and the water reservoir can be easily detached for filling or washing. This design consideration makes it ideal for everyday use, ensuring a clean brew process and simple maintenance.
Safety is also prioritized in the K10, equipped with an automatic shut-off feature that engages after the machine has been idle for a specific period. This energy-efficient feature helps eliminate the worry of leaving the machine on for extended periods.
In summary, the Keurig K10 brings together style, convenience, and functionality. Its compact design, versatile brewing options, straightforward operation, and innovative heating technology make it a standout choice for anyone seeking a quick and delicious caffeine fix. Whether for individual use or entertaining guests, the K10 proves to be an excellent addition to any coffee lover’s routine.