Location Requirements

IMPORTANT: Observe all governing codes and ordinances.

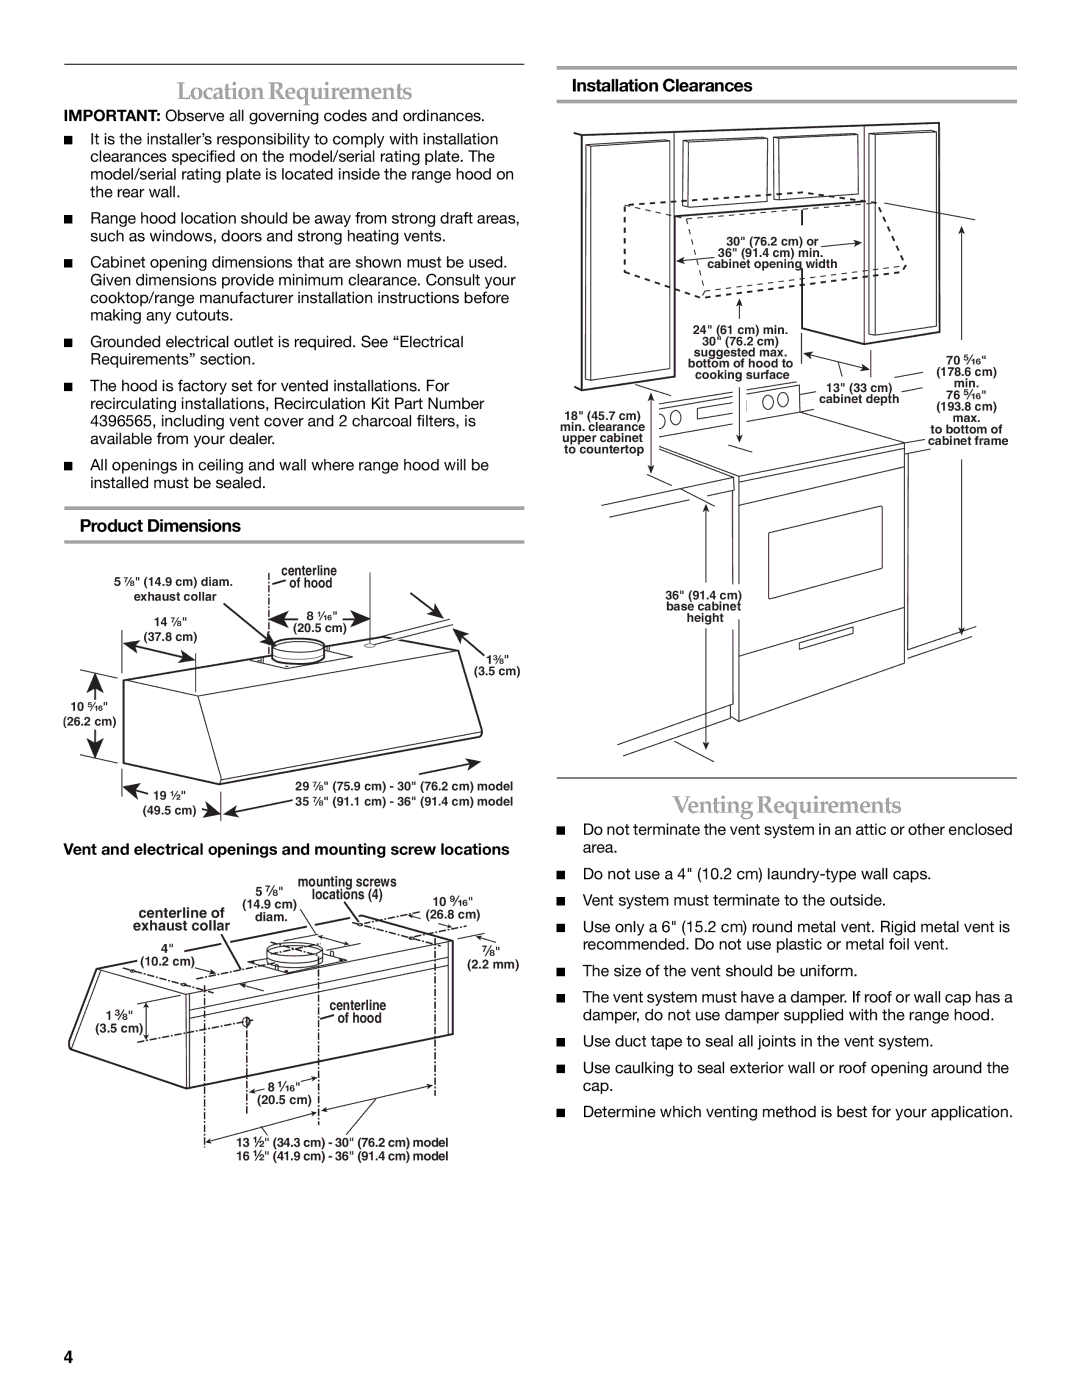
Installation Clearances

It is the installer’s responsibility to comply with installation clearances specified on the model/serial rating plate. The model/serial rating plate is located inside the range hood on the rear wall.

Range hood location should be away from strong draft areas, such as windows, doors and strong heating vents.

Cabinet opening dimensions that are shown must be used. Given dimensions provide minimum clearance. Consult your cooktop/range manufacturer installation instructions before making any cutouts.

Grounded electrical outlet is required. See “Electrical Requirements” section.

The hood is factory set for vented installations. For recirculating installations, Recirculation Kit Part Number 4396565, including vent cover and 2 charcoal filters, is available from your dealer.

All openings in ceiling and wall where range hood will be installed must be sealed.

18" (45.7 cm)

min. clearance upper cabinet to countertop

30" (76.2 cm) or


36" (91.4 cm) min.


cabinet opening width


24" (61 cm) min.


30" (76.2 cm)


suggested max.

70 ⁵⁄₁₆"

bottom of hood to

cooking surface

(178.6 cm)


13" (33 cm)

min.


cabinet depth

76 ⁵⁄₁₆"


(193.8 cm)


max.


to bottom of


cabinet frame


Product Dimensions

centerline

5 ⁷⁄₈" (14.9 cm) diam.

of hood

36" (91.4 cm)

exhaust collar


8 ¹⁄₁₆"

base cabinet

14 ⁷⁄₈"

height

(20.5 cm)


(37.8 cm)


1³⁄₈"


(3.5 cm)

10⁵⁄₁₆"

(26.2 cm)

29 ⁷⁄₈" (75.9 cm) - 30" (76.2 cm) model

19 ¹⁄₂"35 ⁷⁄₈" (91.1 cm) - 36" (91.4 cm) model (49.5 cm)

Vent and electrical openings and mounting screw locations


5 ⁷⁄₈"

mounting screws


locations (4)

10

⁹⁄₁₆"

centerline of

(14.9 cm)


diam.


(26.8 cm)

exhaust collar


4"


⁷⁄₈"

(10.2 cm)


(2.2 mm)

1 ³⁄₈"


centerline


of hood


(3.5 cm)

8 ¹⁄₁₆" (20.5 cm)

13 ¹⁄₂" (34.3 cm) - 30" (76.2 cm) model 16 ¹⁄₂" (41.9 cm) - 36" (91.4 cm) model

Venting Requirements

Do not terminate the vent system in an attic or other enclosed area.

Do not use a 4" (10.2 cm) laundry-type wall caps.

Vent system must terminate to the outside.

Use only a 6" (15.2 cm) round metal vent. Rigid metal vent is recommended. Do not use plastic or metal foil vent.

The size of the vent should be uniform.

The vent system must have a damper. If roof or wall cap has a damper, do not use damper supplied with the range hood.

Use duct tape to seal all joints in the vent system.

Use caulking to seal exterior wall or roof opening around the cap.

Determine which venting method is best for your application.

4

Page 4
Image 4
KitchenAid 2005 Location Requirements, Venting Requirements, Installation Clearances, Product Dimensions

2005 specifications

In 2005, KitchenAid continued to establish itself as a leader in the kitchen appliance industry, innovating and enhancing its product line to cultivate a blend of style, functionality, and reliability. One of the standout products of this year was the KitchenAid Stand Mixer, which had solidified its reputation as an essential kitchen companion for both amateur cooks and professional chefs alike.

The 2005 model featured a powerful 575-watt motor that provided ample torque, allowing users to effortlessly mix even the thickest doughs. This enhanced motor capability was complemented by 10 different speed settings, enabling cooks to tailor their mixing to the specific needs of various recipes, from whipping cream to kneading bread.

One of the hallmark characteristics of KitchenAid stand mixers was their distinctive and iconic design. The 2005 models maintained a classic aesthetic while offering a wide palette of colors to suit any kitchen décor. Additionally, their durable metal construction promised longevity, making them not only a functional tool but also a stylish addition to countertops.

Another notable feature was the versatility of these mixers. The 2005 lineup had various attachments and accessories available, including a food grinder, pasta maker, and vegetable slicer, all of which expanded the mixer’s utility beyond simple mixing tasks. This adaptability encouraged creativity in the kitchen and promoted the idea of homemade meals.

KitchenAid also emphasized ease of use and convenience in their 2005 models. The tilting head design allowed for easy access to the bowl, simplifying the process of adding ingredients. Moreover, the bowl-lift design provided stability, particularly useful for larger batches and heavier mixtures.

The brand also integrated advanced technologies into their stand mixers, ensuring consistent performance. For instance, the unique planetary mixing action guaranteed thorough mixing by allowing the beater to spin in one direction while the shaft rotated in the opposite direction—ensuring that every ingredient was evenly incorporated.

In summary, KitchenAid's 2005 offerings combined powerful performance, stunning design, and innovative technology, making their appliances a beloved choice among culinary enthusiasts. The focus on durability and versatility transformed the everyday kitchen experience, solidifying KitchenAid's reputation for excellence in the realm of kitchen appliances.