RANGE HOOD USE

The range hood is designed to remove smoke, cooking vapors and odors from the cooktop area. For best results, start the hood before cooking and allow it to operate several minutes after the cooking is complete to clear all smoke and odors from the kitchen.

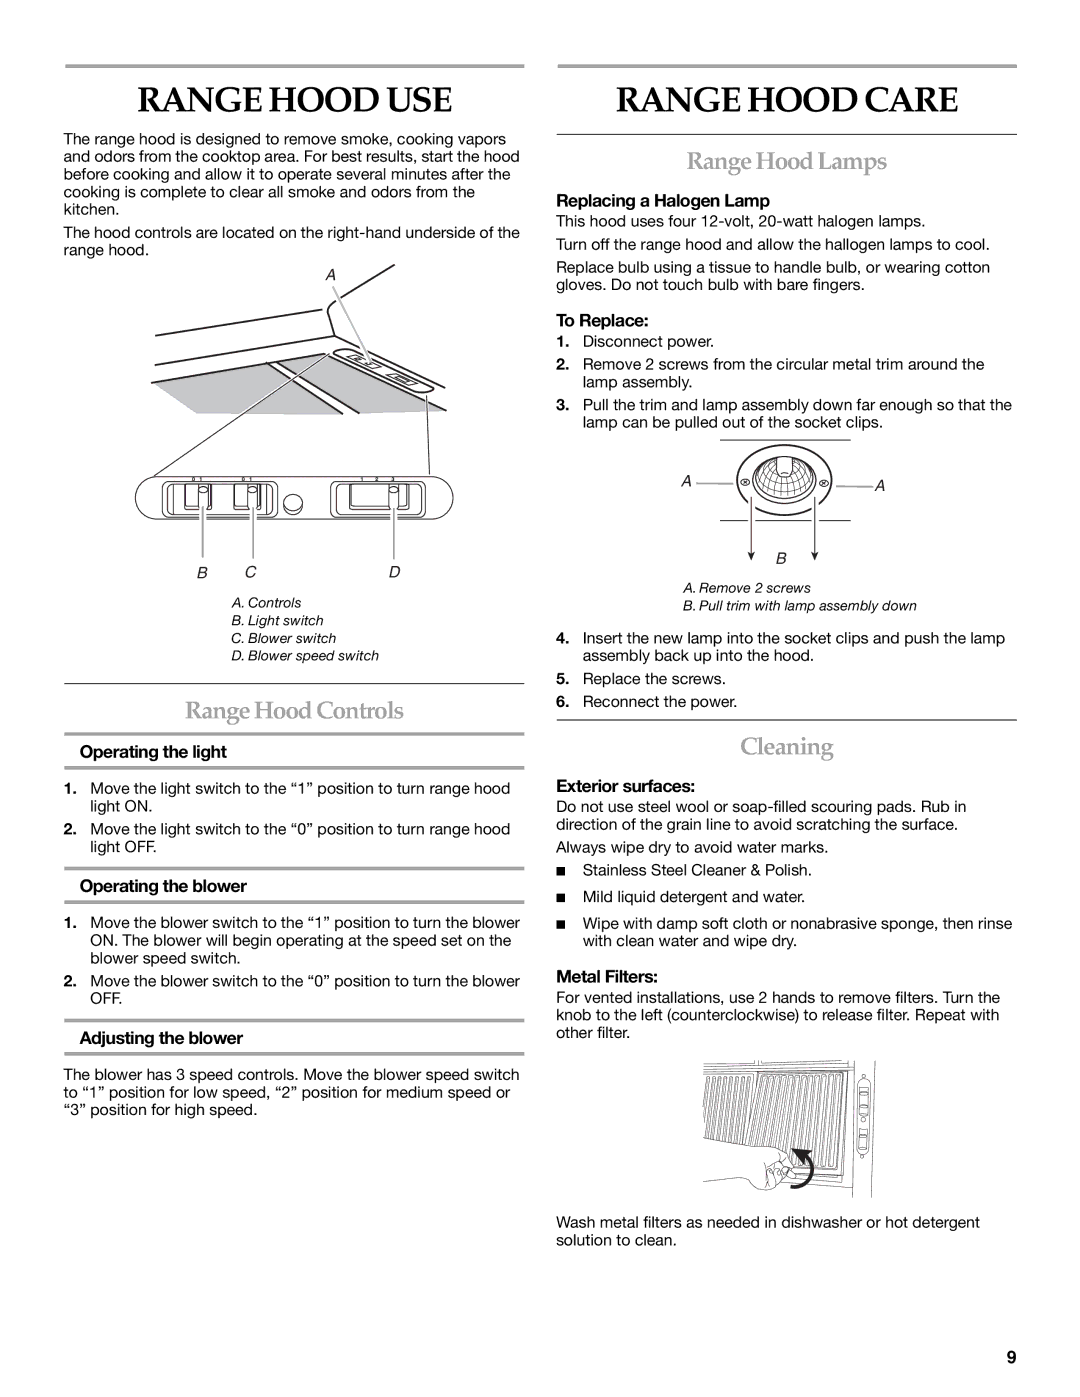
The hood controls are located on the right-hand underside of the range hood.

A

B CD

A.Controls

B.Light switch

C.Blower switch

D.Blower speed switch

Range Hood Controls

Operating the light

1.Move the light switch to the “1” position to turn range hood light ON.

2.Move the light switch to the “0” position to turn range hood light OFF.

Operating the blower

1.Move the blower switch to the “1” position to turn the blower ON. The blower will begin operating at the speed set on the blower speed switch.

2.Move the blower switch to the “0” position to turn the blower OFF.

Adjusting the blower

The blower has 3 speed controls. Move the blower speed switch to “1” position for low speed, “2” position for medium speed or “3” position for high speed.

RANGE HOOD CARE

Range Hood Lamps

Replacing a Halogen Lamp

This hood uses four 12-volt, 20-watt halogen lamps.

Turn off the range hood and allow the hallogen lamps to cool.

Replace bulb using a tissue to handle bulb, or wearing cotton gloves. Do not touch bulb with bare fingers.

To Replace:

1.Disconnect power.

2.Remove 2 screws from the circular metal trim around the lamp assembly.

3.Pull the trim and lamp assembly down far enough so that the lamp can be pulled out of the socket clips.

A A

B

A. Remove 2 screws

B. Pull trim with lamp assembly down

4.Insert the new lamp into the socket clips and push the lamp assembly back up into the hood.

5.Replace the screws.

6.Reconnect the power.

Cleaning

Exterior surfaces:

Do not use steel wool or soap-filled scouring pads. Rub in direction of the grain line to avoid scratching the surface.

Always wipe dry to avoid water marks.

Stainless Steel Cleaner & Polish.

Mild liquid detergent and water.

Wipe with damp soft cloth or nonabrasive sponge, then rinse with clean water and wipe dry.

Metal Filters:

For vented installations, use 2 hands to remove filters. Turn the knob to the left (counterclockwise) to release filter. Repeat with other filter.

Wash metal filters as needed in dishwasher or hot detergent solution to clean.

9

Page 9
Image 9
KitchenAid 2005 installation instructions Range Hood USE, Range Hood Care, Range Hood Controls, Range Hood Lamps, Cleaning

2005 specifications

In 2005, KitchenAid continued to establish itself as a leader in the kitchen appliance industry, innovating and enhancing its product line to cultivate a blend of style, functionality, and reliability. One of the standout products of this year was the KitchenAid Stand Mixer, which had solidified its reputation as an essential kitchen companion for both amateur cooks and professional chefs alike.

The 2005 model featured a powerful 575-watt motor that provided ample torque, allowing users to effortlessly mix even the thickest doughs. This enhanced motor capability was complemented by 10 different speed settings, enabling cooks to tailor their mixing to the specific needs of various recipes, from whipping cream to kneading bread.

One of the hallmark characteristics of KitchenAid stand mixers was their distinctive and iconic design. The 2005 models maintained a classic aesthetic while offering a wide palette of colors to suit any kitchen décor. Additionally, their durable metal construction promised longevity, making them not only a functional tool but also a stylish addition to countertops.

Another notable feature was the versatility of these mixers. The 2005 lineup had various attachments and accessories available, including a food grinder, pasta maker, and vegetable slicer, all of which expanded the mixer’s utility beyond simple mixing tasks. This adaptability encouraged creativity in the kitchen and promoted the idea of homemade meals.

KitchenAid also emphasized ease of use and convenience in their 2005 models. The tilting head design allowed for easy access to the bowl, simplifying the process of adding ingredients. Moreover, the bowl-lift design provided stability, particularly useful for larger batches and heavier mixtures.

The brand also integrated advanced technologies into their stand mixers, ensuring consistent performance. For instance, the unique planetary mixing action guaranteed thorough mixing by allowing the beater to spin in one direction while the shaft rotated in the opposite direction—ensuring that every ingredient was evenly incorporated.

In summary, KitchenAid's 2005 offerings combined powerful performance, stunning design, and innovative technology, making their appliances a beloved choice among culinary enthusiasts. The focus on durability and versatility transformed the everyday kitchen experience, solidifying KitchenAid's reputation for excellence in the realm of kitchen appliances.